11
10
Mo
ist
ur
e Se
nsi
ng
Irr
iga
tio
n K
it
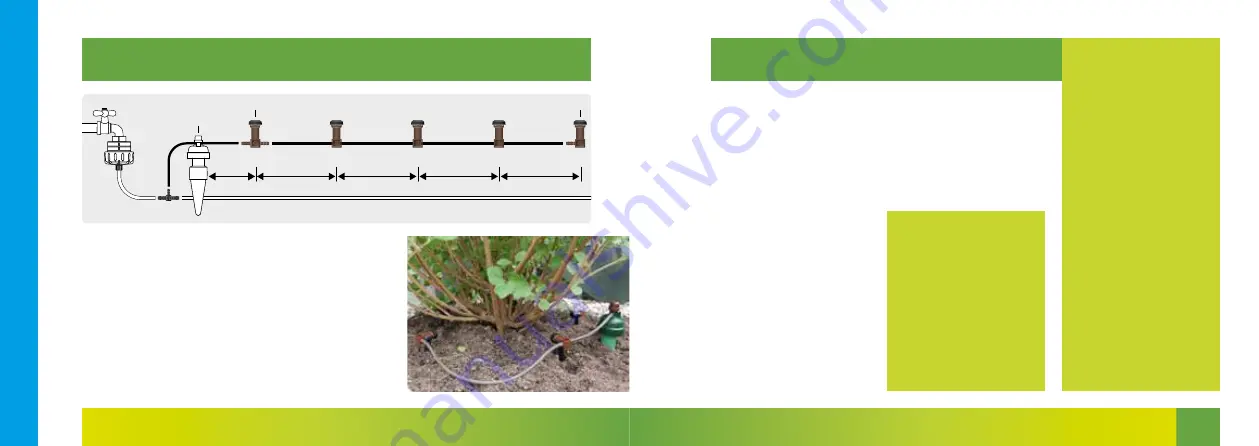
20 cm
20 cm
20 cm
20 cm
max. 5x
8 cm
USE OF DISTRIBUTION DRIPPERS – Sold separately
Take the thin drip tube and cut off pieces approx. 20 cm long.
Then connect a maximum of 5 distribution drippers together
and fit the end distribution dripper at the end of the chain.
Lay the chain of distribution drippers anywhere around the
roots of the plants. It is important to leave a distance of approx.
8 cm between the Watering Sensor and the nearest distribu-
tion dripper. First set the Watering Sensor as instructed in
Step 6
and then connect the chain with the Watering Sensor.
The black screw need not be adjusted unless a distribution
dripper can be seen to be releasing less water. In this case
loosen the black screw by one turn. Unscrew completely and
clean once a year.
T-Piece
Watering sensor
Distribution dripper
End distribution dripper
WHAT SHOULD I DO IF…
... THERE IS NO WATER IN THE SEN-
SOR?
Causes:
air intake, poor screw fitting,
drip tube kinked, poor anchorage in
soil, water supply cut off.
Solution:
refill the Watering Sensor
with water and screw tight down to
marking ring.
... THE WATERING DIAMETER IS TOO
SMALL?
Cause:
drip tube too short. The water
is getting through to the ceramic
sensor too quickly.
Solution:
lengthen drip tube to 8 cm.
... THE WATERING SENSOR DOESN’T
TURN OFF?
Cause:
low air temperature (can be
the case after cold nights), The Wa-
tering Sensor turns off slower
Solution:
close adjustment screw by
about 1/2 a marking.
... THERE IS NO WATER COMING OUT
OF THE DRIP TUBE?
Cause:
tube blocked, gummed up or
intake kinked.
Solution:
take the drip tube out slight-
ly and squeeze out the flat part with
your fingers.
This watering system has been
specially developed for outdoor
plants and may not be used in-
doors. Protect plants from falling
over and do not place on mois-
ture-sensitive ground. Any water
which may escape must not cause
damage (e.g. flow into cellar
rooms).
Preparing for winter (in sub-ze-
ro conditions)
Empty the tank
before winter and remove the
pressure reducer. Wash down the
insides and outsides of all the
Watering Sensor inserts with
water, removing encrusted soil
from the cones with sandpaper.
All the tubes can be left outside.
Store the pressure reducer and
watering sensors in a frost-free
location.
Fertilisation
Slow-release fertilisers are rec-
ommended, preferably added to
the soil when planting. Alterna-
tively, add fertiliser to the plants
once a month with a watering can.
IMPORTANT:
Always leave the tap open / refill
the water tank in time.
Even in
rainy weather. If the water supply
is cut off for a longer period of
time, the roots could draw the
water out of the sensor.
Do not be deceived if the surface
of the earth is dry.
The water
spreads out underground in the
shape of an onion. In most cases,
only the surface of the soil under
the drip tube is visibly moist.
Summary of Contents for Moisture Sensing Irrigation Kit
Page 1: ...INSTRUCTIONS EN Moisture Sensing Irrigation Kit...
Page 8: ......


