background image

User Manual of Network Zoom Camera 

65


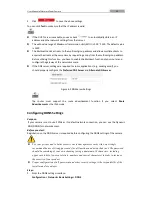
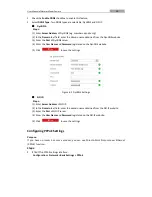
When  the  port  number  is  not  the  default  number  443,  the  format  of  the  URL  is 

https://IP 

address:port number

, eg., https://192.168.1.64:81. 

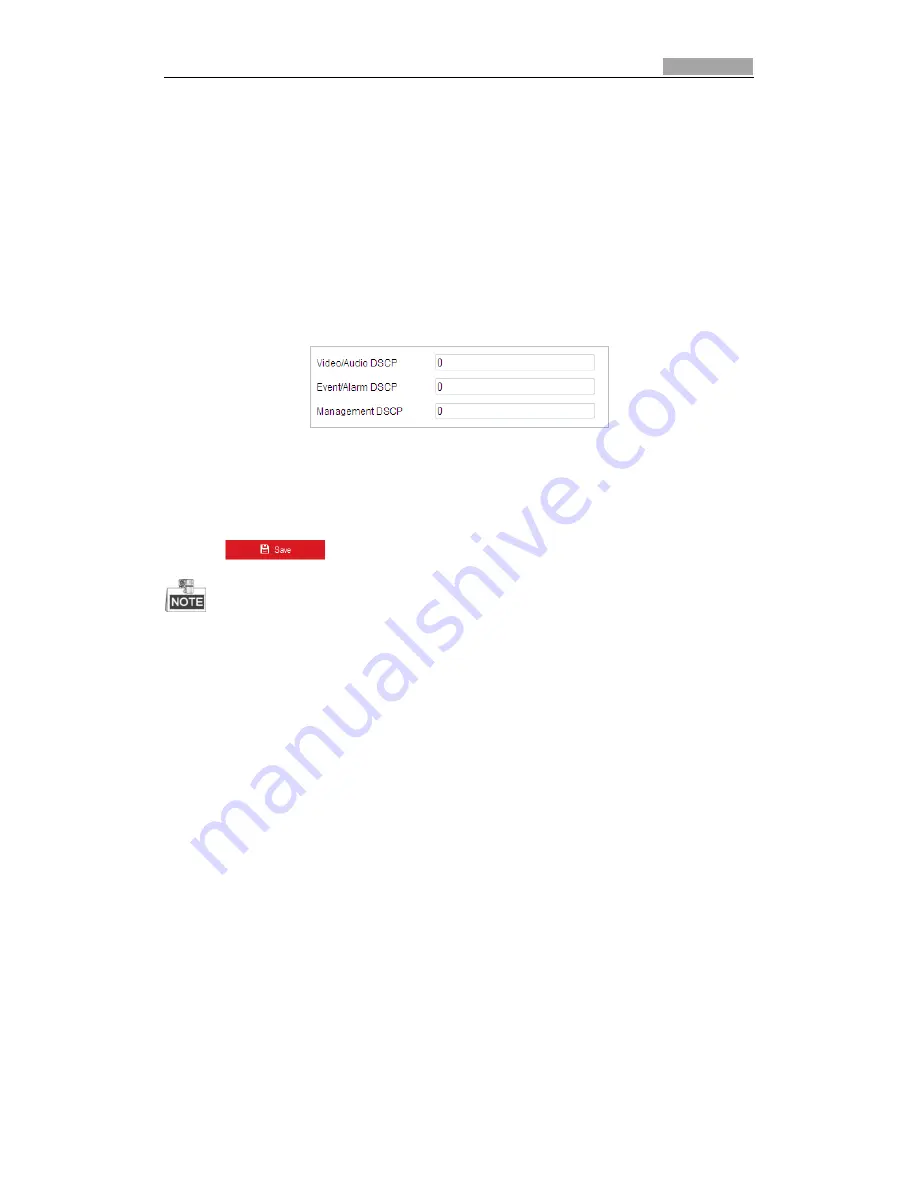
Configuring QoS Settings 

Purpose: 

QoS (Quality of Service) can help solve the network delay and network congestion by configuring 
the priority of data sending. 

Steps: 

1.


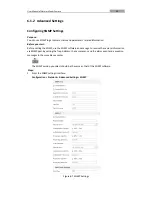
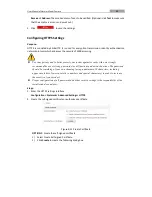
Enter the QoS settings interface:


Configuration >Advanced Configuration >


Network > QoS


Figure 6-15


QoS Settings 

2.


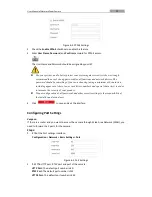
Configure  the  QoS  settings,  including  video  /  audio  DSCP,  event  /  alarm  DSCP  and 
Management DSCP. 
The valid DSCP value ranges from 0 to 63. The DSCP value is bigger, the priority is higher. 

3.


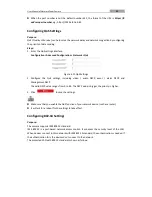
Click 

  to save the settings. 


Make sure that you enable the QoS function of your network device (such as a router). 


It will ask for a reboot for the settings to take effect. 

Configuring 802.1X Settings 

Purpose: 

The camera supports IEEE 802.1X standard. 
IEEE  802.1X  is  a  port-based  network  access  control.  It  enhances  the  security  level  of  the  LAN. 
When devices connect to this network with IEEE 802.1X standard, the authentication is needed. If 
the authentication fails, the devices don

t connect to the network. 

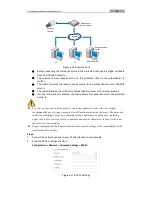
The protected LAN with 802.1X standard is shown as follows: 

Summary of Contents for SICH-2036AUT

Page 1: ...Network Zoom Camera User Manual...

Page 2: ...PARTY IN NO EVENT WILL OUR COMPANY ITS DIRECTORS OFFICERS EMPLOYEES OR AGENTS BE LIABLE TO YOU FOR ANY SPECIAL CONSEQUENTIAL INCIDENTAL OR INDIRECT DAMAGES INCLUDING AMONG OTHERS DAMAGES FOR LOSS OF B...

Page 3: ...ice must accept any interference received including interference that may cause undesired operation EU Conformity Statement This product and if applicable the supplied accessories too are marked with...

Page 4: ...on a wall or ceiling the device should be firmly fixed To reduce the risk of fire or electrical shock do not expose the indoor used product to rain or moisture This installation should be made by a qu...

Page 5: ...To avoid heat accumulation good ventilation is required for a proper operating environment While shipping the product should be packed in its original packing Use the provided glove when open up the...

Page 6: ...15 4 1 CONFIGURING LOCAL PARAMETERS 15 4 2 LIVE VIEW PAGE 16 4 3 STARTING LIVE VIEW 17 4 4 OPERATING PTZ CONTROL 19 4 4 1 PTZ Control Panel 20 4 4 2 Auxiliary Functions 21 4 4 3 Setting Calling a Pres...

Page 7: ...NETWORK SETTINGS 54 6 1 1 Basic Settings 54 6 1 2 Advanced Settings 59 6 2 CONFIGURING VIDEO AND AUDIO SETTINGS 68 6 2 1 Configuring Video Settings 68 6 2 2 Configuring Audio Settings 69 6 2 3 Config...

Page 8: ...mages during the day And as light diminishes at night the cameras switch to night mode and deliver black and white images with high quality Slow Shutter In slow shutter mode the shutter speed will aut...

Page 9: ...t levels of permission in the admin login status Multiple users are allowed to access and control the same camera via network simultaneously 3D Digital Noise Reduction Comparing with the general 2D di...

Page 10: ...Camera over the LAN If you want to set the network camera via a WAN Wide Area Network refer to Section 2 2 Setting the Network Camera over the WAN 2 1 Setting the Network Camera over the LAN Purpose...

Page 11: ...nput the IP address into the address bar of the web browser and click Enter to enter the activation interface The default IP address of the camera is 192 168 1 64 Figure 2 3 Activation Interface Web 3...

Page 12: ...ssword Figure 2 4 SADP Interface The SADP software supports activating the camera in batch Refer to the user manual of SADP software for details 3 Create a password and input the password in the passw...

Page 13: ...dification The batch IP address modification is supported by the SADP Refer to the user manual of SADP for details Activation via Client Software The client software is versatile video management soft...

Page 14: ...ice Management interface as shown in the figure below Figure 2 7 Device Management Interface 3 Check the device status from the device list and select an inactive device 4 Click Activate to pop up the...

Page 15: ...ial characters in order to increase the security of your product Proper configuration of all passwords and other security settings is the responsibility of the installer and or end user Figure 2 8 Act...

Page 16: ...nnect it to the WAN directly Connecting the network camera via a router Steps 1 Connect the network camera to the router 2 Assign a LAN IP address the subnet mask and the gateway Refer to Section 2 1...

Page 17: ...something of your own choosing using a minimum of 8 characters including upper case letters lower case letters numbers and special characters in order to increase the security of your product Proper...

Page 18: ...he DDNS provider E g DynDns com Follow the steps below for normal domain name resolution and private domain name resolution to solve the problem Normal Domain Name Resolution Steps 1 Apply a domain na...

Page 19: ...e top right of login interface 5 Input the user name and password and click The admin user should configure the device accounts and user operator permissions properly Delete the unnecessary accounts a...

Page 20: ...he product CD contains the client software You can view the live video and manage the camera with the client software Follow the installation prompts to install the client software and WinPcap The con...

Page 21: ...If you use third party VMS software contact technical support of our branch for camera firmware For detailed information about client software of our company refer to the user manual of the software T...

Page 22: ...e View Parameters Set the protocol type play performance rules and image format Protocol Type TCP UDP MULTICAST and HTTP are selectable TCP Ensures complete delivery of streaming data and better video...

Page 23: ...to Set the saving path of the manually captured pictures in interface Save snapshots when playback to Set the saving path of the captured pictures in interface Save clips to Set the saving path of th...

Page 24: ...Window Display the live video Toolbar Operations on the live view page e g live view capture record audio on off regional exposure regional focus etc PTZ Control Panning tilting focusing and zooming...

Page 25: ...start stop recording Mute audio on and adjust volume Start stop digital zoom Enable disable regional exposure Enable disable regional focus Double click on the live video to switch the current live v...

Page 26: ...cture Click the on the toolbar to enter the regional exposure operation mode and the icon turns into Then drag the mouse to draw a rectangle on the image as the desired exposure region Click the on th...

Page 27: ...ents Click the zoom iris focus buttons to realize lens control Figure 4 4 PTZ Control Panel Table 4 2 Descriptions of PTZ Control Panel Button Name Description PTZ Control Panel Hold and press the dir...

Page 28: ...ch patrol and one touch park Speed Adjustment Adjust speed of pan tilt movements Preset Refer to 4 4 3 for detailed information of setting preset Patrol Refer to 4 4 4 for detailed information of sett...

Page 29: ...toolbar of live view interface 2 Operate the 3D positioning function Click a position of the live video The corresponding position will be moved to the center of the live video Hold down the left mou...

Page 30: ...right or left Tilt the camera up or down Zoom in or out Refocus the lens 3 Click to finish the setting of the current preset 4 Edit a preset name by double clicking on the default name such as preset...

Page 31: ...Back to initial position 93 Set limit stops manually 35 Call patrol 1 94 Remote reboot 36 Call patrol 2 95 Call OSD menu 37 Call patrol 3 96 Stop a scan 38 Call patrol 4 97 Start random scan 39 Day m...

Page 32: ...a patrol number from the list and click 3 Click to enter the adding interface of preset as shown in Figure 4 9 Figure 4 9 Adding Presets 4 Configure the preset number patrol time and patrol speed Nam...

Page 33: ...h patrol and the camera moves as the patrol path 8 automatically Steps 1 Set preset No 1 to No 32 Refer to 4 4 3 Setting Calling a Preset for detailed information of setting preset 2 Call preset No 45...

Page 34: ...igure 4 12 Figure 4 12 Patterns Settings Interface 3 Click to enable recording the panning tilting and zooming actions 4 Use the PTZ control buttons to move the lens to the desired position after the...

Page 35: ...is valid the limit stops and auto flip will be invalid and the 3D positioning operation is not supported 4 5 Playback Purpose This section explains how to view the video files stored in the network d...

Page 36: ...eo files Stop Audio on and adjust volume Mute Speed down Download Speed up Playback by frame Enable Disable digital zoom You can choose the file paths locally for downloaded playback video files and p...

Page 37: ...terface The pop up menu is shown in Figure 4 19 2 Set the start time and end time Click Search The corresponding video files are listed on the left Figure 4 19 Video Downloading interface 3 Check the...

Page 38: ...20 Picture Interface 2 Select the file type of capturing the pictures from the list as timing alarm motion etc 3 Set the start time and end time Click Search The corresponding picture files will be li...

Page 39: ...camera manual recording and scheduled recording In this section you can follow the instructions to configure the scheduled recording By default the record files of scheduled recording are stored in t...

Page 40: ...parameters vary depending on different camera models 4 Click OK to save the advanced setting 5 Select a Record Type The record type can be Continuous Motion Alarm Motion Alarm Motion Alarm and Event...

Page 41: ...save the settings 5 1 2 Configuring Capture Schedule Purpose You can configure the scheduled snapshot and event triggered snapshot The captured picture can be stored in the local storage or network s...

Page 42: ...ions to upload the snapshots to FTP Upload continuous snapshots to FTP Steps 1 Configure the FTP settings and check Upload Picture checkbox in FTP Settings interface Refer to Section 6 1 2 Configuring...

Page 43: ...and to better protect your system against security risks we strongly recommend the use of strong passwords for all functions and network devices The password should be something of your own choosing...

Page 44: ...ompleted the status of disk will become Normal as shown in Figure 5 7 Figure 5 7 View Disk Status Define the Quota for Record and Pictures 1 Input the quota percentage for picture and for record 2 Cli...

Page 45: ...control the pan tilt movements Click the zoom iris focus buttons to realize lens control The functions vary depending on different camera models 5 2 1 Configuring Motion Detection Purpose Motion dete...

Page 46: ...mal Steps 1 Click and drag the mouse on the live video image to draw a motion detection area 2 Click to finish drawing You can draw up to 8 motion detection areas on the same image You can click to cl...

Page 47: ...nation automatically Scheduled Switch Switch to the day mode at 6 00 a m and switch to the night mode at 18 00 p m 2 Select Area No to configure in the dropdown list 3 Set the values of sensitivity an...

Page 48: ...time of the arming task 3 After you set the scheduled task you can click and copy the task to other days optional Figure 5 12 Arming Time Schedule 4 After setting the arming schedule you can click a...

Page 49: ...ck the checkbox to select the linkage method Notify Surveillance Center Send Email Upload to FTP Memory NAS Trigger Alarm Output and Trigger Recording are selectable Notify Surveillance Center Send an...

Page 50: ...5 2 4 Configuring Alarm Output to set the alarm output parameters Trigger Recording Record a video when an event occurs You have to set the recording schedule to realize this function Refer to Sectio...

Page 51: ...on Detection 4 Click tab to select the linkage method taken for tampering notify surveillance center send email and trigger alarm output are selectable Refer to Section 5 2 1 Configuring Motion Detect...

Page 52: ...ab to select the linkage method taken for alarm input including Notify Surveillance Center Send Email Upload to FTP Memory Card NAS Trigger Alarm Output and Trigger Recording Refer to Section 5 2 1 Co...

Page 53: ...can be set to 5sec 10sec 30sec 1min 2min 5min 10min or Manual The delay time refers to the time duration that the alarm output remains in effect after alarm occurs 5 Click tab to enter the arming sch...

Page 54: ...o the cameras Steps 1 Enter the Exception settings interface Configuration Event Basic Event Exception 2 Check the checkbox to set the actions taken for the Exception alarm Refer to Section 5 2 1 Conf...

Page 55: ...the sudden rise detection Sensitivity Range 1 100 the smaller the value the more severe the sound change will trigger the detection Sound Intensity Threshold Range 1 100 it can filter the sound in th...

Page 56: ...ing Intrusion Detection Intrusion detection can set an area in the surveillance scene and once the area is entered a set of alarm action is triggered Steps 1 Enter the intrusion detection interface Co...

Page 57: ...the same as the settings of the arming schedule for motion detection Refer to Section 5 2 1 Configuring Motion Detection 7 Click tab to select the linkage method taken for intrusion detection Notify...

Page 58: ...tection direction in the dropdown list there are A B A B and B A selectable Sensitivity Range 1 100 The value of the sensitivity defines the size of the object which can trigger the alarm when the sen...

Page 59: ...ers Purpose You can configure the basic PTZ parameters including zooming speed and power off memory 1 Enter the Basic PTZ Parameter Configuration interface Configuration PTZ Basic Settings Figure 5 23...

Page 60: ...the Scheduled Tasks function takes effect Park function varies depending on different camera models Steps 1 Enter the Park Action settings interface Configuration PTZ Park Action Figure 5 24 Set the P...

Page 61: ...Configuring TCP IP Settings Purpose TCP IP settings must be properly configured before you operate the camera over network IPv4 and IPv6 are both supported Steps 1 Enter TCP IP settings interface Conf...

Page 62: ...Alternate DNS server Figure 6 2 DNS Server Settings The router must support the route advertisement function if you select Route Advertisement as the IPv6 mode Configuring DDNS Settings Purpose If yo...

Page 63: ...sword registered on the DynDNS website 5 Click to save the settings Figure 6 3 DynDNS Settings NO IP Steps 1 Enter Server Address of NO IP 2 In the Domain text field enter the domain name obtained fro...

Page 64: ...ters lower case letters numbers and special characters in order to increase the security of your product Proper configuration of all passwords and other security settings is the responsibility of the...

Page 65: ...nts With the function enabled you don t need to configure the port mapping for each port and the camera is connected to the Wide Area Network via the router Steps 1 Enter the UPnP settings interface C...

Page 66: ...ting the SNMP use the SNMP software and manage to receive the camera information via SNMP port By setting the Trap Address the camera can send the alarm event and exception messages to the surveillanc...

Page 67: ...ter the FTP settings interface Configuration Network Advanced Settings FTP Figure 6 8 FTP Settings 2 Configure the FTP settings including server address port user name password directory and upload ty...

Page 68: ...folder in FTP server The name of folder can be defined as shown in following Figure 6 10 Figure 6 10 Child Directory Upload type To enable uploading the captured picture to the FTP server 3 Click to...

Page 69: ...ked the email will not be encrypted Attached Image Check the checkbox of Attached Image if you want to send emails with attached alarm images Interval The interval refers to the time between two actio...

Page 70: ...ng passwords for all functions and network devices The password should be something of your own choosing using a minimum of 8 characters including upper case letters lower case letters numbers and spe...

Page 71: ...llation 1 Select Create certificate request first and continue the installation 2 Click Create to create the certificate request and fulfill the required information 3 Download the certificate request...

Page 72: ...DSCP event alarm DSCP and Management DSCP The valid DSCP value ranges from 0 to 63 The DSCP value is bigger the priority is higher 3 Click to save the settings Make sure that you enable the QoS functi...

Page 73: ...validated the switch allows the network access to the protected network For your privacy and to better protect your system against security risks we strongly recommend the use of strong passwords for...

Page 74: ...n configure ONVIF user in this interface Refer to ONVIF standard for detailed configuration rules Steps 1 Enter the Integration Protocol configuration interface Configuration Network Advanced Settings...

Page 75: ...he bandwidth is limited Refer to the Section 4 1 Configuring Local Parameters for switching the main stream and sub stream for live viewing 3 You can customize the following parameters for the selecte...

Page 76: ...H 265 is an improved compression coding technology based on H 265 By enabling H 265 users can estimate the HDD consumption by its maximum average bitrate Compared to H 265 H 265 reduces storage by up...

Page 77: ...you can configure the Sampling Rate in the dropdown list The greater the value is the better the audio quality will be Input Volume Slid the bar to turn up down the volume The value ranges from 0 to...

Page 78: ...k and then drag the mouse to draw a red frame in the live view image You can click to clear it The number of areas supported in ROI function varies depending on different camera models 4 Select the Re...

Page 79: ...stment and other parameters in display settings The parameters in Display Settings interface vary depending on different camera models You can double click the live view to enter full screen mode and...

Page 80: ...6 24 Manual Iris Shutter Priority The value of shutter needs to be adjusted manually The iris and gain values will be adjusted automatically according to the brightness of the environment Figure 6 25...

Page 81: ...condition of environment Figure 6 27 Auto Mode Sensitivity Day In Day mode the camera displays color image It is used for normal lighting conditions Night In Night mode the image is black and white Ni...

Page 82: ...ition function of the camera used to adjust the color temperature according to the environment Auto In Auto mode the camera retains color balance automatically according to the current color temperatu...

Page 83: ...the MIRROR function on the image will be flipped It is like the image in the mirror Video Standard You can set the Video Standard to 50 Hz PAL or 60 Hz NTSC according to the video system in your count...

Page 84: ...ted at 10 o clock in the morning and stopped at 1 o clock early in the next morning 3 Click Common to configure the common parameters applicable to the day mode and night mode For the detailed informa...

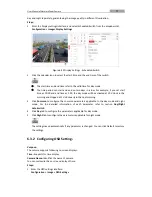
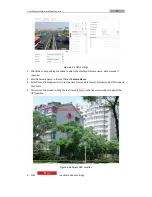
Page 85: ...k if required 3 Edit the camera name in the text field of Camera Name 4 Select from the dropdown list to set the time format date format display mode OSD size and Font color 5 You can use the mouse to...

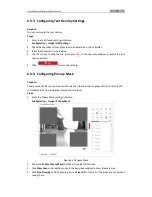
Page 86: ...overlay position 5 Click to save the settings 6 3 4 Configuring Privacy Mask Purpose Privacy mask enables you to cover certain areas on the live video to prevent certain spots in the surveillance area...

Page 87: ...Number of HDDs Number of Alarm Input Number of Alarm Output and Firmware Version Property are displayed The information cannot be changed in this menu It is the reference for maintenance or modificat...

Page 88: ...utes Figure 6 40 Time Sync by NTP Server You can click to make sure that the NTP server is connected If the camera is connected to a public network you should use a NTP server that has a time synchron...

Page 89: ...e 6 42 select the Time Zone in which the camera locates Figure 6 42 Time Zone Settings Configuring DST Daylight Saving Time Purpose Daylight Saving Time DST is a way of making better use of the natura...

Page 90: ...be controlled remotely by the computer through the network Steps 1 Enter RS 232 Port setting interface Configuration Advanced Configuration System RS 232 Figure 6 44 RS 232 Settings 2 Configure the B...

Page 91: ...oftware Licenses 6 4 2 Maintenance Upgrade Maintenance Rebooting the Camera Steps 1 Enter the Maintenance interface 2 Configuration System Maintenance Upgrade Maintenance 3 Click to reboot the network...

Page 92: ...mport configuration file You need to reboot the camera after importing configuration file Upgrading the System Steps 1 Enter the Maintenance interface Configuration System Maintenance Upgrade Maintena...

Page 93: ...matched log files will be displayed on the Log interface 4 To export the log files click Save Log to save the log files in your computer System Service Steps 1 Enter the interface of configuring the r...

Page 94: ...tication WEB Authentication type from the dropdown list Digest and digest basic are selectable 3 Click to save the settings Configuring IP Address Filter Purpose With this function on the camera allow...

Page 95: ...finish modifying Delete an IP Address Left click an IP address from filter list and click Delete Delete all IP Addresses Click Clear to delete all the IP addresses 5 Click to save the settings Config...

Page 96: ...me select Level and input Password For your privacy and to better protect your system against security risks we strongly recommend the use of strong passwords for all functions and network devices The...

Page 97: ...ation field you can check or uncheck the permissions for the new user 4 Click to finish the user addition Figure 6 53 Add a User Modify a User Steps 1 Left click to select the user from the list and c...

Page 98: ...sword when admin user forgets the password Set Security Question You can set the security questions during camera activation Or you can set the function at user management interface Security question...

Page 99: ...n 4 Create new password Note User IP address is locked for 30 minutes after 7 failed attempts of answering security questions Online Users Enter the Online Users configuration interface Configuration...

Page 100: ...conds from the subnet where your computer locates It displays the total number and information of the searched devices in the Online Devices interface Device information including the device type IP a...

Page 101: ...3 Enter the password of the admin account of the device in the Password field and click to save the changes For your privacy and to better protect your system against security risks we strongly recomm...

Reviews: