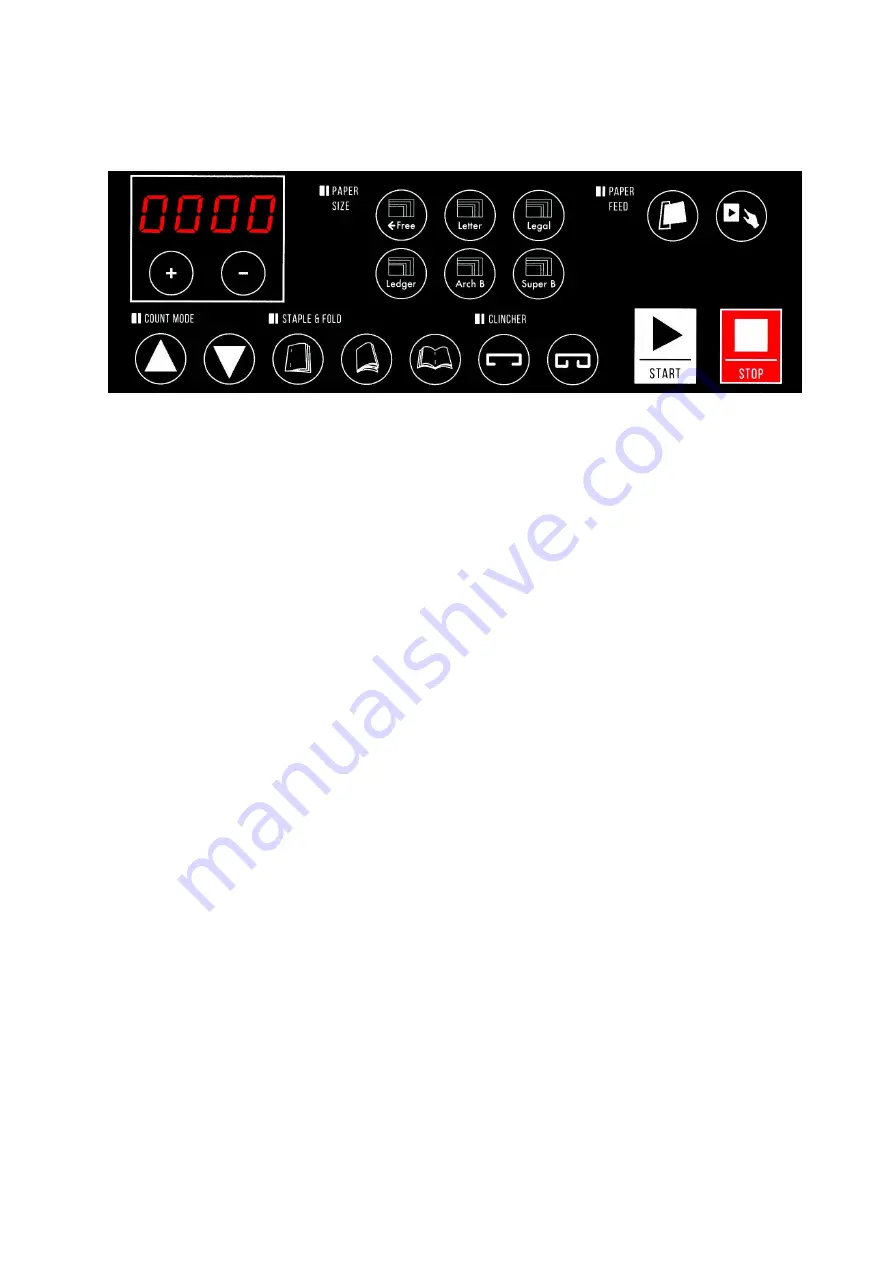
background image


5. Functions 

1) Operation Panel 


(1) Counter 

(i)  In 

Count Up

 mode, the panel displays the number of copies counted. 

In 

Count  Down

  mode,  the  panel  displays  the  value  calculated  by  subtracting  the 

number counted from the preset value. 

(ii)  When  changing  the  paper  size,  the  panel  displays  the  change  made  within  the 

range of +/- 0.2 inch for four seconds. 
When  the  paper  size  is  set  to 

Free

,  the  panel  displays  the  full  length  for  four 

seconds. 

(iii) In side binding mode, the panel displays the adjustment made within the range of 

0.30 inch to 0.60 inch for four seconds. 

(iv) In auto mode, the panel displays the detection time within the range of one to five 

seconds for four seconds. 

(v) The value may be increased or decreased by pressing the positive (+) or negative 

(-) key.   


(2) Paper Size 

(i)  Choose  the  original  paper  size  from  the  following  options:  LETTER,  LEGAL, 

LEDGER, ARCH B, SUPER B, and FREE. 

(ii) For 

FREE

, set the original paper length within the range of 5 inch to 19 inch 

(iii) Press any of the switches twice to increase or decrease the paper length by up to 

+/- 0.2 inch. This is fine adjustment for each preset paper size.     


(3) Paper Feed 

(i) 

Auto

  Mode:  Press  the  auto  switch.  The  product  will  automatically  start  when  the 

optical sensor detects the paper that is fed.   
Press  the  auto  switch  twice  to  change  the  detection  time,  using  the  positive  (+) 
and negative (-) keys to change the value. 

(ii) 

Manual

 Mode: The product starts when the Start switch is pressed.   


(4) Count Mode 

(i) Press the 

▲ key for the Count Up mode, or the▼ key for the Count Down mode.   

(ii) In the Count Down mode, specify the value in advance, using the positive (+) and 

negative (-) keys to change the value.   

(iii) No value exceeding three digits can be displayed or specified.   

(2) 

(3) 

(5) 

(1) 

(4) 

(6) 

(7) 

(8) 

Summary of Contents for iBOOKLET

Page 1: ...MBM iBOOKLET May 26 2017 MBM Corporation Operation Manual Ver A_2 ...

Page 2: ... size Read this manual carefully to ensure the product is handled and used under the best conditions Table of Contents 1 Specifications 4 2 Names of Components 1 Front 5 2 Rear 3 Accessories 6 4 Steps for Operation Process Flow from Preparation to Finish 1 Preparation 7 2 Bookbinding 3 Finish 5 Functions 1 Operation Panel 8 2 Refilling Staples 3 Staple Heads 6 Regular Maintenance 1 Cleaning the Op...

Page 3: ...se an electric shock or fire Do not use a damaged power cord Do not process the power cord Do not put anything heavy on the power cord Keep the AC inlet at least 8 cm from the wall Failure to follow these instructions could cause an electric shock or fire Warning Do not use the product when it is acting abnormally such as emitting smoke foul odors or noises Doing so may cause an electric shock or ...

Page 4: ...apacity Anvil clinching From 2 to 16 sheets 80g m2 or 24lb paper Flat clinching From 6 to 16 sheets 80g m2 or 24lb paper 6 Counter Up or Down 7 Staple Width 3 5 5 3 or 7 1 8 Staple Type Standard chisel point staples SF4 9 Multi functional Fold staple Fold only or staple only 10 Stitching Type Squarely flat or loop 11 Speed 800 booklets hour 12 Error Detections Paper jam Cover open No staple 13 Ope...

Page 5: ...5 2 Names of Components 1 Front 2 Rear AC Inlet ...

Page 6: ...6 3 Accessories Accessory Qty Appearance Operation Manual this document 1 Set of staples 1 AC Power Cord 1 Stocker 1 ...

Page 7: ...om six paper size options Count Mode Select between Count Up or Count Down In Count Down mode specify a value in advance 2 Bookbinding i Set the paper width guide to the size of paper to be bound Put the paper on the table and then release your finger to let it fall naturally In manual mode press the Start switch In auto mode the product will start operating automatically when the optical sensor d...

Page 8: ... 2 Paper Size i Choose the original paper size from the following options LETTER LEGAL LEDGER ARCH B SUPER B and FREE ii For FREE set the original paper length within the range of 5 inch to 19 inch iii Press any of the switches twice to increase or decrease the paper length by up to 0 2 inch This is fine adjustment for each preset paper size 3 Paper Feed i Auto Mode Press the auto switch The produ...

Page 9: ...ds of the staple 7 Start Press this switch to start binding 8 Stop Press this switch to stop binding and to initialize the settings 2 Refilling Staples 1 Press the power switch to turn the product off Next open the lower cover 2 Remove the staple retainer and put it at the rear part of the magazine to fix it in place 3 Refill the staples 4 Return the staple retainer slowly to its original state Th...

Page 10: ...peated use of a dirty cloth or the same cloth may scratch the LCD panel ii Do not use a detergent containing abrasives when cleaning the panel Doing so may not only scratch the screen but also hamper normal operations iii If the product is splashed with water solvent or other liquid wipe it off immediately Failure to wipe the liquid off the product may not only cause the panel to deteriorate and m...

Page 11: ...s the paper loaded properly Set the paper guides properly to match the paper width Be sure to load the number of paper within the specified limit Are staples used properly Use the recommended staples Is there an excessive number of sheets loaded Load the paper within the specified limit Is the folding position right Turn the power switch off and turn it on again to move the stopper to the initial ...

Page 12: ...tact the distributor or a person in charge in our sales office to ask for a new one When you want to transfer this product to the next owner be sure to hand over this Instruction Manual along with the product If there is any label that becomes illegible or is about to peel off contact the distributor or a person in charge in our sales office to immediately replace it with a new one Operation Manua...

Reviews:

Related manuals for iBOOKLET