6
9
1.-
2.-
3.-
4.-
5.-
6.-
7.-
8.-
9.-
10.-
Follow the Pressure Relief Procedure.
If the sprayer has been used before, remove the filter bowl and screen.
Clean the screen separately and install the bowl without the screen to
flush it.
Close the pressure drain valve
For 2 liters of compatible solvent into a grounded metal pail. Put the
suction tube in the pail.
Remove the spray tip from the gun
Lower the pressure setting by turning the pressure adjusting knob all the
way counterclockwise.
Hold a metal part of the gun against a metal container. Squeeze the trigger
and hold it open, turn the ON/OFF switch to ON, and slowly increase
the pressure setting until the sprayer starts. Keep the gun triggered until
all air is forced out of the system and the solvent flows freely from the
gun. Release the trigger and engage the gun safety latch.
Remove the suction tube from the pail. Disengage the gun safety latch
and trigger the gun to force solvent from the hose. Do not let the pump
run dry for more than 15 seconds to avoid damaging the pump packings.
Then follow the Pressure Relief Procedure.
Leave the pressure drain valve open until you are ready to use the sprayer
again. If the screen was removed, unscrew the filter bowl and reinstal the
clean screen. Reinstall the bowl, hand tight.
If you flushed with mineral spirits and are going to use water-base paint,
flush with clean water.
CLEANING
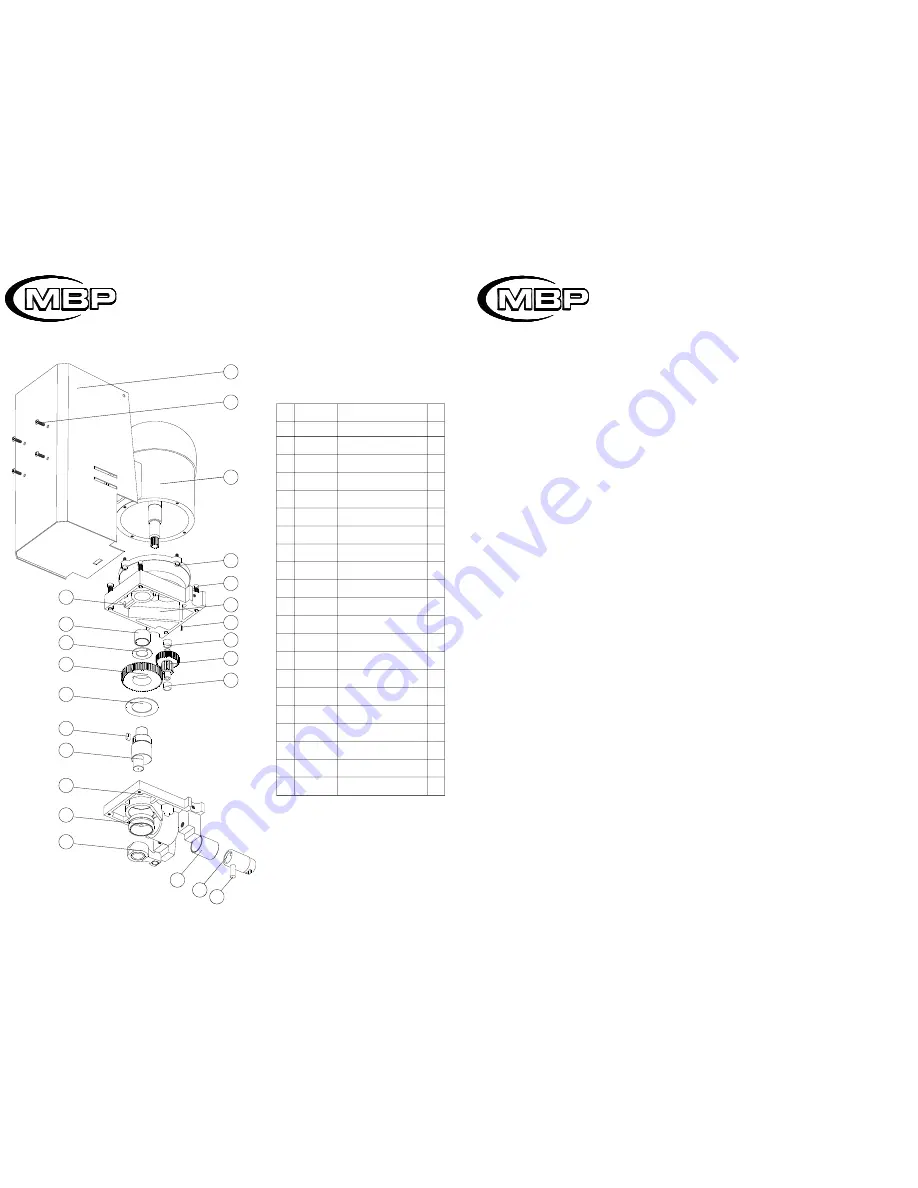
PARTS LIST
REF.
102.110.00
CTB.003
102.111.01
CTB.014
CPA.204
CB1010
A1.920.02
CB1012
CB2007
A1.920.03
CB2008
A1.910.02
CPA.501
102.111.02
CB1009
102.121.00
CB2002
102.120.02
A1.930.03
102.100.01
CTB.204
DESCRIPTION
Motor
Screw
Housing
Screw
Pin
Sleeve
Gear
Bearing
Washer
Gear
Washer
Rod
Cotter pin
Body
Bearing
Rod
Sleeve
Rod
Pin
Cover
Screw
Nº
1
2
3
4
5
6
7
8
9
10
11
12
13
14
15
16
17
18
19
20
21
Q
1
4
1
4
2
2
1
1
1
1
1
1
1
1
1
1
1
1
1
1
4
1
2
3
5
4
8
5
6
10
13
11
12
14
15
16
17
6
7
9
19
18
20
21