background image

16

Storage
Storing the Snowthrower

Immediately prepare your snow thrower for storage at 

the end of the season or if the unit will not be used for 30 

days or more.

  WARNING: Never store the snow thrower with 

gaso line in the tank in side a build ing where fumes 

may reach an open flame, spark or pilot light as 

on a fur nace, water heater, clothes dryer or gas 

ap pli ance.  Allow the engine to cool be fore storing 

in any enclosure.

SNOW THROWER

When snow thrower is to be stored for a period of time, 

clean it thor oughly, re move all dirt, grease, leaves, etc. 

Store in a clean, dry area.
1.  Clean entire snow thrower after each use.
2.  Inspect and replace belts, if necessary (See “Replace-

ing the Drive Belt” sec tion of this manual).

3.  Be sure that all nuts, bolts, screws, and pins are securely 

fas tened. Inspect moving parts for damage, breakage 

and wear. Replace if nec es sary.

4.  Touch up all rusted or chipped paint surfaces; sand 

lightly before painting.

FUEL SYS TEM
IMPORTANT

:  It is important to prevent gum deposits from 

forming in essential fuel system parts such as carburetor,  

fuel hose, or tank during storage. Also, alcohol blended 

fuels (called gasohol or using ethanol or methanol) can 

attract moisture which leads to separation and formation 

of acids during storage. Acidic gas can damage the fuel 

system of an engine while in storage.
•  Empty the fuel tank by starting the engine and letting 

it run until the fuel lines and car bu re tor are empty.

•  Never use engine or carburetor cleaner prod ucts in 

the fuel tank or permanent damage may occur.

•  Use fresh fuel next season.

NOTE: 

 Fuel stabilizer is an acceptable alternative in min i-

 miz ing the formation of fuel gum deposits during stor age. 

Add stabilizer to gasoline in fuel tank or storage container. 

Always follow the mix ratio found on stabilizer container. 

Run engine at least 10 min utes after adding stabilizer to 

allow the stabilizer to reach the carburetor. Do not empty 

the gas tank and carburetor if using fuel stabilizer.

ENGINE OIL

Drain oil (with engine warm) and replace with clean engine 

oil. (See “Changing the Engine Oil” section of this man ual).

CYLINDER

1.  Remove spark plug.
2.  Pour one ounce (29 ml) of oil through spark plug hole 

into cylinder.

3.  Pull recoil starter handle slowly a few times to dis trib ute 

oil.

4.  Replace with new spark plug.

OTHER

•  Remove safety ignition key; store it in a safe place. 
•  Do not store gasoline from one season to another.
•  Replace your gasoline can if your can starts to rust. 

Rust and/or dirt in your gasoline will cause problems.

• 

If possible, store your snow thrower indoors and cover 

it to protect it from dust and dirt.

•  Cover your snow thrower with a suitable pro tec tive 

cover that does not retain moisture. Do not use plastic. 

Plastic cannot breathe, which allows con den sa tion to 

form and will cause your snow thrower to rust.

IMPORTANT

: Never cover snow thrower while engine/

exhaust area is still warm.

Summary of Contents for 96188000300

Page 1: ...MC621 MC621 Owner s Manual ...

Page 2: ...move all doormats sleds boards wires and other foreign objects 2 Disengage all clutches and shift into neutral before starting the engine motor if equipped 3 Donotoperatetheequipmentwithoutwearingadequate winter garments Avoid loose fitting clothing that can get caught in moving parts Wear footwear that will improve footing on slippery surfaces 4 Handle fuel with care it is highly flammable a Use ...

Page 3: ...arting the engine and for transporting the snow thrower in or out of the building Open the outside doors exhaust fumes are dangerous 8 Exercise extreme caution when operating on slopes 9 Neveroperatethesnowthrowerwithoutproperguards andothersafetyprotectivedevicesinplaceandworking 10 Never direct the discharge toward people or areas where property damage can occur Keep children and others away 11 ...

Page 4: ...re supplied with the product Learn and under stand their meaning IMPORTANT Safety and instruction decals are located near areas of potential danger Replace damaged decals 2 2ª7 2 2 ª ª 7ª ª3 49ª 2 4 ª 3425 4 3ª 2 ª53 ª ª4 3ª02 5 4 0ª4 3 ª 3425 4 3ª 2ª 5452 ª2 2 4 ª 9 3 24ª4 ª34 24 ª25 05 ª 54ª4 ª34 0 5 02 2 MAINTENANCE 11 15 STORAGE 16 TROUBLESHOOTING 17 REPAIR PARTS 18 26 WARRANTY 28 SAFETY RULES...

Page 5: ...ndle knobs and pull out the two handle bolts until you can move the handle freely and rotate the handle to the operating position Figure 2 2 Tightenthehandleknobsuntiltheyaresnug Figure3 2 Installing the Discharge Chute 5 Carriage bolts 4 Flange nuts 2 Washers 1 Knob 1 Chute 1 Deflector Procedure Install the discharge chute as shown Figure 4 IMPORTANT Do not overtighten the flange nuts otherwise y...

Page 6: ... 10W30 synthetic oil is acceptable for use in cold temperatures 1 Move the snowthrower to a level surface 2 Clean around the dipstick Figure 6 NOTE Dipstick location may vary depending on engine type 3 Remove either side mounted filler cap dipstick or high oil fill dipstick and wipe it clean 4 Insert the dipstick into the filler neck and turn clockwise until fully seated Then remove the dipstick b...

Page 7: ...o the gasoline IMPORTANT Do not use E85 blended fuels This engine is not E20 E30 E85 compatible Alternative fuels with high alcohol content can cause hard starting poor engine performance and may cause internal engine damage Checking the Engine Oil Level NOTE 10W30 synthetic oil is acceptable for use in cold temperatures 1 Move the snowthrower to a level surface 2 Clean around the dipstick Figure ...

Page 8: ...er or the choke if the engine has been running and is hot Excessive priming may flood the engine and prevent it from starting 4 Connect an extension cord to the snowthrower and plug the other end into a three hole grounded 120 volt A C receptacle and push the electric start button Figure 13 or pull the recoil start handle Figure 14 NOTE Use only a UL listed 16 gauge extension cord recommended for ...

Page 9: ...ing the electric starter extensively can overheat and damage it If the engine does not start after this series of attempts wait at least 40 minutes to allow the starter to cool before attempting to start it again If the engine does not start after the second series of attempts take the snowthrower to an Authorized Service Dealer for service NOTE If you pull the recoil handle and feel no resistance...

Page 10: ...chute left and right to free it from any ice buildup With the ignition key in the Off position pull the recoil starter handle several times or connect the electrical cord to a power source and the snowthrower and push theelectricstartbuttononcetopreventtherecoilstarter and or the electric starter from freezing up In snowy and cold conditions some controls and mov ing parts may freeze Do not use ex...

Page 11: ... right sides of the machine from the normal operating position The best time to remove snow is the early morning At this time the snow is usually dry and has not been exposed to the direct sun and warming temperatures Slightly overlap each successive path to ensure all snow will be removed Throw snow downwind whenever possible For extremely heavy snow reduce the width of snow removal by overlappin...

Page 12: ... adjusted to position 2 ensure that the auger stops properly when the control bar is released Inspecting the Auger Blades Before each session inspect the auger blades for wear When a auger blade edge has worn down have an Authorized Service Dealer replace the auger blades and the scraper Figure 22 Figure 22 1 Auger blades 2 Scraper 1 2 Adjusting the Control Cable 1 With the control bar disengaged ...

Page 13: ...fully pour oil into the oil fill hole until Full on the fill cap dipstick line Figure 26 Maxfill 18oz 0 5l type automotivedetergentoilwith an API service classification of SJ SL or higher Use Figure 25 below to select the best oil viscosity for the outdoor temperature range expected Figure 24 1 Oil fill cap dipstick 1 1 Figure 25 NOTE 10W30 synthetic oil is acceptable for use in cold temperatures ...

Page 14: ...d IMPORTANT Replace a cracked fouled or dirty spark plug Do not clean the electrodes because grit entering the cylinder can damage the engine 11 Set the gap on the plug to 0 030 inch 0 76 mm Figure 30 12 Install the spark plug and torque it to 20 22 ft lb 27 30 N m 13 Connect the spark plug wire to the spark plug Figure 29 14 Remove the oil fill cap 15 Install the shroud with the screws removed in...

Page 15: ...e new drive belt first around the engine pulley then the idler pulley and finally around the drive pulley while pressing down on the front of the idler arm Figure 32 5 Install the drive side cover with the screws removed in step 1 NOTE Ensure that the drive belt is properly adjusted and operating refer to Checking the Control Cable and Adjusting the Control Cable in the Maintenance section of this...

Page 16: ...k by starting the engine and letting it run until the fuel lines and carburetor are empty Never use engine or carburetor cleaner products in the fuel tank or permanent damage may occur Use fresh fuel next season NOTE Fuel stabilizer is an acceptable alternative in mini mizing the formation of fuel gum deposits during storage Add stabilizer to gasoline in fuel tank or storage container Always follo...

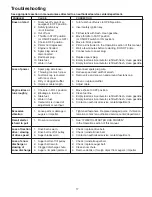
Page 17: ... Engine idles or 1 Choke is in FULL position 1 Move choke to OFF position runs roughly 2 Blockage in fuel line 2 Clean fuel line 3 Stale fuel 3 Empty fuel tank carburetor refill with fresh clean gasoline 4 Water in fuel 4 Empty fuel tank carburetor refill with fresh clean gasoline 5 Carburetor is in need of 5 Contact an authorized service center department adjustment or overhaul Excessive 1 Loose ...

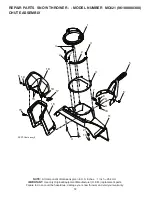
Page 18: ...3 4 4 4 5 6 19 19 8 20 7 4 6 15 21 19 15 16 17 18 SSST Chute asm_5 NOTE All component dimensions given in U S inches 1 inch 25 4 mm IMPORTANT Use only Original Equipment Manufacturer O E M replacement parts Failure to do so could be hazardous damage your snow thrower and void your warranty ...

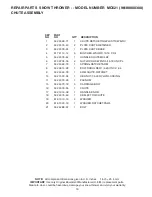
Page 19: ...76 40 2 PLATE CHUTE RETAINER 3 532 43 76 35 1 PLATE CHUTE BASE 4 817 41 13 12 6 BOLT HEX WSH HD 13 16 X 3 4 5 532 43 76 42 1 HANDLE CHUTE MS428 6 873 97 05 00 4 NUT LOCK HX W INS 5 16 18 UNC PL 7 532 43 48 79 1 SPRING RATCHET ARM 8 532 08 13 28 1 BOLT SHOULDER 1 4 20 UNC X 94 9 532 43 48 78 1 ARM CHUTE RATCHET 10 532 13 20 04 1 HEX NUT 1 4 20 NYLON LOCKING 11 532 43 76 26 1 PLENUM 15 532 43 73 18 ...

Page 20: ...ch 25 4 mm IMPORTANT Use only Original Equipment Manufacturer O E M replacement parts Failure to do so could be hazardous damage your snow thrower and void your warranty 1 532 43 76 67 1 BAIL HANDLE PAINT MS431 2 532 43 76 64 1 HANDLE PNT UPPER SSST 3 532 43 48 06 1 CONTROL CABLE 4 532 19 19 38 2 KNOB HANDLE BLACK 5 532 19 15 74 2 BOLT HANDLE BLACK PATCHED 6 532 14 50 06 1 CLIP PUSH IN HINGED ...

Page 21: ... PART NO NO QTY DESCRIPTION 1 872 11 04 07 12 BOLT CARRIAGE 2 532 43 76 20 1 PIN ROLL 3 16 X 1 1 4 3 532 19 96 87 1 BOLT 1 4 20 1 50 4 532 43 76 18 2 PLATE CENTER BLADE 5 532 13 20 04 13 HEX NUT 1 4 20 NYLON LOCKING 6 819 09 10 16 8 WASHER 9 32 X 5 8 X 16 GA 7 532 43 74 59 2 BLADE AUGER 8 532 43 76 17 1 WELDMENT AUGER ASM 9 532 43 76 21 2 SUPPORT BEARING SSST PNT 10 532 43 76 22 2 BEARING BALL MAN...

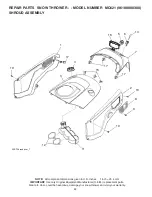
Page 22: ...l component dimensions given in U S inches 1 inch 25 4 mm IMPORTANT Use only Original Equipment Manufacturer O E M replacement parts Failure to do so could be hazardous damage your snow thrower and void your warranty 1 4 3 17 15 2 10 8 9 10 11 12 10 6 17 17 7 14 5 16 SSST Shroud asm_7 ...

Page 23: ...32 43 76 27 1 COVER NON DRIVE SIDE MS428 2 532 43 76 30 1 COVER DRIVE SIDE MS428 3 532 43 76 34 1 TOP COVER 4 532 43 02 20 1 CAP ASM FUEL 2 25 FR N CB E10 5 532 43 62 35 1 BULB PRIMER 6 532 43 54 07 1 KEY HOUSING 7 532 43 76 48 1 TOP REAR COVER 8 532 43 76 31 1 PLATE EXHAUST PNT 9 817 41 13 12 2 SCREW 10 817 67 04 12 12 SCREW HEXWSH THDROL 1 4 20X3 4 11 532 43 48 80 1 TANK FUEL ASM 12 532 14 68 48...

Page 24: ...1 2 3 4 4 5 7 6 11 10 6 8 3 9 SSST Frame asm_3 12 12 NOTE All component dimensions given in U S inches 1 inch 25 4 mm IMPORTANT Use only Original Equipment Manufacturer O E M replacement parts Failure to do so could be hazardous damage your snow thrower and void your warranty ...

Page 25: ...ur warranty KEY PART NO NO QTY DESCRIPTION 1 532 43 48 56 1 LCT ENGINE 2 532 43 76 06 1 FRAME WELDMENT 3 532 43 76 62 2 WHEEL 8X1 5 BRICK GS 3SPK MS421 4 532 43 54 17 2 NUT PUSH AXLE 0 5IN 5 532 43 55 78 2 SCREW 5 16 24 X 2 00 HHCS 6 532 15 04 06 2 BOLT ENG 3 8 16 X 1 280 7 532 19 17 30 3 NUT HEX FLANGE 1 4 20 CTR LOCK 8 872 14 04 05 3 BOLT RDHD SQNK 1 4 20 UNC X 5 8 9 532 43 55 35 1 PLATE SCRAPER...

Page 26: ...32 43 48 60 1 SPACER ENGINE CRANK 2 532 43 45 02 1 KEEPER ENGINE BELT 3 532 42 64 90 1 PULLEY ENG TRACTION 3 4 4 532 85 10 74 1 WASHER HARDEN 5 532 43 72 61 1 BELT V TRACTION 6 532 43 08 17 1 SCREW CAP SCHD 3 8 24 X 1 25 7 532 43 48 59 1 SPRING IDLER PULLEY RETURN 8 532 43 76 09 1 ARM IDLER PNT MS431 9 532 16 60 43 1 PULLEY IDLER BACKSIDE 10 817 06 06 20 1 SCREW HXWH THDRL 1 4 20X1 1 4 11 532 19 9...

Page 27: ...27 SERVICE NOTES ...

Page 28: ...od for any products used for rental or commercial purposes is limited to 90 days from the date of origi nal purchase 5 This Warranty applies only to products which have been properly assembled adjusted operated and maintained in ac cordance with the instructions furnished This Warranty does not apply to any product which has been subjected to altera tion misuse abuse improper assembly or installat...

Reviews: