background image


250-018 

P2008 Jens Broecking © Firma WJG, Braunschweig. Nachdruck oder Vervielfältigung  nur mit ausdrücklicher Genehmigung 

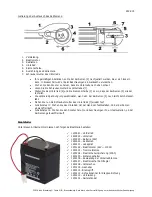
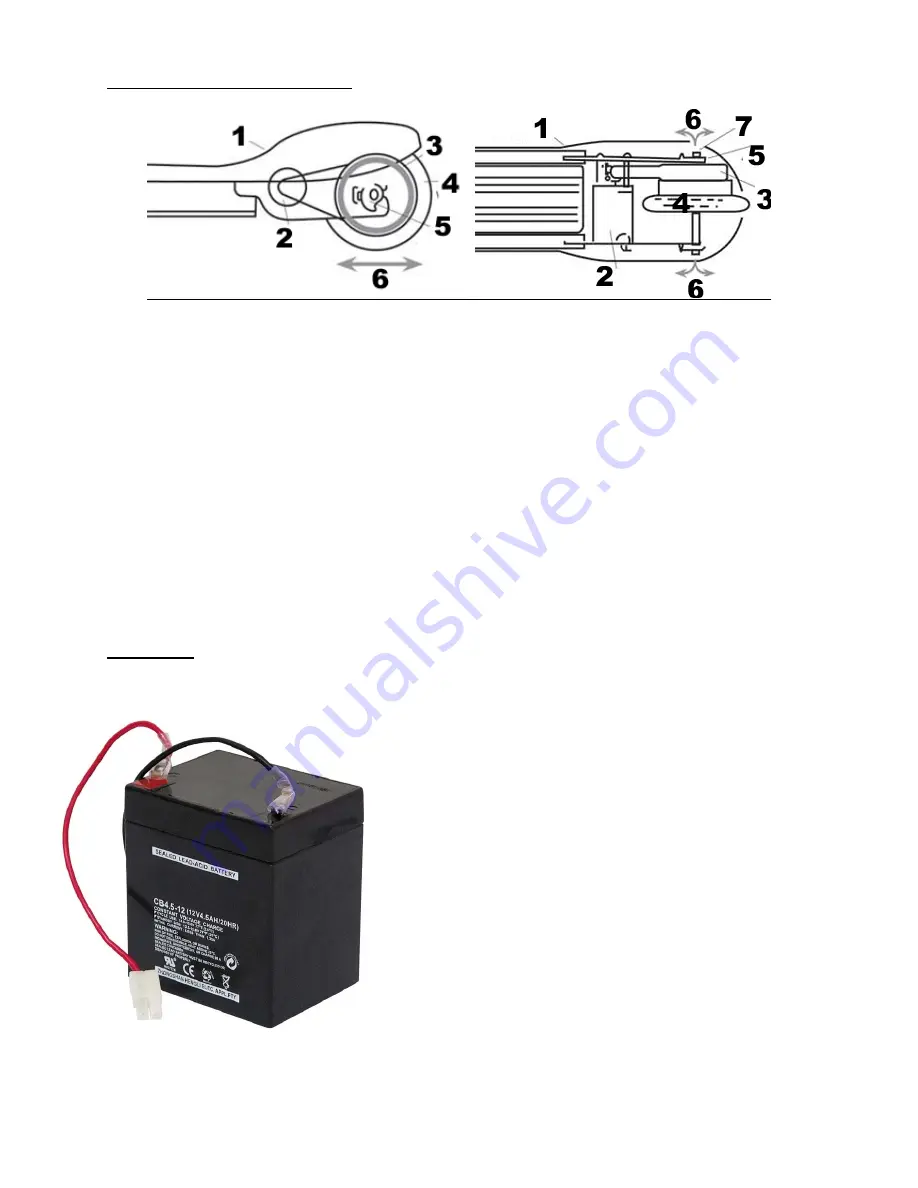
Alignment or Exchange of the Fan Belt: 


1.


Casing. 

2.


Electric motor. 

3.


Fan belt. 

4.


Back wheel. 

5.


Belt pulley. 

6.


Alignment of the fan belt. 

7.


Screw nut of the back wheel. 


Readjust the fan belt [3] in frequent intervals because it can loosen. In that case you will hear noises 

from the belt whenever you accelerate. 


Turn the scooter upside down. 


Loose the screw nut of the back wheel [7]. 


Adjust the back wheel [4] and the belt pulley [5] that the fan belt [3] is tight again.   


The optimal tension is ensured if you can extrude the fan belt [3] slightly. 


Fasten the screw nut of the back wheel [7] firmly. 


Function test 1: Rotate the back wheel by hand to make sure the fan belt runs correctly. 


Function test 2: Turn the scooter back and accelerate it to make sure that the fan belt runs noiselessly. 


Spare Parts: 


Under these item numbers you can order the following spare parts:   


9


1250021 – Front Wheel 

9


1250022 – Back Wheel 

9


1250023 – Battery (24V) 

9


1250024 – Fan Belt 

9


1250101 – Charger 

9


1250102 – Electric Motor (24V ~ 100W) 

9


1250103 – Drum Brake 

9


1250104 – Elecric Micro Fuse (20Ah) 

9


1250105 – Fuse Bracket 

9


1250106 – Bowden Cable of the Rear Wheel Brake 

9


1250107 – Electronic Cruise Control 

9


1250108 – Rear Axle 

9


1250109 – Accelerator Level  

9


1250110 – Brake Level 

9


1250112 – Quick Release for Folding Mechanism 

9


1250113 – Casing 

9


1250114 – Kick Stand 


Summary of Contents for eScooter II

Page 1: ...en Er hat einen leisen und umweltfreundliche Elektroantrieb Damit kann er kosteng nstig betrieben werden Er ist einfach zu montieren und hat eine h henverstellbare sowie einklappbare Lenks ule Sicherh...

Page 2: ...n Sie den Scooter mit dem Ein Aus Schalter ein Stellen Sie sich mit beiden Beiden auf die Plattform Dr cken Sie den Gashebel damit der Scooter sich vorw rts bewegt Um anzuhalten bet tigen Sie den Brem...

Page 3: ...u Lenker Setzen Sie die Griffe 1 mit Hilfe der Rastzungen 2 in den Lenker 4 ein Um die H he des Lenkers anzupassen l sen Sie die H henverstellschraube 14 und schieben Sie den Lenker hoch oder runter D...

Page 4: ...hrleistet wenn sich der Keilriemen 3 noch leicht durchdr cken l t Ziehen Sie nun die Schraubenmutter des Hinterrads 7 wieder fest Funktionstest 1 Drehen Sie das Hinterrad mit der Hand um festzustelle...

Page 5: ...perate it without big physical effort It has a quiet and non polluting electro motor With this you can operate it very reasonable It is easy to assemble and has a height adjustable as well as a retrac...

Page 6: ...r Drive the Electro Scooter Turn on the scooter by using the on off switch Stand yourself with both legs on the platform Press the accelerator to move the scooter forward To stop the scooter use the b...

Page 7: ...Handlebar Insert the grips 1 with the help of the snap in pins 2 into the handlebar 4 To adjust the height of the handlebar loose the height adjuster 14 and pull up or push down the handlebar The dire...

Page 8: ...u can extrude the fan belt 3 slightly Fasten the screw nut of the back wheel 7 firmly Function test 1 Rotate the back wheel by hand to make sure the fan belt runs correctly Function test 2 Turn the sc...

Reviews: