background image

Page 15

For technical questions, please call 1-888-866-5797.

Item 64857 
        

Sa

F

ety

Opera

ti

O

n

Maintenance

in

S

talla

ti

O

n

Oil Maintenance

Check the oil periodically for clarity�  Replace oil if it appears milky or if debris is present,  
or every 6 months, or 100 operation hours, whichever comes first�   
Replace the oil more frequently if compressor is used in harsh environments such as high heat or high humidity�

caUtiOn!  tO preVent inJUry FrOM BUrnS: 
allow air compressor to cool before changing the oil.

1�  Place a container under the Oil Drain Bolt�

2�  Remove the Oil Breather to allow 

air flow into the Pump�

3�  Remove the Oil Drain Bolt, allowing 

the oil to drain into the container�

4�  When the oil is completely drained from the Pump,  

replace the Oil Drain Bolt�

5�  Fill the Pump with new SAE 30W, non-detergent, 

Air Compressor Oil to the FULL level 
on the Oil Sight Glass (5�6 oz�)�

6�  Replace and tighten the Oil Breather�

7�  Discard the old oil according to local, 

state and federal regulations�

Draining Moisture from the tank

The Moisture Drain is located under the Tank�  It must be used daily to release all trapped air and 
moisture from the Tank�  Doing this will eliminate condensation and prevent tank corrosion�

1�  Turn the Power Switch off�

2�  Place a collection pan under the Drain Valve�

3�  Turn the Drain Valve to open it�  Tilt 

Compressor forward to drain�

4�  When all the pressure and moisture are released,  

close the Drain Valve�

air Filter Maintenance

Check the Air Filter weekly to see if it needs replacement�   
Replace the filter more often if compressor is used in dirty environments�

1�  Remove the Cover�

2�  Remove the Air Filter�

3�  Replace with a new Air Filter�

4�  Replace the Cover�


Summary of Contents for 64857

Page 1: ...eference 18j When unpacking make sure that the product is intact and undamaged If any parts are missing or broken please call 1 888 866 5797 as soon as possible Copyright 2018 by Harbor Freight Tools All rights reserved No portion of this manual or any artwork contained herein may be reproduced in any shape or form without the express written consent of Harbor Freight Tools Diagrams within this ma...

Page 2: ...instructions may result in electric shock fire and or serious injury Save all warnings and instructions for future reference The warnings precautions and instructions discussed in this instruction manual cannot cover all possible conditions and situations that may occur It must be understood by the operator that common sense and caution are factors which cannot be built into this product but must ...

Page 3: ...any accidents are caused by a poorly maintained compressor e Use the compressor in accordance with these instructions taking into account the working conditions and the work to be performed Use of the compressor for operations different from those intended could result in a hazardous situation 5 Service a Have your compressor serviced by a qualified repair person using only identical replacement p...

Page 4: ...ct GrOUnDinG Wire cOnnectiOn check with a qualified electrician if you are in doubt as to whether the outlet is properly grounded Do not modify the power cord plug provided with the compressor never remove the grounding prong from the plug Do not use the compressor if the power cord or plug is damaged if damaged have it repaired by a service facility before use if the plug will not fit the outlet ...

Page 5: ... must be properly installed and grounded in accordance with all codes and ordinances 9 Do not use an adapter to connect this compressor to a different outlet Symbology pSi Pounds per square inch of pressure cFM Cubic Feet per Minute flow ScFM Cubic Feet per Minute flow at standard conditions npt National pipe thread tapered npS National pipe thread straight Double Insulated V Volts Alternating Cur...

Page 6: ...e of this product tO preVent SeriOUS inJUry FrOM acciDental OperatiOn turn the power Switch OFF and unplug the air compressor from its electrical outlet before assembling or making any adjustments to the compressor note For additional information regarding the parts listed in the following pages refer to the Assembly Diagram near the end of this manual Functions power Switch air Outlet behind Hand...

Page 7: ...tallatiOn attach Wheels Attach the Wheels to the brackets on the Tank using Bolts 96 Washers 95 Sleeves 97 Spring Washers 98 and Nuts 99 Bolt 96 Wheel bracket on tank Washer 95 nut 99 Sleeve 97 Spring Washer 98 install air Filter Thread the Air Filter onto the side of the Pump Motor Assembly air Filter ...

Page 8: ...verfill the oil so that it is above the center dot Oil Breather Oil Sight Glass OVerFill lOW FUll 3 To add oil a Remove the Oil Breather b Using a funnel to avoid spills pour enough oil into the Pump Crankcase to reach the full level in the Oil Sight Glass c Replace the Oil Breather note SAE 30W non detergent Air Compressor Oil sold separately is recommended for use with this compressor 4 If uncer...

Page 9: ...line shut off valve and a 1 4 NPT air hose to the Quick Coupler all sold separately The air hose must be long enough to reach the work area with enough extra length to allow free movement while working note an in line shutoff ball valve is an important safety device because it controls the air supply even if the air hose is ruptured the shutoff valve should be a ball valve because it can be closed...

Page 10: ... A Air Hose Connects air to tool B Filter Prevents dirt and condensation from damaging tool or workpiece C Regulator Adjusts air pressure to tool D Lubricator optional For air tool lubrication E Coupler and Plug Provides quick connection and release F Leader Hose optional Increases coupler life G Air Cleaner Dryer optional Prevents water vapor from damaging workpiece H Air Adjusting Valve optional...

Page 11: ...or vibration reduction E Main Air Line 3 4 minimum recommended Distributes air to branch lines F Ball Valve To drain moisture from system G Branch Air Line 1 2 minimum recommended Brings air to point of use H Air Hose Connects air to tool I Filter Prevents dirt and condensation from damaging tool or workpiece J Regulator Adjusts air pressure to tool K Lubricator optional For air tool lubrication L...

Page 12: ...d after pressure cut out Look for air bubbles If air bubbles are present at connections tighten connections Do not use the Air Compressor unless all connections are air tight the extra air leaking out will cause the compressor to operate too often increasing wear on the compressor note As long as the Power Switch is ON the operation of the Air Compressor is automatic controlled by an internal pres...

Page 13: ... off before reaching its normal cutoff pressure a Shut off all tools b Turn Power Switch OFF c Unplug Compressor d Wait until the Compressor cools down about 10 minutes e Plug in Compressor f Turn Power Switch ON g Resume operation 2 Possible causes of repeated automatic shut off of the compressor are a Using an extension cord that is too long or narrow b An air leak or open hose causing the compr...

Page 14: ...ipe external surfaces of the compressor with a clean cloth 3 WarninG if the supply cord of this compressor is damaged it must be replaced only by a qualified service technician Maintenance Schedule Following are general guidelines for maintenance checks of the Air Compressor note The environment in which the compressor is used and the frequency of use will affect how often you will need to check t...

Page 15: ...he Oil Drain Bolt 5 Fill the Pump with new SAE 30W non detergent Air Compressor Oil to the FULL level on the Oil Sight Glass 5 6 oz 6 Replace and tighten the Oil Breather 7 Discard the old oil according to local state and federal regulations Draining Moisture from the tank The Moisture Drain is located under the Tank It must be used daily to release all trapped air and moisture from the Tank Doing...

Page 16: ...educe air pressure then check all fittings with a soap solution for air leaks and tighten as needed Do not overtighten Compressor not building enough air pressure 1 Air filter needs cleaning 2 Check Valve needs service 3 Compressor not large enough for job 4 Loose fittings 5 Hose or hose connections too narrow 6 Crankcase oil too thick 7 High altitude reducing air output 1 Check air filter and cle...

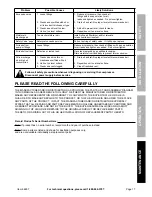
Page 17: ...on 1 Crankcase oil too thin or crankcase overfilled with oil 2 Unit not on level surface 3 Crankcase vent clogged 1 Drain oil and refill to proper level with recommended oil 2 Reposition unit on a level surface 3 Clean Crankcase vent Follow all safety precautions whenever diagnosing or servicing the compressor Disconnect power supply before service pleaSe reaD tHe FOllOWinG careFUlly THE MANUFACTU...

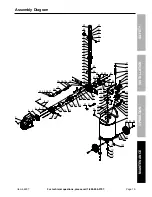
Page 18: ... Cylinder 1 41 Spring Washer 2 42 Bolt M8x30 2 43 Seal 1 44 Valve Plate 2 45 Reed Valve 1 46 Reed Valve 1 47 Seal 1 48 Air Filter 1 49 Bolt M6x50 4 50 Spring Washer 8 51 Washer 4 52 Start Valve 1 part Description Qty 53 Cylinder Cap 1 54 Elbow 1 55 Snap Ring 2 56 Piston Pin 1 57 Rubber Seal 1 58 End Cover 1 59 Oil Breather 1 60 O Ring 1 61 Bolt M6x20 4 62 Oil Glass 1 63 Bolt M5x10 1 64 O Ring 1 65...

Page 19: ... 1 3 4 5 6 7 8 9 10 11 12 13 14 15 16 17 27 28 29 18 20 19 21 22 30 19 31 32 33 34 35 56 55 36 37 38 39 40 41 42 43 44 45 46 47 48 49 50 51 52 53 54 57 58 59 60 50 65 64 63 67 61 62 66 69 70 68 71 72 73 81 80 84 85 86 87 88 89 90 72 91 92 76 77 93 78 94 95 76 77 78 79 96 97 98 99 100 33 101 102 103 20 67 66 82 83 23 74 75 24 25 26 ...

Page 20: ...so the above limitation of exclusion may not apply to you THIS WARRANTY IS EXPRESSLY IN LIEU OF ALL OTHER WARRANTIES EXPRESS OR IMPLIED INCLUDING THE WARRANTIES OF MERCHANTABILITY AND FITNESS To take advantage of this warranty the product or part must be returned to us with transportation charges prepaid Proof of purchase date and an explanation of the complaint must accompany the merchandise If o...

Reviews: