background image

14

Changing the Remote Control’s 

Battery 

Someday, the two AAA battery in the Remote 

Control will need to be replaced. To replace the two 

AAA batteries:
•  Locate the battery door. Looking at the back of 

the remote, the battery door is in the lower part

•  Slide battery door towards the bottom of the 

Remote Control. The battery door will slide 

open 1/4 inch (0.63cm)

•  Lift the door up to reveal the batteries
•  Remove the old batteries
•  Insert two new AAA batteries noting the 

polarity which is printed on the bottom of the 

battery compartment. The spring will connect 

with the negative (-) part of the battery

•  Place the door over the batteries leaving a       

1/4 inch gap

•  Slide the door up towards the top of the remote 

to secure

Specifications 

Disc Media

CD, SACD, DVD (data) 

Fixed Output level

2.0Vrms Unbalanced

4.0Vrms Balanced

Output Impedance

100 ohms Unbalanced and Balanced

Signal to Noise Ratio

Better than 98dB (A-weighted)

Harmonic Distortion

0.02% @ 1000Hz

Frequency Response

±0.5dB from 20Hz-20,000Hz

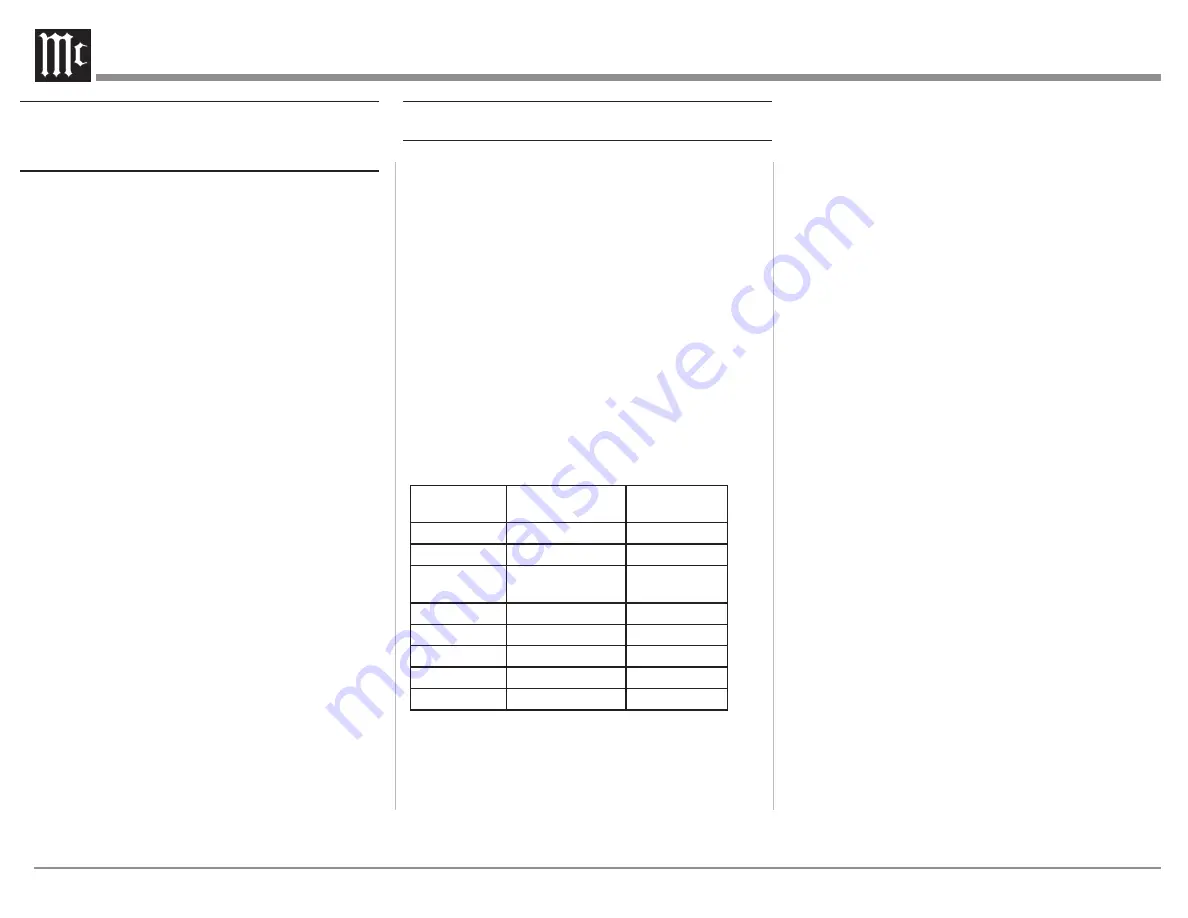
Playable Disc Media Files

Format

Up To Frequency/

Bit

Bit Rate

MP3 (.mp3)

48KHz

up to 320kbps

WMA (.wma)

48KHz

up to 320kbps

AAC (.aac/

mp4)

48KHz

up to 320kbps

WAV (.wav)

192KHz/24 Bit*

uncompressed

FLAC (.flac)

192KHz/24 Bit*

uncompressed

ALAC (.m4a)

96KHz/24 Bit*

uncompressed

AIFF (.aif/aiff) 192KHz/24 Bit*

uncompressed

DSD (.dff/dsf) DSD128 (5.6MHz)

uncompressed

*up to 48KHz with CD-R/+RW

Power Control and Trigger Output

12VDC, 25mA

Power Requirements

Field AC Voltage conversion of the MCD85 is not 

possible. The MCD85 is factory configured for one  

of the following AC Voltages:

100 Volts, 50/60Hz at 35 watts

110 Volts, 50/60Hz at 35 watts

120 Volts, 50/60Hz at 35 watts

220 Volts, 50/60Hz at 35 watts

230 Volts, 50/60Hz at 35 watts

240 Volts, 50/60Hz at 35 watts

Standby, less than 0.5 watt

Note: Refer to the rear panel of the MCD85 for the 

correct voltage.

Overall Dimensions

Width is 12-5/32 inches (31.2 cm)

Height is 7-3/4 inches (19.7cm) including feet

Depth is 16-1/4 inches (41.3cm) including the Front

Panel, Knobs and Cables

Weight

20.5 pounds (9.3Kg) net, 27.5 pounds (12.5Kg) in 

shipping carton

Shipping Carton Dimensions

Width is 20-3/8 inches (51.8cm)

Height is 13-1/4 inches (33.7cm)

Depth is 16-1/4 inches (41.3cm)

Summary of Contents for MCD85

Page 1: ...McIntosh Laboratory Inc 2 Chambers Street Binghamton New York 13903 2699 Phone 607 723 3512 www mcintoshlabs com MCD85 SACD CD Player Owner s Manual...

Page 2: ...eration Information Guide CAUTION Invisible Laser Radiation when open DO NOT stare into the beam or view directly with optical instruments Use of controls or adjustments or performance of procedures o...

Page 3: ...The Right Knob 5 Connections on the Back 6 The Inputs 6 The Outputs 6 Making Connections 6 Balanced XLR Output 6 Unbalanced RCA Phono Output 7 RS232 7 Wired IR Input 7 Power Control Trigger Output 7 C...

Page 4: ...m on each side of the MCD85 so that airflow is not obstructed 18 inches 45 7cm depth behind the front panel 1 7 16 inch 3 7cm in front of the mounting panel for knob clearance Figure 01 MCD85 Dimensio...

Page 5: ...gh the available Inputs Stop turning when a desired Input is reached The Buttons STOP Disc LAYER PLAY PAUSE and OPEN CLOSE are used to operate the CD PLAYER as seen in Figure 03 The Disc LAYER button...

Page 6: ...unbalanced RCA Output One pair balanced XLR audio Output One 1 8 inch Data Output jack OUT One 1 8 inch Power Control trigger Output OUT Making Connections Balanced XLR Output The Balanced Output BAL...

Page 7: ...ues of receiving the Remote Control s commands from two different Inputs The front IR can be turned on off by doing the following Press and Hold the Left Knob for two seconds Turn the Left Knob to the...

Page 8: ...AL 2 BAL R BAL L UNBAL L R DIGITAL INPUTS 8 Connect to AC Outlet IR Sensor Connect a Power Control Trigger cable from Preamplifier to Power Control IN Connect DATA PORT IN to DATA PORT on Preamplifier...

Page 9: ...needed Click Finish when drvier is installed Next connect the Computer to the MCD85 using a USB 2 0 Cable Type A to Type B see Figure 12 Windows should detect the new device if you installed the drive...

Page 10: ...letters to the Right are the unit s serial number This number can also be found on the rear of the unit Auto Off Auto Off can be toggled On default or Off Enter the Setup Menu Select On or Off by rot...

Page 11: ...put you wish to display or hide Rotate the Right Knob to select On or Off Press and release the Left Knob twice to exit the Setup Menu Baud Rate Setup The MCD85 can be controlled remotely via the RS23...

Page 12: ...re MP3 or WMA encoded L PCM indictes WAV encoded Indicates the Repeat Mode selected Repeat All Tracks or Repeat 1 Track Indicates when the TRACK Number is being displayed Indicates the total disc rema...

Page 13: ...or Coax Optical Digital Inputs Press to STOP disc playback SHIFT push button with LED Indicators used to select a push button function with white or gold color nomenclature Use to CLEAR the last prog...

Page 14: ...Playable Disc Media Files Format Up To Frequency Bit Bit Rate MP3 mp3 48KHz up to 320kbps WMA wma 48KHz up to 320kbps AAC aac mp4 48KHz up to 320kbps WAV wav 192KHz 24 Bit uncompressed FLAC flac 192KH...

Page 15: ...34654 Foam Pad Bottom 1 034658 Foam Top Cover 1 034656 Foam Ring 1 034657 Foam Upper Ring 1 034655 Foam Top 1 034662 Sheet Slit Scored Foam Top Cover Foam Pad Bottom Shipping Carton Accessories Sheet...

Page 16: ...The continuous improvement of its products is the policy of McIntosh Laboratory Incorporated who reserve the right to improve design without notice Printed in the U S A McIntosh Part No 24110300...

Reviews: