background image

9

Assembly and maintenance of brushes

Assembly and maintenance of battery

Assembly and maintenance of mop (optional)

On the brushes there is a hexagon shaped hole that fits perfectly with the one in the booth. Push the brush already in the 

cab until you hear the click sound.

1

To remove the brushes, pull them gently from their base in the 

direction indicated by the white arrows in the pattern.

2

Remove battery. Use a crosshead screwdriver to 

unscrew the screws from the battery cover. Follow the 

direction indicated by the white arrows on the 

diagram. Open the cover and remove the battery.

1

Insert a battery. Place the battery in the same way as 

shown in the diagram, then close the lid and tighten 

the screws in the direction indicated by the black arrow 

on the diagram.

2

When the battery is properly installed, you will hear a 

beep sound indicating that the device is ready for use.

3

Follow these steps:

Follow these steps:

A.

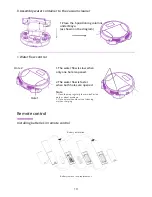
Assembly of mop and water fill

Put the 

brushes 

in the cabins

1.Place the mop 

as shown in the

diagram

2.Open the two 

rubber plugs

3.Fill with 

water

4. Close the rubber 

plugs after filling 

with water

Screw holes

How to insert 

a battery

Summary of Contents for Maya

Page 1: ...User Manual ...

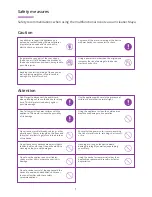
Page 2: ...e Use the appliance with care in the presence of children to avoid their possible fright Don t attempt to clean wet surfaces with the appliance This would increase the possibility of its damage Using the appliance to clean the outside area would cause damage to its operation Do not leave movable threads cables or other objects over 150 mm in length on the floor and those that are likely to get stuc...

Page 3: ...ntenance 8 Assembly and maintenance of waste container 8 Assembly and maintenance of brushes 9 Battery assembly and maintenance 9 Assembly and maintenance of mop optional 9 Remote control 9 Functions available from the remote control 11 Control panel of remote control 11 How to use remote control 11 24 hour programming 12 Error check 12 Technical specifications 15 ...

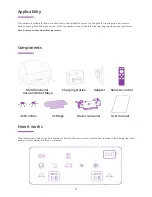
Page 4: ...long carpets and uneven surfaces Note Remove brushes when cleaning carpets 3 Applicability The brushes sweep the dust to a dust container after which the durt is sucked into the dust container After filtering the trash remains in the container and the air is released How it works Components Multifunctional Vacuum Robot Maya Adapter Remote control Charging station 4x Brushes Water container User man...

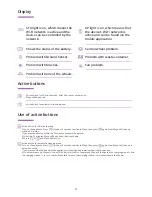
Page 5: ...matic mode Maya will run until the battery is short of power and then will change to auto charging mode to find the charging station If for any reason Maya fails to reach the charging station it will automatically shut down 4 Display Active buttons STA light is on which means the Wi Fi network is active and the device can be controlled by the network Shows the status of the battery Problem with Gro...

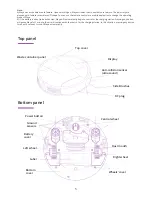
Page 6: ...ya will automatically begin to search for the charging station Pressing any button will pause Maya for 1 minute then it will continue with the search for the charging station In this situation pressing any button for about 3 seconds turns off Maya automatically 5 Top panel Waste container panel Top cover Display Side Brushes Power button Central wheel Dust mouth Wheels cover Bottom cover Label Left...

Page 7: ... be flashing while Maya is charging 2 When fully charged flashing will stop 3 After Maya is charged remove the adapter and turn Maya off Wire Inlet Light indicator Active when the charging station is connected to the electrical network via power adapter 4 Power input 1 Wire inlet 5 Front cover 9 Stand 6 Back cover 8 DC plug 7 Wire assembly 2 Light indicator 3 Electrodes 4 Electrodes ...

Page 8: ...Wire seat DC plug Serves to store the surplus DC plug Front and back cover Connect the adapter to the charging base Note Make sure there is free access to the charging station 2 5 meters in front of it and or 0 5 meters on both sides 1 Open the stand when you place the charging station in a corner of the room Close the stand when you place the charging station tightly against the wall in the room ...

Page 9: ...hours Maya is recommended to be turned on while charging After being fully charged Maya will work for 90 150 minutes depending on the flooring and battery capacity In case the access to the charging station is obstructed 2 5 meters ahead of it and or 0 5 meters on both sides Maya will not be able to find it 8 Assembly and maintenance Place the waste container as shown in the diagram steps 1 to 5 1 T...

Page 10: ... cover Follow the direction indicated by the white arrows on the diagram Open the cover and remove the battery 1 Insert a battery Place the battery in the same way as shown in the diagram then close the lid and tighten the screws in the direction indicated by the black arrow on the diagram 2 When the battery is properly installed you will hear a beep sound indicating that the device is ready for u...

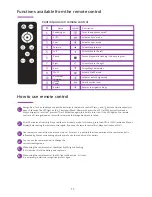
Page 11: ...attery removal and replacement 1 Place the 5 positioning columns under Maya as shown on the diagram 1 The water flow is slow when only one hole is opened 2 The water flow is faster when both holes are opened Note 1 Clean the mop regularly to avoid ineffective work or wheel problems 2 Close holes when Maya is not cleaning or when charging Hole 1 Hole 2 ...

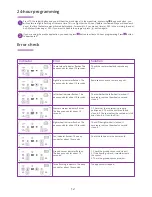
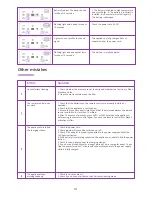
Page 12: ... Maya s display to turn it off press AUTO or 20M button again this time to turn it on If the LED light on the remote control is off recognition was successful otherwise the recognition process failed 1 After 30 minutes of inactivity Maya switches to economy mode In this case press the AUTO or 20M located on Maya s display before using the remote control again If you use the remote control first Maya ...

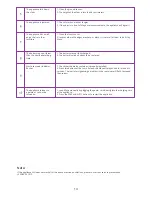
Page 13: ...ounds for about 10 seconds Check the fan next to the dust mouth Ground sensor indicator flashes The beep sounds for about 10 seconds 1 Check the ground sensor and clean it 2 If the flooring is black it would activate the sensor 3 There is a ground sensor problem Three flashing indicators The beep sounds for about 10 seconds The appliance is trapped 12 24 hour programming Error check Indicator Error S...

Page 14: ... work 1 Check that the batteries on the remote control are properly installed or depleted 2 Check that the appliance is switched on 3 Ensure that you have direct visibility and that the distance between the remote control and the unit is less than 10 meters 4 After 30 minutes of inactivity press AUTO or 20M located on the appliance before using the remote control again If you use the remote contro...

Page 15: ...ases where the edges are sharp or black it is normal for them to be hit by Maya The appliance refuses to operate or can not be turned on 1 Load Maya manually by plugging the power cord directly into the charging cord of the appliance 2 Press the 20M and AUTO buttons to restart the appliance Waste container indicator flashes 1 Check that the waste container is properly installed 2 Press two buttons ...

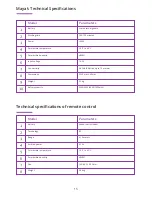
Page 16: ... to 10 meters Dimensions F300 mm X 60 mm Weight 2 1 kg Battery capacity 2200 3000 4000 7000mAH Battery 2xAAA not included Technology RF Range 10 meters Emitted power 0 1W Permissible temperature 10ºС to 45ºС Permissible humidity 85RH Size 142 4 X 36 X 20 mm Weight 0 04 kg 15 Maya s Technical Specifications Model Parameters Technical specifications of remote control Model Parameters ...

Page 17: ...bot multifunction vacuum cleaner along with the accessories meets the following European Community standards 2006 95 EU Low Voltage Directive Directive 2004 108 EC Electromagnetic Compatibility Directive RoHS 2002 95 EC EuP 2009 125 EC Need some help For more product information and issues related to it visit support mclimate eu 00359 800 3 1010 Monday Friday 09 00 18 00 110 Bulgaria Blvd Section ...

Page 18: ...Designed by MClimate in China ...

Reviews: