background image

OM 135

PFS 155C - 315C

21

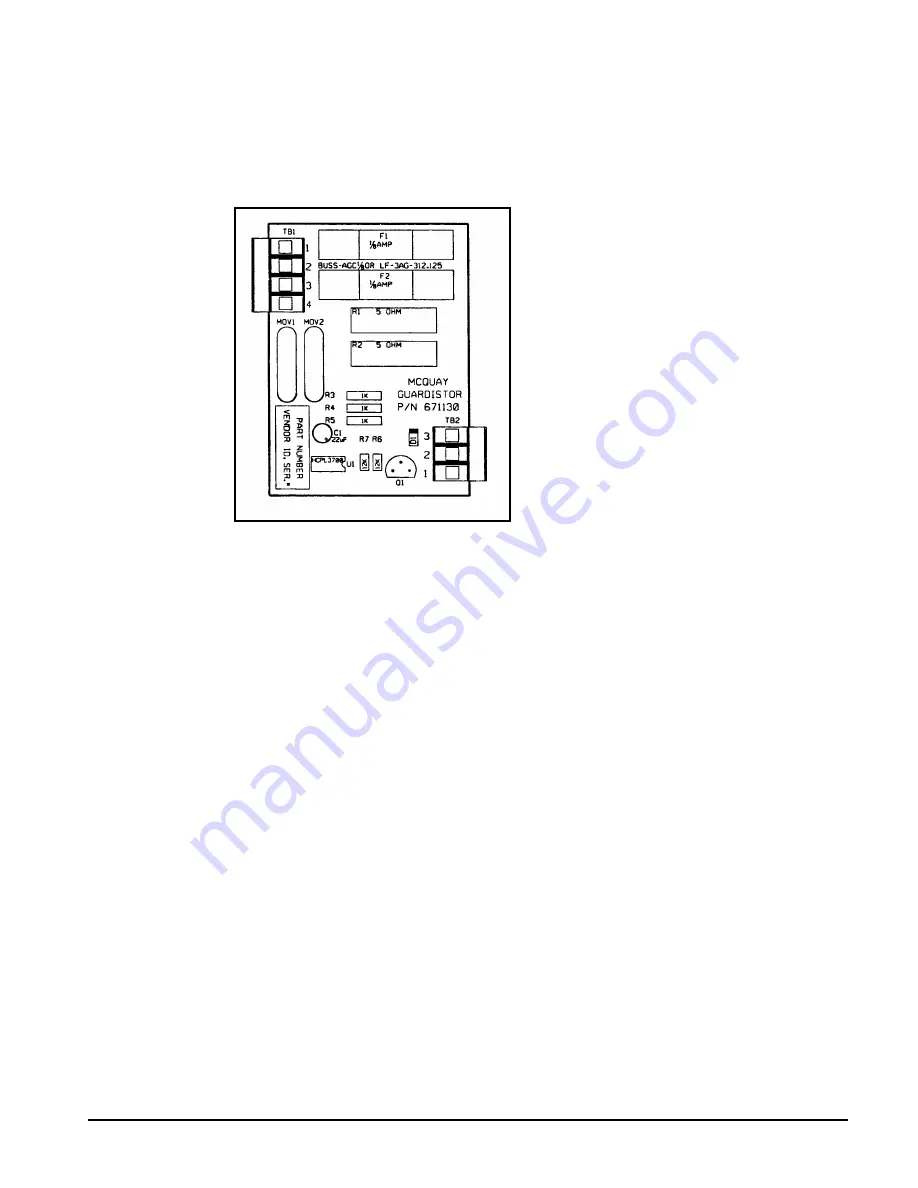
Guardistor Board

The Guardistor board monitors the motor winding temperature through the embedded Guardistor
sensors.  If the motor temperature rises to an unsafe level, the board will signal the M280 controller
and the chiller will be shut down.

Figure 7, Guardistor board

Power Transformers

Transformers T2,T3 and T4 provide operating power to the MicroTech controller and it’s associated
components.  T2 is a conventional ferrite core transformer that converts 120VAC from the control
transformer into 24VAC.  T3 and T4 are transformers that convert 24VAC from T2 into a center-tapped
18VAC.

Keypad / Display

The Keypad/Display is the primary operator interface to the unit.  All operating conditions, system
alarms and setpoints can be monitored from this display and all adjustable setpoints can be modified
from this keyboard if the operator has entered a valid operator password.

Summary of Contents for PFS 155C

Page 1: ...Manual OM 135 Group Chiller Part Number 629956Y Effective November 1997 Supersedes None 1997 McQuay International PFS 155C through 315C Operation and Maintenance Manual 50 and 60 Hertz Refrigerant R...

Page 2: ...11 Electronic Expansion Valve Operation 11 Evaporator 12 Condenser 12 Refrigerant Charging 12 Liquid Presence Sensor 13 High Condenser Pressure Control 13 Mechanical High Pressure Safety Control 13 C...

Page 3: ...ays The compressor heater HTR is energized through the normally closed contacts on the starter Note Before start up the compressor heater must be on for at least 12 hours to insure there is not any li...

Page 4: ...e electronic expansion valves are operated by the MicroTech controller through adaptive control strategies use of different system temperatures and pressures to maintain desired refrigerant control to...

Page 5: ...eady to start unit Place main power and control disconnect switches in on position This will energize compressor heaters Wait at least 12 hours before starting unit Note Evaporator and condenser water...

Page 6: ...n stop position 2 After compressors have shut down and electronic expansion valves have closed turn off chilled water pump 3 Turn off all power to the unit and to the chilled water and condenser water...

Page 7: ...alues in a chiller log daily The values will change as the load condenser temperature and evaporator temperature vary The operator should be able to correlate displayed information to varying load con...

Page 8: ...ar the sightglass If subcooling is normal 10 to 15 F 6 to 13 C at full load and flashing is visible in the sightglass check pressure drop across the filter dryer An element inside the sightglass indic...

Page 9: ...unit screw compressors are equipped with three solenoids to control compressor capacity The solenoids are controlled by MicroTech outputs see unit wiring diagrams The solenoids are energized at vario...

Page 10: ...e Unit condensers are sized to hold the entire refrigerant charge Use method A or B below to pump down the unit A Unit pump down using the compressor 1 Go to MicroTech menu number 16 2 Select Manual P...

Page 11: ...to shut down due to lack of liquid injection The liquid injection solenoid valve only closes when the compressor stops Electronic Expansion Valve The expansion valve is responsible for allowing the pr...

Page 12: ...all units All condensers are equipped with two relief valves and a shutoff valve Either end on the condenser can be easily removed in the field Refrigerant Charging PFS water cooled screw chillers ar...

Page 13: ...iquid Presence Sensor Each compressor is equipped with a liquid sensor to assure that liquid flows to the compressor for cooling and sealing during operation The sensor will shutdown the compressor if...

Page 14: ...hould come on If the output relay does not close perform the following tests 1 Check the voltages between L1 L2 L1 L3 and L2 L3 These voltages should be approximately equal and within 6 of the rated t...

Page 15: ...a single keypad display instead of reading gauges thermometers pots etc The display is a backlit 4 line by 40 character LCD type for easy viewing in all lighting conditions Two levels of security pro...

Page 16: ...Locations Terminal Block Low Voltage Wireway Signal Converter Signal Converter Guardister Board Guardister Board Low Voltage Wireway Transformer T3 Transformer T4 AOX Board EXV Modem Low Voltage Wirew...

Page 17: ...the electronic hardware and software required to monitor and control the unit It receives input from the ADI Board and sends commands to the Output Board to maintain the unit s optimum operating mode...

Page 18: ...ting power by closing CB 1 If the green running LED still does not turn on a hardware failure exists or the control software is corrupted Downloading new control software or replacing the 280 controll...

Page 19: ...al output board Analog Digital Input Board ADI The ADI Board provides low voltage power for the temperature and pressure sensors It also provides optical isolation between the Microprocessor Control B...

Page 20: ...put signal range of 0 10 VDC An additional output on the AOX board provides an analog signal that is proportional to compressor motor current Figure 5 AOX board Signal Converter Board The AC current s...

Page 21: ...perating power to the MicroTech controller and it s associated components T2 is a conventional ferrite core transformer that converts 120VAC from the control transformer into 24VAC T3 and T4 are trans...

Page 22: ...n indicator Keypad Display Operation General Description The MicroTech keypad consists of eighteen pressure sensitive membrane switches used to step through access and manipulate the information in th...

Page 23: ...peratures and pressures at the time the fault occurred Pressing the ALARM key at any time shifts the display to Menu 20 which is the first menu of the ALARM category Switch Key Pressing the SWITCH key...

Page 24: ...e At this point the password must be entered before the user can continue with the action Increment When changing the value of a menu item entry pressing INCR shifts the selected menu item to the next...

Page 25: ...ord access time will expire providing protection against unauthorized users Figure 13 Quick Access Group Display Format The information stored in the MicroTech controller tree structure can be viewed...

Page 26: ...on When the correct value or option is flashing press the enter key to store it into memory Pressing the Enter key a second time or pressing Clear Screens and menus cannot be changed while in the Chan...

Page 27: ...and line 3 field 2 indicates the leaving condenser water temperature Screen 2 Line 1 shows the interstage timer settings Pressing the switch key will toggle between this menu and Menu 13 Timers Item S...

Page 28: ...ps x 1 Starts 2 3 Compr Hours 1 1 Suction Line x F 1 Discharge x F 2 2 2 Suct Suprht x F 1 Dsch Suprht x F 2 Menu 3 Comp 2 Status Press the NEXT MENU key and Menu 3 will be displayed This menu has two...

Page 29: ...overy system multiplied by the water flow rate and a special factor would provide the amount of heat recovered in Btu s Item Screen Line Display Field Range 1 1 Ent Evap xx xo F 1 Ent Cond xx xo F 2 2...

Page 30: ...l be valid only if the chiller is controlling the cooling tower fans Line 2 field 1 indicates the entering condenser water temperature line 3 field 1 indicates the cooling tower by pass valve position...

Page 31: ...anual Off Automatic Manual Enable Service Testing Man Cmpr Load x Stgs 2 2 Comp 1 Mode 1 Comp 1 Stage x stgs 2 3 Comp 2 Mode 1 Comp 2 Stage x stgs 2 Manual Off This mode causes the chiller to stop If...

Page 32: ...nd cannot be changed Active spt indicates the current setpoint factoring in any reset signals that is controlling the chiller and can be used to determine if the chiller is maintaining leaving chilled...

Page 33: ...t are required by ice banks Ice option requires an external 24 Vac input to change the chiller from regular operation to ice operation The local spt should be set to equal the ice temperature plus the...

Page 34: ...nel will control the schedule The slave unit should be programmed the same as the master to have consistent operation should the network communications fail Sun through Fri The start time first value...

Page 35: ...in FloodWaitTmr x se 2 2 1 IntrstgTmr xx sec 1 Start Start This value determines the minimum time between chiller starts The chiller must run the time selected before it will start again If the chille...

Page 36: ...s value is the control band for the fan staging control logic This value must be exceeded to stage up or down Stage 1 On This value determines when the first stage control will start This value plus 1...

Page 37: ...n Pos At The outside air temperature associated with the Min Start Pos Max Pos At The outside air temperature associated with the Max Start Pos Menu 16 Alarm Setpoints Press the NEXT MENU key and Menu...

Page 38: ...38 PFS 155C 315C OM 135 3 LiqL Offset 1 9 9 15 0psi...

Page 39: ...tput 14 Off 1 Off On Output 17 Off 2 Off On 4 1 Output 18 Off 1 Off On Output 21 Off 2 Off On 2 Output 19 Off 1 Off On Output 22 Off 2 Off On 3 Output 20 Off 1 Off On Output 23 Off 2 Off On 5 1 DI 0 7...

Page 40: ...r port A This is critical if there is a network Port A baud rate must be set to 9600 on the master unit Full Load Amp This value must match the compressor label value indicating the RLAs of the chille...

Page 41: ...xpsi 1 Discharge xxx x o F 2 3 Evap Aprch xxx x o F 1 Dsch Suprht xxx x o F 2 3 1 Suct Suprhtxxx x o F 1 Evap Flow 0gpm 2 2 Subcool xxx x o F 1 Cond Flow xxxxgpm 2 3 EXV Position 0 1 Motor Current x...

Page 42: ...The information displayed can provide trouble shooting information Item Screen Line Display Field Range 1 1 Alarm Buffer 1 1 2 Alarm Buffer 2 1 3 Alarm Buffer 3 1 2 1 Alarm Buffer 4 1 2 Alarm Buffer 5...

Page 43: ...otor electrical trouble 12 See 6 7 8 above 13 Loose wiring 13 Check circuits for voltage at required points Tighten all power wiring terminals Compressor Noisy or Vibrating 1 Compressor internal probl...

Page 44: ...aks Repair and add charge 13 Low suction pressure 13 See corrective Steps for low suction pressure 14 Low ambient condition 14 Check cooling tower control operation 15 Compressor operating unloaded 15...

Page 45: ...X Reset leaving chilled water control to design Observe water temp And record amps X E Internal compressor check X II CONTROLS A Operating controls Check water temp Setpoints against operating temps X...

Page 46: ...e contactors hardware and operation X B Verify overload setting and trip X C Test electrical connections X D Pump down controls verify operation X VIII OPTIONAL CONTROLS A Hot gas bypass controls veri...

Page 47: ...OM 135 PFS 155C 315C 47 Notes...

Page 48: ...48 PFS 155C 315C OM 135 Notes...

Page 49: ...OM 135 PFS 155C 315C 49 Notes...

Page 50: ...Post Office Box 2510 Staunton Virginia 24402 2510 USA 540 248 0711...

Reviews: