McQuay IM 777-7
33
Service and Maintenance
Removing the Fan Section
For plenum fan assemblies, the entire fan cabinet may need to
be removed to replace the entire fan assembly depending on
the length of the fan section. In some cases, the fan section is
not long enough for the assembly to fit out the side of the
cabinet. For those cases where it will fit, follow the above
steps except the neoprene seal is a D-gasket on the inlet side
that needs to be removed for plenum fans. Otherwise, the
entire fan cabinet must be removed from the other sections and
then the fan assembly can be removed out the discharge side of
the cabinet.
Removing and Replacing the Coil
Removing Single Coils
Note:
Single coils are bolted to the unit on the connection end.
The connection end is held in place with a clamp.
1
Disconnect all piping and remove the brass plugs for the
vents and drains located in the connections.
2
Remove all screws and remove the access panel.
3
Remove the screws holding the coil in place.
4
Lift and pull the coil out the side.
Installing Single Coils
1
Slide the coil through the opening in the coil section onto
the bottom coil rests.
2
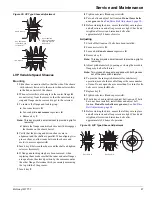
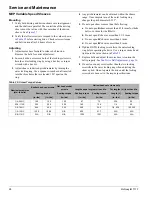
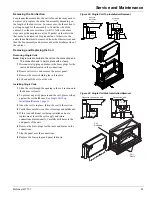
To prevent any air bypass around the coil, place coils up
against the coil bulkheads. See
Single Coil Top
Installation/Removal‚ page 33
.
3
Once the coil is in place, fasten the coil to the section.
4
Caulk the seams between the coil casings and bulkheads
.
5
If this is an additional coil being installed and not a
replacement, locate the coil supply and return
connections dimensionally. Carefully drill holes in the
end panels of the unit.
6
Remove the brass plugs for the vents and drains on the
connections.
7
Slip the panel over the connections.
8
Replace the brass plugs and panel fasteners.
Figure 42: Single Coil Top Installation/Removal
Figure 43: Single Coil Side Installation/Removal
Coil
Connection
end
Coil
Opposite
connection
end
Coil
Connection end
Coil
Opposite connection end
Coil
Bulkhead
Coil
Rests

