RITC-15B
TEMPERATURE CONTROLLER
OPERATOR'S MANUAL
BASIC OPERATIONS
1.
Turn power Switch on.
2.
The normal operating modes are Ramp Start and Closed loop which are
automatically selected on power up. Select Manual mode if needed, once selected
the controller will power up in Manual mode until Ramp Start or Closed loop is
selected.
3.
Select setpoint temperature (or % power in manual mode) by using the up / down
keys.
4.
After making any changes to modes or the setpoint wait for ‘str’ to appear on the
display. This indicates that the changes have been put into the non-volatile
memory. The module will now remember these settings each time it is powered up.
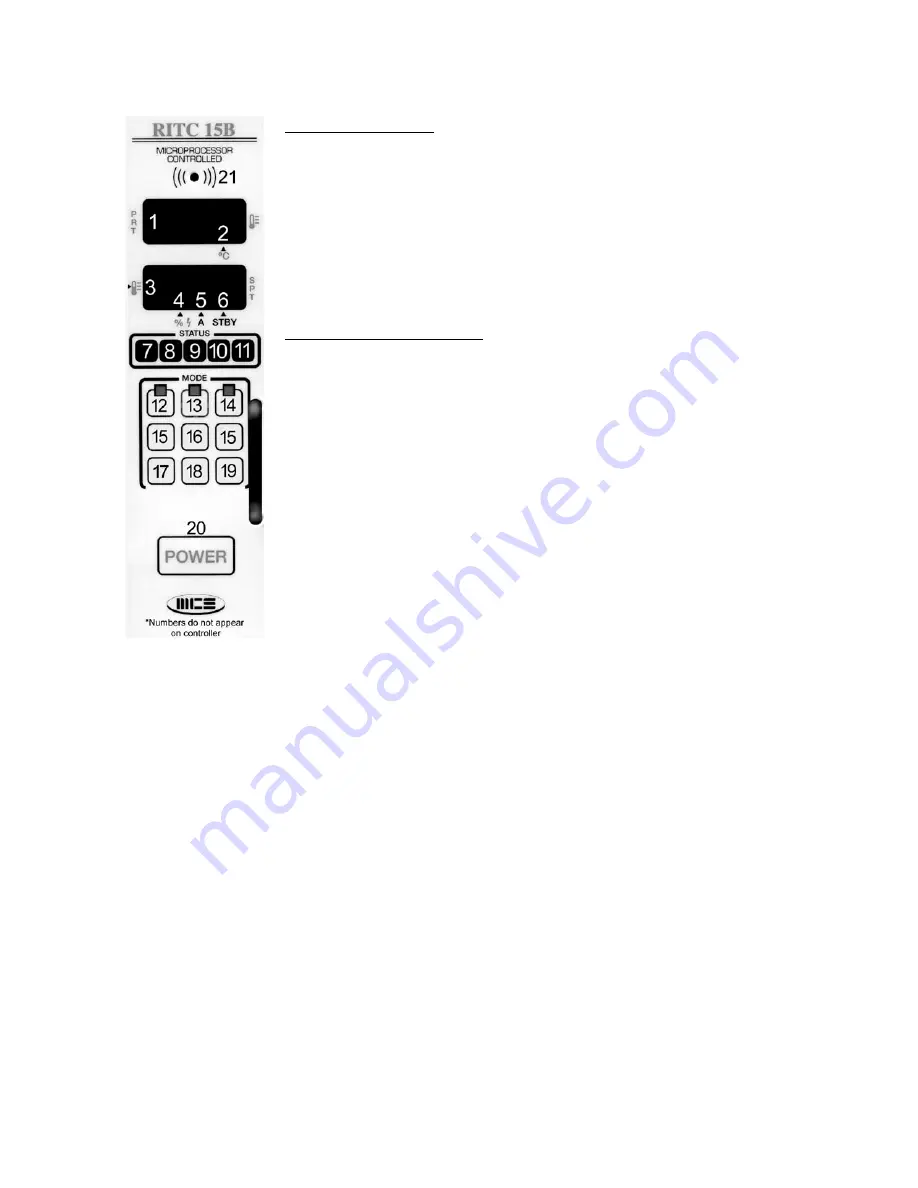
CONTROLS AND DISPLAYS
1.Upper digital display
- Displays:
•
Process temperature
•
Error Conditions
•
Parameter number (Programming mode)
2.Decimal point
- Indicating unit is displaying temperature in
°
C
3.Lower digital display
- Displays:
•
Setpoint
•
Percent power applied to heater (Manual mode)
•
Parameter values (Programming mode)
•
Current (Amps mode)
4.Decimal point
- Indicates that the display is showing percent power (Manual mode)
5.Decimal point
- Indicates that the display is showing the output current (Amps mode)
6.Decimal point
- Indicates that the unit is in standby
7.Under temperature indicator
- Flashes when process temperature is below under
temperature alarm limit. The under temperature alarm limit is adjustable from -5 to -
30F via parameter # 6.
8.Open thermocouple indicator
- Flashes when the unit detects an open thermocouple
9.Power to heater indicator
- This is illuminated any time power is applied to the heater
10.Reverse thermocouple indicator
- Flashes when the unit detects a reversed thermocouple
*Note: A shorted thermocouple is indicated when the open(8) and reversed(10) LEDS are flashing alternately
11.Over temperature indicator
- Flashes when process temperature is above over temperature alarm limit.The
over temperature alarm limit is adjustable from +5 to +30 F via parameter # 7.
12.Ramp Start key
- Press to enter Ramp Start mode. LED lights to indicate that the unit is in Ramp Start mode.
When the controller detects that the heater temperature is below 212
°
F or 100
°
C, it automatically initializes
Ramp Start mode at cold start up. The unit will enter Automatic mode after Ramp Start expires. This time period
is adjustable via parameter #5 (0 to 20 min).
13. Open loop key -
Press to enter Manual mode. LED lights when the unit is in Manual mode.
14. Closed loop key -
Press to enter Automatic mode. LED lights when unit is in Automatic mode.
15. Up / Down keys -
Used to change the following:
•
Setpoint (Automatic mode / Ramp Start mode)
•
Percentage of power applied to the heater (Manual mode)
•
To change the values in the parameters mode.
16. Standby key -
Used to place the unit in and out of standby
17. Parameter key -
Used to select parameters
18. Amps key -
Used to select the current measurement feature
19. 100% power key -
Pressing this key will output 100% power in manual mode. In auto mode it will output
100% unit temperature reaches the upper alarm setting.
20. Power switch -
Controls power to the module.
MUST BE SET TO OFF BEFORE INSERING OR REMOVING MODULE.
21. Audible alarm -
Use parameter #2 to turn on or off


