background image

Dynascan Manual (RT3005G) v_0611


Page 68 


© Copyright Measurement Devices Limited 

Copying of the materials in this document is prohibited 


Issue 1 


13.2.10


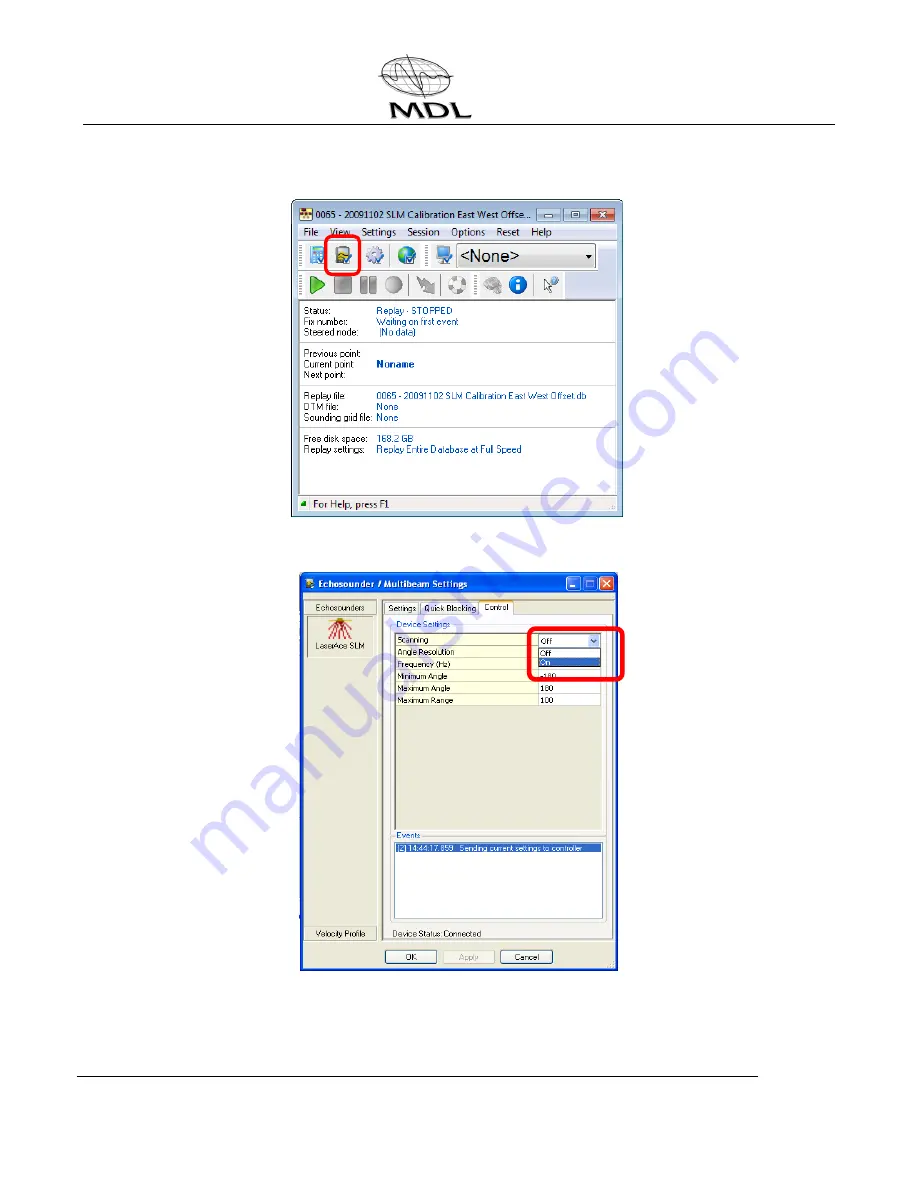
SLM Settings 


Laser control ON / OFF Frequency Selection


Summary of Contents for Dynascan

Page 1: ...to or r s s M Ma an nu ua al l D Dy yn na as sc ca an n L LA AN ND D V VE EH HI IC CL LE E A AN ND D M MA AR RI IN NE E V VE ES SS SE EL L L Li iD DA AR R MEASUREMENT DEVICES US LLC 17555 GROESCHKE R...

Page 2: ...M Laser Module with Red Dot Pointer Option 10 6 System Components 11 6 1 Dynascan pod 11 6 2 Laptop computer 11 6 3 Interface Adapter IA 12 6 4 Interconnecting cables 13 6 4 1 Optional cables 14 7 Ins...

Page 3: ...1 Calibrating Pitch Roll and Heading 46 13 2 QINSy General Guide 51 13 2 1 Manage Projects 52 13 2 2 Database Setup 53 13 2 3 Online Settings 56 13 2 4 Replay function 57 13 2 5 Dynascan Displays 60...

Page 4: ...ly Asked Questions 76 17 Appendix 1 Odometer Option 77 17 1 Pulses per metre 77 17 1 1 Example Pegasem Odometer 77 17 1 2 Example Corrsys Datron Odometer 78 18 Appendix 2 Camera Option 79 18 1 Nikon D...

Page 5: ...0611 Issue 1 Copyright Measurement Devices Limited Copying of the materials in this document is prohibited Page 5 1 Dynascan MANUAL 1 1 Manual Revision History DATE INITIALS ISSUE Comments 20 Mar 2011...

Page 6: ...and each system is factory calibrated for pitch and roll If you are using a Dynascan system which uses GNSS heading you will have to calibrate the heading if you move the system from one platform to a...

Page 7: ...n message DONGLE Security device for computers FOG Fibre Optic Gyro GLONASS Russian GNSS system GNSS Global Navigation Satellite System Covers GPS GLONASS and future GALILEO IA Interface Adapter Used...

Page 8: ...Range resolution 1cm 0 4 Scanner field of view 360 Scanner angle resolution 0 01 Scanner rate 10 Hz 600 rpm Measurement rate 36 000 points per second Inertial Sensor Velocity Accuracy 0 05km h RMS Ac...

Page 9: ...d Page 9 OMNISTAR HP SBAS 0 1 metre RT 2 1cm 1ppm Environmental Operating temperature 20 to 60 C 14 F to 140 F Storage temperature 20 C to 70 C 14 F to 158 F Water and dust resistant to IP 67 Power an...

Page 10: ...ained persons should be assigned to operate the SLM with red dot laser pointer When not in use the laser should be stored in a location where unauthorized personnel cannot gain access We recommend tha...

Page 11: ...ctions The radio module is either fitted separately from the GNSS receiver or inside the GNSS receiver as an option An external GNSS antenna secondary antenna is fitted forward of the pod which connec...

Page 12: ...C voltage to the pod components as well as acting as the interface for the system cables The IA is fitted with an ON OFF switch which powers the pod and is reverse polarity protected When the IA is s...

Page 13: ...Ethernet cable CBL 8305A 10009 The first part of the cable number is the type number and the second part is the serial number You should ensure the serial number of the set of cables in use is the sam...

Page 14: ...he materials in this document is prohibited Issue 1 6 4 1 Optional cables Some systems are integrated with external equipment such as Odometers or echo sounders These systems have cables which connect...

Page 15: ...it will affect the calibration of the pitch and roll values When the system is vehicle mounted a roof rack and ladder can be used to provide a reasonably rigid cost effective platform on which to moun...

Page 16: ...nt to line up the pod and secondary GNSS antenna along the centreline of the vehicle see photo below Try to fabricate brackets fixing holes for the pod and secondary antenna so that the system can be...

Page 17: ...or hot surfaces An interconnection diagram is shown below N B 1 Ensure the IA power switch is turned off before connecting any of the cables 2 There are two different cables which fit the same RTK co...

Page 18: ...n though it is not terminated at the other end 7 3 2 RTK radio built into GNSS receiver When using a GNSS receiver with combined RTK radio module you do not need to use the RTK cable at all The intern...

Page 19: ...ith the alerts shown in the bottom left of the screen Check the computer clock is set to local time 7 5 System initialisation In order to enable a useable output from the motion sensor it is necessary...

Page 20: ...opying of the materials in this document is prohibited Issue 1 You should now only have one red alert in the Alert Display which is the Laser alert SLM Click on settings and select echo sounder settin...

Page 21: ...need to calibrate the heading once and if you re use the same fixing holes in future you will not need to re calibrate N B You can check power is being supplied to the pod by Checking the red dot poin...

Page 22: ...Issue 1 Ensure the IA is switched on before typing ping 128 2 0 201 and then enter using the IP address of the Dynascan unit which is on a label underneath the unit and also shown on the QINSy setup...

Page 23: ...l RT3005G v_0611 Issue 1 Copyright Measurement Devices Limited Copying of the materials in this document is prohibited Page 23 If communication with the laser fails you will see a screen similar to th...

Page 24: ...TK Radio programming or if using VRS set up the VRS mobile equipment to give CMR output at 38400 baud 8 N 1 4 If using your own RTK mobile radio receiver you must use the VRS cable and connect the 9 p...

Page 25: ...not calibrate pitch and roll as these are factory set and will not change 8 1 Restoring Dynascan factory settings The following information provides a means of re setting the system back to the MDL fa...

Page 26: ...surement Devices Limited Copying of the materials in this document is prohibited Issue 1 Ensure the Restore project data from backup box is ticked and click next The file name should show the QINSy fa...

Page 27: ...nascan Manual RT3005G v_0611 Issue 1 Copyright Measurement Devices Limited Copying of the materials in this document is prohibited Page 27 The Project Folder boxes should all be ticked then select nex...

Page 28: ..._0611 Page 28 Copyright Measurement Devices Limited Copying of the materials in this document is prohibited Issue 1 Click the start button to begin the re store operation Click the Finish button to co...

Page 29: ...w MDL Houston and they will talk you through the process If your laptop is not already loaded with Teamviewer software you will need to do this before contacting Houston 9 2 Laptop Recovery If a major...

Page 30: ...d and is also entered on the setup page of QINSy A typical example of the IP address used by MDL for the laser is 128 2 0 201 The laptop is also setup to use a fixed IP address which can be checked by...

Page 31: ...RTK radio signals The laptop is loaded with Pacific Crest PDL or ADL software which can be opened by clicking on the desktop icon Before using the software you should connect the RTK cable from the I...

Page 32: ...e window to view Select Serial Port and Set Capture Method see below 10 2 1 Select Serial Port Click on select serial port to set up the port you will use for programming the radio If you are not sure...

Page 33: ...If this method fails you can select the power on capture method which means you will have to power up the system then disconnect the RTK cable before clicking on the Load button You will then have 10...

Page 34: ..._0611 Page 34 Copyright Measurement Devices Limited Copying of the materials in this document is prohibited Issue 1 Confirm that the Radio Frequency Link Rate and Modulation Type are compatible with y...

Page 35: ...s document is prohibited Page 35 Confirm that the radio serial output is set to 38400 8 N 1 to match the internal GPS receiver and that the RTK message protocol matches the RTK GPS Base Station Once y...

Page 36: ...can INS sensor is set up in the factory and the only screens the user should change are the GNSS secondary antenna offsets RTK baud rate and odometer sensor information if this option is purchased 11...

Page 37: ...ight Measurement Devices Limited Copying of the materials in this document is prohibited Page 37 WARNING Selecting Use Default Settings will return the RT3000 to its original factory settings and all...

Page 38: ...Dynascan Manual RT3005G v_0611 Page 38 Copyright Measurement Devices Limited Copying of the materials in this document is prohibited Issue 1...

Page 39: ...ght Measurement Devices Limited Copying of the materials in this document is prohibited Page 39 You can change the settings on the screen below The screen below shows the options you can change the di...

Page 40: ...5G v_0611 Page 40 Copyright Measurement Devices Limited Copying of the materials in this document is prohibited Issue 1 You will see the CMR message and baud rate for the RTK or VRS input You can chan...

Page 41: ...Dynascan Manual RT3005G v_0611 Issue 1 Copyright Measurement Devices Limited Copying of the materials in this document is prohibited Page 41 Further options are shown at the bottom of this page...

Page 42: ...Dynascan Manual RT3005G v_0611 Page 42 Copyright Measurement Devices Limited Copying of the materials in this document is prohibited Issue 1...

Page 43: ...Issue 1 Copyright Measurement Devices Limited Copying of the materials in this document is prohibited Page 43 Below shows you can save the settings in the folder of your choice You can then recover t...

Page 44: ...20 0 15887 IMU to SLM 0 02535 0 3530 0 05060 Production Single Head Novatel IMU to GPS 0 03085 0 09545 0 18187 IMU to SLM 0 03085 0 45135 0 05160 Production Twin Head Novatel IMU to GPS 0 03085 0 0954...

Page 45: ...GPS 0 00 0 125 0 186 IMU to Port Laser 0 153 0 536 0 112 IMU to Starboard Laser 0 153 0 536 0 112 Add 19mm if the white spacer is fitted under the GPS Antenna The version below was introduced in Marc...

Page 46: ...ibrate roll and the vertical pole for pitch and heading 2 Record four separate QINSy files by driving slowly 2 3 KPH past the pole in each direction approx 10 20 metres away and on opposite sides of t...

Page 47: ...and select Unique Colour Per QPD then click the user defined line and draw a line in the direction of vehicle travel on the Plan View screen as per 6 above 8 Click the View Validate icon and use the c...

Page 48: ...t area where the two files were recorded 10 Click the Calibrate Alignment icon to bring up the roll pitch heading value box then select Roll and click Auto 11 Start with the coarse setting and click S...

Page 49: ...ect the files 14 Replay all four files before starting on the pitch calibration see Section 13 2 4 Replay function 15 When calibrating pitch choose two files on the same side of the pole but in differ...

Page 50: ...and after entering the value click on roll and then back to pitch for the change to take effect 20 When you are happy with the value click transfer and then select the template plus all files and use...

Page 51: ...mages are parallel Use small values to start e g 1 and after entering the value click on roll and then back to Heading for the change to take effect 27 Repeat steps 19 and 20 and then open QLOUD 28 Us...

Page 52: ...Dynascan Manual RT3005G v_0611 Page 52 Copyright Measurement Devices Limited Copying of the materials in this document is prohibited Issue 1 13 2 1 Manage Projects Figure 3 Add New Project...

Page 53: ...Dynascan Manual RT3005G v_0611 Issue 1 Copyright Measurement Devices Limited Copying of the materials in this document is prohibited Page 53 13 2 2 Database Setup...

Page 54: ...Dynascan Manual RT3005G v_0611 Page 54 Copyright Measurement Devices Limited Copying of the materials in this document is prohibited Issue 1 Copy Database Settings Figure 8 New Database...

Page 55: ...Dynascan Manual RT3005G v_0611 Issue 1 Copyright Measurement Devices Limited Copying of the materials in this document is prohibited Page 55 New Database Set Active Template...

Page 56: ...Dynascan Manual RT3005G v_0611 Page 56 Copyright Measurement Devices Limited Copying of the materials in this document is prohibited Issue 1 13 2 3 Online Settings...

Page 57: ...prohibited Page 57 13 2 4 Replay function The replay function can be used to replay data after changes have been made without losing the original raw data From the QINSy console click on the replay b...

Page 58: ...ted Copying of the materials in this document is prohibited Issue 1 You will then see a screen similar to the one below Click on the session set up icon to get to the next screen Select sounding grid...

Page 59: ...Copyright Measurement Devices Limited Copying of the materials in this document is prohibited Page 59 Select the options required for replaying the data and then click OK Click on the play button whic...

Page 60: ...2 5 Dynascan Displays Dynascan Status Window Displays INS and RTK Solution Status Alerts Window Storage can be Controlled by Alerts SLM Data Raw and Filtered SLM Data Online Controller Computation Ses...

Page 61: ...RT3005G v_0611 Issue 1 Copyright Measurement Devices Limited Copying of the materials in this document is prohibited Page 61 13 2 6 Computation Setup N B Enter Approximate Location to ensure footprin...

Page 62: ...Dynascan Manual RT3005G v_0611 Page 62 Copyright Measurement Devices Limited Copying of the materials in this document is prohibited Issue 1 13 2 7 Session Setup Sounding grid Sounding grid Storage...

Page 63: ...Dynascan Manual RT3005G v_0611 Issue 1 Copyright Measurement Devices Limited Copying of the materials in this document is prohibited Page 63 Create New Sounding Grid...

Page 64: ...scan Manual RT3005G v_0611 Page 64 Copyright Measurement Devices Limited Copying of the materials in this document is prohibited Issue 1 Add a New Layer to the Sounding Grid Add Intensity to Sounding...

Page 65: ...Dynascan Manual RT3005G v_0611 Issue 1 Copyright Measurement Devices Limited Copying of the materials in this document is prohibited Page 65 Select the Correct Layer...

Page 66: ...t Measurement Devices Limited Copying of the materials in this document is prohibited Issue 1 13 2 8 Session Setup DTM Storage Select Point Storage QINSy Processing File Select Point Storage ASCII Eas...

Page 67: ...Dynascan Manual RT3005G v_0611 Issue 1 Copyright Measurement Devices Limited Copying of the materials in this document is prohibited Page 67 13 2 9 Session Setup Control...

Page 68: ...ynascan Manual RT3005G v_0611 Page 68 Copyright Measurement Devices Limited Copying of the materials in this document is prohibited Issue 1 13 2 10 SLM Settings Laser control ON OFF Frequency Selectio...

Page 69: ...Dynascan Manual RT3005G v_0611 Issue 1 Copyright Measurement Devices Limited Copying of the materials in this document is prohibited Page 69 Laser Filter Settings...

Page 70: ...Manual RT3005G v_0611 Page 70 Copyright Measurement Devices Limited Copying of the materials in this document is prohibited Issue 1 Sounding Grid Properties for Navigation Display Click Auto for Best...

Page 71: ...Dynascan Manual RT3005G v_0611 Issue 1 Copyright Measurement Devices Limited Copying of the materials in this document is prohibited Page 71 13 2 11 Data Export settings...

Page 72: ...Dynascan Manual RT3005G v_0611 Page 72 Copyright Measurement Devices Limited Copying of the materials in this document is prohibited Issue 1...

Page 73: ...Dynascan Manual RT3005G v_0611 Issue 1 Copyright Measurement Devices Limited Copying of the materials in this document is prohibited Page 73...

Page 74: ...power infrared light source Avoid mechanical shock Do not use paint solvents to clean the instrument use mild detergent applied using a cloth Clean and dry the equipment before during and after use 1...

Page 75: ...on the system external cable connectors for RTK VRS and the power functions are available below 15 1 RTK Cable 8303A 15 2 VRS Cable 8304A 15 3 Power Cable 8302A Cigarette lighter plug D Type Socket Fe...

Page 76: ...he frequency band of the pod radio e g 430 470MHz The base radio and pod radio are set to the same bandwidth and same radio link baud rate e g 25KHz and 9600 baud Check the RTK base station GPS receiv...

Page 77: ...set up page should be selected see below and the cable connected between the pod and odometer 17 1 Pulses per metre The pulses per metre information can be worked out as below if you know the pulses p...

Page 78: ...ce 79 x which is 2 48 metres for each revolution Therefore the pulses metre 1024 2 48 which is 413 17 1 2 Example Corrsys Datron Odometer Pulses revolution 1000 Wheel diameter 79cm Therefore the wheel...

Page 79: ...process of setting up the cameras as you can design the bracket to mount the cameras in exactly the same position each time they are fitted Suction caps are provided which can be used to mount the ca...

Page 80: ...ocument is prohibited Issue 1 The picture below shows the camera mounted close to the Dynascan pod and perpendicular to the Z and Y axes The picture below shows the USB cable connected between the cam...

Page 81: ...ight Measurement Devices Limited Copying of the materials in this document is prohibited Page 81 18 2 MDL integrated pod cameras MDL are undergoing trials of an internal camera system mounted inside t...

Page 82: ...ied below 19 1 Teledyne ODOM ES3 The ES3 requires a cable from the Dynascan pod to the RTA unit in order to provide time tagged data to QINSy This cable connects to the same connector as the Odometer...

Page 83: ...Copying of the materials in this document is prohibited Page 83 19 1 1 ES3 and Velocimeter transducer mounting The ES3 transducer and velocimeter transducer are fitted to the pole as per the photogra...

Page 84: ...Dynascan Manual RT3005G v_0611 Page 84 Copyright Measurement Devices Limited Copying of the materials in this document is prohibited Issue 1...

Page 85: ...Dynascan Manual RT3005G v_0611 Issue 1 Copyright Measurement Devices Limited Copying of the materials in this document is prohibited Page 85 E EN ND D O OF F D DO OC CU UM ME EN NT T...

Reviews: