background image

Chapter 1  General Information 

MX-2100/2104

 Installation and Operation Manual 

1-46 Application Considerations


When operating channels in the DTE2 clock mode, one of the data channels can 
be selected as the external timing reference source for the entire system timing. 
The external timing option is always used because it ensures the main link transmit 
and receive data rates are locked to the corresponding channel rates. If the main 
link data rates are not locked to the corresponding channel rates, bit integrity will 
be lost. MX-2100 units integrated in a large network that includes a master timing 
reference ensures locked timing without the use of external timing. The master 
timing source is used by all the equipment in the network. This includes data 

equipment connected to the MX-2100 channels and the transmission equipment 
serving the main link. Do not use the DTE2 clock mode when the main link timing 
is derived from the internal oscillator of MX-2100. 
If you are using a MX-2100 equipped with KML.5, KML.6, KML.7, KML.8, 
KML.10, or KML.F modules and you cannot attain the conditions for master timing 
as described above, do not use DTE2 clock mode. 

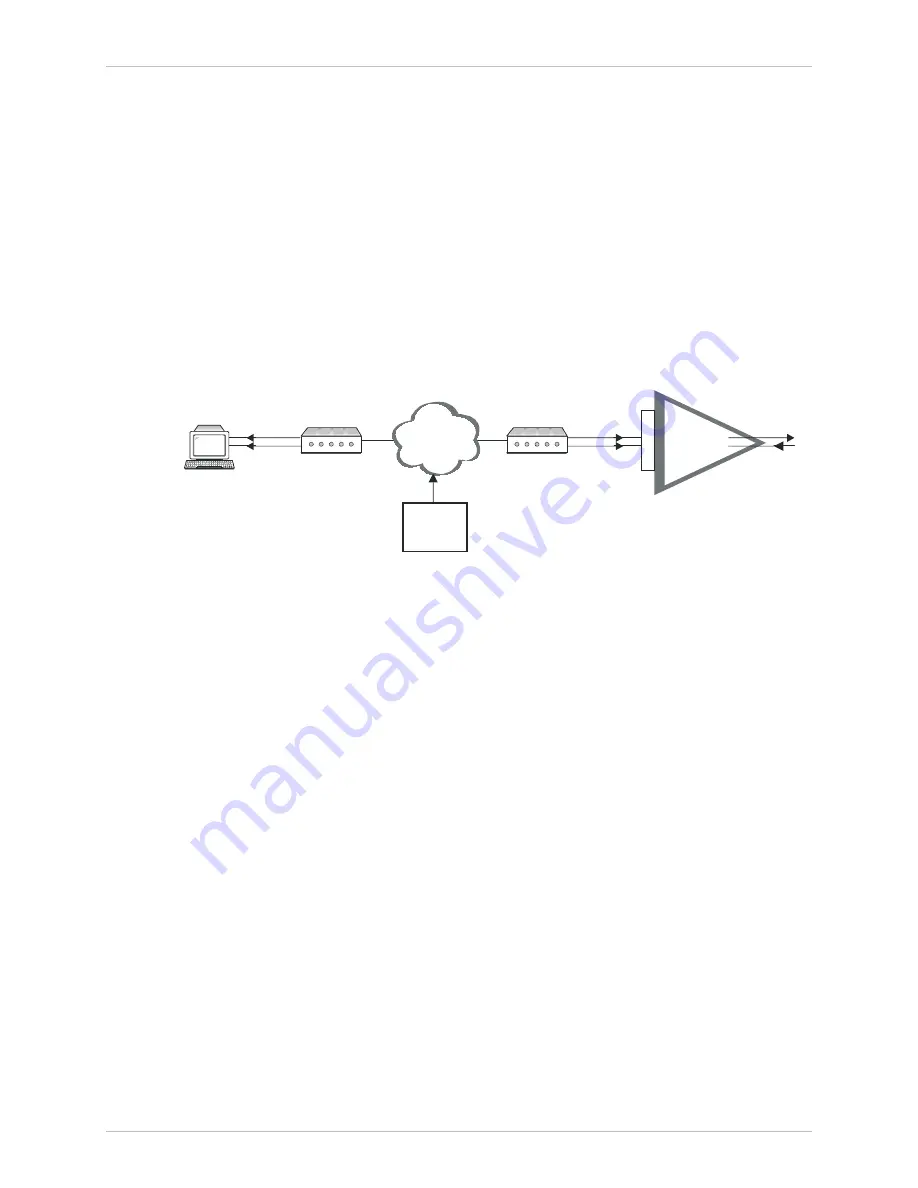
MX-2100

External Timing

Digital

Data

 Network

Master

Clock

KH
S

.1

DTE

XMIT Clock

XMIT Clock

RCV Clock

RCV Clock

Modem

Modem

Mode DTE 2


Figure 1-36. Clock Mode 3 (DTE2) 

Timing Modes of ISDN Channels 

ISDN basic rate access channels are available on the KHS.U and KVF.4/S0 
modules. These channels provide the interface between the MX-2100 system and 
the ISDN network. 

Timing of Channels with "U" Interface 

The transmit timing of a channel with "U" interface, such as a KHS.U module, is 
locked to the nodal timing of MX-2100. The system nodal timing depends on the 
selected operating mode of the channel: 

• 

NT Mode.

 In the NT mode, the ISDN "U" interfaces are usually connected to 

an ISDN switch, whose timing is generally provided by an accurate and stable 
source. 
One of the "U" interface ports connected to the network termination (NT) unit 

must be selected as an external clock source for MX-2100. Thus the MX-2100 
nodal clock, and therefore the transmit timing of the "U" interface, are locked 
to the timing of the NT unit. 

• 

LT Mode.

 MX-2100 provides the transmit clock for the "U" interface. The 

receive timing is recovered from the signal received from the user's terminal 
equipment. 

Summary of Contents for MX-2100

Page 1: ...s made either by MICROWAVE DATA SYSTEMS INC or its agents MICROWAVE DATA SYSTEMS INC reserves the right to revise this publication and make changes without obligation to notify any person of such revisions or changes For further information contact MICROWAVE DATA SYSTEMS INC at the address below or contact your local distributor MICROWAVE DATA SYSTEMS INC 175 SCIENCE PARKWAY ROCHESTER NY 14620 426...

Page 2: ......

Page 3: ...MDS all costs of handling transportation and repairs at the then prevailing repair rates D All the above warranties are contingent upon proper use of the Product These warranties will not apply i if adjustment repair or parts replacement is required because of accident unusual physical electrical or electromagnetic stress neglect misuse failure of electric power environmental controls transportati...

Page 4: ...h the limits of the Class A digital device pursuant to Part 15 of the FCC rules These limits are designed to provide reasonable protection against harmful interference when the equipment is operated in a commercial environment This equipment generates uses and can radiate radio frequency energy and if not installed and used in accordance with the instruction manual may cause harmful interference t...

Page 5: ...d typical applications of the MX 2100 2104 family describes the various equipment versions and lists the technical characteristics of the MX 2100 2104 systems Chapter 2 Installation provides detailed installation and operation instructions for MX 2100 2104 systems Chapter 3 Configuring MX 2100 provides general instructions for using and managing MX 2100 2104 systems by means of terminals and Telne...

Page 6: ...ocedure is not followed correctly A warning alerts to the presence of important operating and maintenance servicing instructions in the literature accompanying the equipment If these instructions are not followed exactly bodily injury may occur Related Documentation In addition to this system manual separate Installation and Operation Manuals are available for each of the modules that are used in ...

Page 7: ...er 5 Install an additional KPS module if necessary refer to Installation and Setup in the System Installation and Setup chapter 6 Install the KM Ringer module refer to Installation and Setup in the System Installation and Setup chapter 7 Connect the power cable the KM Ringer module the Supervisory Port KCL 2 module the KML module option modules and I O modules refer to Interfaces and Connections i...

Page 8: ...To set up the MX 2100 local configuration for more detailed information refer to Setting Configuration Parameters in the Configuring MX 2100 chapter 1 Set the system parameters refer to Configuring the System Parameters in the Configuring MX 2100 chapter 2 Select the main link parameters refer to Configuring the Main Link Parameters in the Configuring MX 2100 chapter 3 Select the channel parameter...

Page 9: ... not for MX 2104 1 27 Switched Backup Operation not for MX 2104 1 28 Switch Mode 1 30 System Management 1 32 System Timing Considerations 1 38 Data Channel Clock Modes 1 45 Timing Modes of ISDN Channels 1 46 Sub Link Timing 1 47 Main Link Interface Characteristics 1 47 1 4 I O MODULE APPLICATIONS 1 50 1 5 TECHNICAL SYSTEM CHARACTERISTICS 1 50 Chapter 2 Installation 2 1 INTRODUCTION 2 1 2 2 SITE RE...

Page 10: ...ETERS 3 7 General Configuration Procedure 3 7 Configuring the System Parameters 3 9 Configuring the Main Link Parameters 3 11 Configuring the Channel Parameters 3 11 Configuring the SP Parameters 3 12 Chapter 4 Operation 4 1 GENERAL 4 1 4 2 MX 2100 SUPERVISION LANGUAGE 4 1 Command Language Syntax 4 1 Command Options 4 2 Command Protocol 4 3 Index of Commands 4 4 4 3 FRONT PANEL CONTROLS AND INDICA...

Page 11: ...Environment C 5 Automatic IP Traffic Routing C 6 C 4 SNMP TRAPS C 8 Appendix D Software Download D 1 SCOPE D 1 D 2 COLD LOCAL INSTALLATION PROCEDURE D 1 Preparations D 1 Downloading Procedure MX 2100 with Single KCL 2 D 2 D 3 WARM INSTALLATION UPGRADING PROCEDURE WINDOWS BASED STATIONS D 3 Preparations D 3 Downloading Procedure D 3 Appendix E Configuration Parameters E 1 GENERAL E 1 System Configu...

Page 12: ...32 DSP AGENT F 33 DSP ALM F 34 DSP BERT F 34 DSP CH CON F 35 DSP FLIP F 36 DSP HDR TST F 37 DSP MANAGER LIST F 37 DSP KVF5 or DSP PBX F 38 DSP KVF6 F 39 DSP SIGNALING or DSP SIG F 40 DSP PRBS_INJ F 40 DSP REM AGENT F 41 DSP REV F 41 DSP ST FRAME F 42 DSP ST ML F 44 DSP ST SLOT F 46 DSP ST SYS F 48 EDIT DB F 50 EXIT F 50 F F 51 FLIP ML F 51 HELP F 52 INIT DB F 52 INIT F F 53 LOAD DB 1 2 F 54 LOAD I...

Page 13: ... 1 30 Figure 1 19 Single Switch Mode 1 31 Figure 1 20 Dual Switch Mode 1 31 Figure 1 21 Single and Switch Mode 1 32 Figure 1 22 Remote Management In Band 1 34 Figure 1 23 Using the Data Frame 1 34 Figure 1 24 Remote Management Out of Band 1 35 Figure 1 25 Local Neighbor Management 1 36 Figure 1 26 Remote Neighbor Management 1 36 Figure 1 27 Network Configurations Using DTE Timing 1 39 Figure 1 28 ...

Page 14: ... Subnetting C 7 List of Tables Table 1 1 MX 2100 Multiplexing Data 1 17 Table 1 2 Bandwidth Allocations 1 19 Table 1 3 Example of Bandwidth Allocations 1 20 Table 1 4 KML F Fiber Optic Interface Characteristics 1 49 Table 2 1 Power Consumption of MX 2100 Modules 2 4 Table 2 2 Nominal Power Consumption of Power Supply Modules 2 6 Table 2 3 DCE and DTE Interfacing Mode Control Lines 2 9 Table 2 4 MN...

Page 15: ...Port Connector Pin Allocations for DTE Emulation A 2 Table A 3 Common Logic Module KCL 2 MNG Connector Pin Allocations A 3 Table A 4 Alarm Relay Connector Pinout A 4 Table B 1 LCD Alarm Messages B 1 Table C 1 IP Address Class C 5 Table E 1 System Parameters E 1 Table E 2 Main Link Parameters E 4 Table E 3 Supervisory Port Parameters E 7 Table F 1 Call out Parameters F 10 Table F 2 Dial out Paramet...

Page 16: ...Table of Contents viii MX 2100 2104 Installation and Operation Manual ...

Page 17: ...s includes High speed synchronous data modules operating at a rate of 2 4 through 614 4 kbps the KHS series of modules Low speed data modules 300 bps to 57 6 kbps or 64 kbps synchronous and asynchronous data channels including statistical multiplexing modules the KLS series of modules ISDN interface modules the KHS U series and KVF 4 S0 series 2W and 4W multiple voice channel interface modules tha...

Page 18: ...ll be specified Figure 1 1 illustrates the basic capabilities of the MX 2100 system Fax Fax PABX MX 2100 KVF 4 KVF 4 KVF 5 KVC 1M KVC 1M KLS 1 KLS 1 KLS 1 KLS 2 KHS 1 KHS 1 KVF 4 MX 2100 KML KCL Modem Terminal SDM Mux Stat Mux CAD CAM I O Modules V 35 RS 530 V 36 RS 232 V 24 X 21 G 703 Codirectional Standard DDS ISDN E1 T1 Fiber Optic Tie Lines Trunk Line Supervision Terminal or TELNET or SNMP Eth...

Page 19: ...her takes over the full load without disturbance to MX 2100 operation The MX 2100 2104 system provides flexible system timing options with several main link and channel timing modes The main link timing modes are DTE DCE and external DCE In the DCE and external DCE modes the timing reference source can be selected by the user Internal oscillator External timing locked to one of the data channels T...

Page 20: ...e alarm buffer on the front panel LCD display and can delete old alarms related to events that are no longer present in the system In addition to the alarm buffer the front panel LED indicators display in real time the main link and power supply status and alert when test loops are present in the system The front panel LED indicators can also be used to monitor on line a selected user channel The ...

Page 21: ... three MX 2100s can be considered the local MX 2100 The other two MX 2100s can be managed through the local MX 2100 Remote MX 2100 MX 2100 MX 2100 Main Link Main Link A B B Local Supervision Terminal or TELNET or SNMP KCL A Remote KCL KCL Figure 1 2 V Configuration The main link between the local MX 2100 and the remote MX 2100 can also be used to download software Out of Band Management There are ...

Page 22: ...e system to normal operation Various types of test loops are provided including modem loops 2 and 3 per ITU T Rec V 54 for rapid isolation of the fault area tone injection for rapid testing of voice interface modules and pseudo random sequence transmission test for checking the proper operation of data interface modules and detection of bit errors 1 2 Physical Description MX 2100 General Descripti...

Page 23: ...Power Supply Sub system Figure 1 3 MX 2100 Enclosure with Modules General View MX 2100 Rear Panel Figure 1 4 shows a typical rear panel of the MX 2100 enclosure and identifies the slots and their use Note the labels which designate the type of module that can be installed in each slot in addition each slot is keyed therefore it is not possible to install the wrong module type ...

Page 24: ...on each system module Note that the indicators are arranged in groups one group for each system module that are positioned before the corresponding module slot Figure 1 5 shows the front panel of the MX 2100 enclosure Refer to the Operation chapter for a description of the front panel functions TXD RXD RTS M LEAD E LEAD DCD DATA VOICE CHANNEL CURSOR SCROLL ENTER ALARM TEST SYSTEM ON LINE TXD RXD L...

Page 25: ... and the system power supply The main link sub system performs main link interfacing multiplexing and demultiplexing functions and provides the timing signals used by the I O modules installed in the enclosure MX 2104 Rear Panel The following figure shows a typical rear view of the MX 2104 enclosure and identifies the I O slots FUSE X 21 ALM RLY ON Power MNG CONTROL 100 240VAC 0 8A T 250V 1234 ALM...

Page 26: ... activities it is possible to temporarily remove the KCL 2 module from the MX 2100 enclosure without disrupting system operation If it is necessary to replace the KCL 2 module the database can be transferred to a new module by installing the NVRAM taken from the original module in the replacement module Main Link Modules The enclosure can accept one KML type main link interface module or for MX 21...

Page 27: ...supply modules are available KPS 3 25W power supply module for 48 VDC power KPS 4 50W power supply module for 100 to 240 VAC mains KPS 5 25W power supply module for 24 VDC power KPS 6 56W power supply module for 100 to 240 VAC mains KPS 7 56W power supply module for 48 VDC mains Two KPS modules are necessary for redundancy when both modules are operational they share the load whereas in case of fa...

Page 28: ...interface for one multidrop channel The multidrop channel is compatible with the data channels of the KLS 1 NEW low speed data module and supports data rates in the range of 0 3 to 64 kbps As is standard practice in a multidrop application the receive path of the local multidrop channel continuously receives the data transferred in its allocated bandwidth on the desired main link the same data is ...

Page 29: ...oice module provides two high quality compressed voice channels For more information refer to the KVC 3 Installation and Operation Manual The following versions are available KVC 3 E M two voice channels with four wire or two wire interface with E M signaling per RS 464 Types I II III and V and British Telecom SSDC5 KVC 3 FXS two voice channels with two wire interface for direct connection to a te...

Page 30: ...oice and fax modes For more information refer to the KVF 4 Installation and Operation Manual The following versions are available KVF 4 E M two channels with four wire or two wire interface with E M signaling per RS 464 Types I II III and V and British Telecom SSDC5 KVF 4 E M E similar to the KVF 4 E M except that it requires an external 48 VDC source to supply the signaling voltage for increasing...

Page 31: ...M KVF 5 master module with balanced T1 sub link interface for connection to PBXs KVF 5 E1 M KVF 5 master module with balanced and unbalanced E1 sub link interfaces for connection to PBXs KVF 5 T1 S basic KVF 5 slave module without trunk interface KVF 5 E1 S basic KVF 5 slave module without trunk interface KVF 6 Voice fax compression module provides direct connection to E1 T1 PBX trunks For more in...

Page 32: ...ed data rate and the end to end signaling requirements of each channel The main link bandwidth is dynamically reallocated when a change occurs in the number of modules or of active module channels or when the operating mode of the main link or of the modules are changed For special applications the user can disable the automatic allocation and perform manual allocation Although in general dynamic ...

Page 33: ...change of configuration that affects the bandwidth utilization e g addition of a new channel selection of a mode that requires end to end signaling etc perform the REBUILD FRAME command on both MX 2100 units Table 1 1 MX 2100 Multiplexing Data Main Link Rate Frame Length Bandwidth Allocation Unit Bandwidth Available to User 9 6 kbps 24 bits 0 4 kbps 9 2 kbps 23 units 14 4 kbps 36 bits 0 4 kbps 14 ...

Page 34: ... TELNET SNMP management or TFTP via the download bandwidth allocation Through in band management some of the bandwidth of the main link between the local MX 2100 and the remote MX 2100 is used to relay management information Channel data Channel end to end signaling The following table provides bandwidth allocation information The use of the information presented in the table to calculate the band...

Page 35: ... 9 10 12 15 18 20 24 30 35 36 40 42 48 54 60 66 72 78 80 100 120 140 150 170 190 210 230 3 3 3 3 3 2 3 5 6 9 10 12 15 N A 18 20 21 24 27 30 33 36 39 40 50 60 70 75 85 95 105 115 3 5 6 9 10 12 15 18 20 25 30 35 In accordance with channel data rate Theoretical minimum is 1 allocation unit per active channel For low rate data i e for data rates lower than the bandwidth allocation unit oversampling is...

Page 36: ...me synchronization Management channel 9 6 kbps 151 units 1 units 6 units Total capacity used 158 units Reserve capacity 2 units 3 2 kbps Redundancy not for MX 2104 The minimum MX 2100 system configuration requires only one KPS module one KCL module and one KML module For critical applications system availability can be increased by installing redundant modules in the enclosure The redundancy capab...

Page 37: ...backup is available install one DC powered KPS 3 module and one AC powered module Make sure to select power supply modules with comparable ratings e g KPS 6 and KPS 7 KML Module Redundancy The KML module serves as the connecting link between the MX 2100 unit and the communication channel For extra protection a second KML module not necessarily of the same type may be installed in parallel to the p...

Page 38: ...t both the module and the link level Dual Link Operation not for MX 2104 Basic Dual Link Configurations As an option MX 2100 allows independent operation of its two multiplexing subsystems Therefore by connecting two main links to one MX 2100 equipped with two KML modules it is possible to double the number of payload time slots Two dual link topologies are possible High capacity point to point li...

Page 39: ... A are connected to users at location B and other users at location A are connected using the bypassing function of the KDI module to users at location C the connection is full duplex As explained above with respect to bypassing the multidrop channel is handled either as a bypassed channel or as a dropped channel depending on the state of the RTS line The KDI module supports the bypassing of one c...

Page 40: ...qual sizes refer to Table 1 1 for allowable selections Therefore the bypassing can be performed between links operating at rates within the same group of rates 9 6 14 4 19 2 28 8 or 32 kbps 0 4 kbps bandwidth allocation unit 48 56 64 128 or 192 kbps 0 8 kbps bandwidth allocation unit 256 or 384 kbps 1 6 kbps bandwidth allocation unit 512 or 768 kbps 3 2 kbps bandwidth allocation unit 1024 or 1536 ...

Page 41: ...use end to end transmission of control signals otherwise all the channels of an I O module using end to end transmission of control signals must be routed to a single module this implies that they must be bypassed or dropped together at the same MX 2100 In the typical bypassing application shown in Figure 1 15 two MX 2104 multiplexers located at two branch offices are connected to MX 2100 located ...

Page 42: ...connections at intermediate locations and the ensuing analog to digital and digital to analog conversions Full digital transmission has significant advantages for data channels as well because it does away with the cables that would otherwise be required for the connection of data channels and provides the equivalent of an electronic cross connect function programmable by the same means used to co...

Page 43: ...When a DTE connected to a KDI M module has data to transmit toward the host it must assert its RTS line The assertion of the RTS line in the multidrop channel interface changes the routing of the main link data by the corresponding KDI M module The KDI M module disconnects the bypassing connection of the multidrop channel data to main link B and the channel data is dropped locally As long as the R...

Page 44: ... main link ISDN backup mode based on the use of the KML 10 main link module MX 2100 allows flexible programming of the switched backup option on a weekly basis For each day of the week it is possible to define up to four different time periods and to specify for each period whether the use of the switched backup function is allowed The backup capabilities can be determined in two ways By entering ...

Page 45: ...o the backup link if the call cannot be established within a predetermined interval the attempt is aborted When the primary link returns to normal operation the dial up modem hangs up and thus disconnects the backup link Switched Backup Using ISDN Lines This mode is supported when a KML 10 module is connected to a switched ISDN line In this case higher data rates are available for the backup link ...

Page 46: ...ese events occurs Typically the channel alignment process requires up to 20 seconds The KML 10 module can use various structured leased line services S0 such as the FV0 Type 4 service available in Germany and can be configured by the user for optimal support of the following specific ISDN implementations ETSI Euro ISDN NET3 AT T 4ESS and 5ESS ISDN switches custom multipoint and point to point serv...

Page 47: ... via an ISDN network allocated to both Main Link A and Main Link B Refer to Figure 1 20 MX 2100 MX 2100 MX 2100 Local Main Link A Main Link B KCL Remote Remote KCL KCL SP Port or SLIP Supervision Terminal or TELNET ISDN Network Figure 1 20 Dual Switch Mode Single and Switch Mode MX 2100 only The local MX 2100 is connected to a remote MX 2100 via one of the main links Main Link A or Main Link B The...

Page 48: ...e Connect Switch command The ISDN line remains open until the operator requests to disconnect by using the Disconnect Switch command For information on the Connect Switch and Disconnect Switch commands refer to the Command Set Description appendix Automatic Configures MX 2100 to automatically connect the ISDN line when an I O request is made The data cards KLS 1 N KLS 2 KHS 1 and KHS 2 and the KVF...

Page 49: ...rrent system configuration and operating mode and lists the values available for each programmable parameter In case of operator errors the LCD displays a message that explains the error and helps the operator take the correct action Supervisory Port Connector Allows the operator to manage a local MX 2100 from a standard ASCII terminal or via a SLIP connection through TELNET or a SNMP networking m...

Page 50: ...t or SLIP Supervision Terminal or TELNET or SNMP Flow of Management Information Figure 1 22 Remote Management In Band Note Management information can be passed from a local MX 2100 to a remote MX 2100 via the data frame On the local MX 2100 connect a supervision terminal TELNET or SNMP to the KLS 1 KLS 2 card On the remote MX 2100 use a cross cable to link the KLS 1 KLS 2 card with the SP port on ...

Page 51: ... You can configure a MX 2100 without a direct connection to a Network Management Station or TELNET or SNMP and without using out of band management Neighbor management allows management information to be sent via a SLIP connection to linked MX 2100s MX 2100s are connected from the Network Port NP DTE on one MX 2100 to the Supervisory Port SP DCE on another MX 2100 TELNET SNMP or a management netwo...

Page 52: ...n problems due to equipment failure Remote neighbor management A local MX 2100 connects to a remote MX 2100 via the main link The remote MX 2100 connects MX 2100s on the remote side using the NP DTE to SP DCE connections Management information is sent via the main link of the local MX 2100 to any of the linked remote MX 2100s using the IP address of the MX 2100 Refer to Figure 1 26 Remote MX 2100 ...

Page 53: ...NC Ethernet interface Supervisory Port Connector The 9 pin D type female type connector located on the KCL 2 module the Supervisory Port connector can be used to manage the MX 2100 unit by means of an ASCII terminal a network management station or TELNET over SLIP The communication parameters of this port can be selected in accordance with system requirements Data rate 9 6 for use with ASCII termi...

Page 54: ...riodic disruptions in network operation Many networks use very accurate timing sources such as atomic clocks to provide the primary timing signals to the main network nodes e g telephone switching offices digital switches etc From the nodes the timing is disseminated via the communication links Since very accurate timing sources are often free running communication equipment usually includes elast...

Page 55: ...ally connected when the main source fails If both the main and fallback sources fail MX 2100 will switch to the internal oscillator The main characteristics of each main link timing mode are explained in the following sections DTE Timing KML 1 KML 2 KML 3 KML 4 and KML 10 Modules With DTE timing both the main link receive and transmit paths of the MX 2100 unit receive external clock signals Figure...

Page 56: ...two MX 2100 units derive their timing reference from the accurate master clock provided by the network When operating in the DTE timing mode buffers are used in the receive and transmit data paths to allow retiming and to absorb short term timing instabilities Buffers size is 8 bits when operating over satellite links the receive buffer size can be increased to 256 bits External DCE Timing KML 1 K...

Page 57: ... not in the transmit path Buffer size is selectable 8 or 256 bits DCE Timing KML 1 KML 2 KML 3 and KML 4 Modules With DCE timing MX 2100 provides both the transmit and receive clock signals to the equipment to which it is connected The timing reference source of the transmit timing signals can be selected as for the external DCE mode The connected equipment must then use the DTE timing mode The DC...

Page 58: ...Figure 1 30 shows a basic network configuration that uses a KML 5 or KML 6 module in the internal timing mode in conjunction with loopback timing I O Modules MX 2100 MX 2100 Internal Timing Loopback Timing I O Modules Figure 1 30 Typical Internal Timing Mode Application Loopback Timing KML 5 KML 6 KML 7 KML 8 and KML F Modules With loopback timing the main link transmit clock is locked to the rece...

Page 59: ...ith DCE timing is the source of the master clock and determines timing of the entire network Figure 1 32 shows a basic network configuration that uses a KML 7 KML 8 or KML F module in the DCE timing mode at the local MX 2100 with the timing taken from one of its KHS 1 channels In conjunction the remote MX 2100 operates in the loopback timing mode MX 2100 MX 2100 DCE Timing Loopback Timing I O Modu...

Page 60: ...in a system that uses bypassing and multidropping must use a common timing reference The KDI module can be used to determine the reference source for both main links of a MX 2100 by internally locking their timing The available selections are as follows Link A the clock of main link A serves as the local reference therefore the timing of link B is locked internally to link A timing Link B the cloc...

Page 61: ...path of the channel to absorb timing jitter For KLS 1 data modules the elastic buffer size is 2 bits for KHS 1 data modules the buffer size is 4 bits This clock mode is usually required for tail end connections when a DCE is connected to a data sub channel and its timing is locked to the MX 2100 timing DCE Channel Timing Mode DTE 1 KHS 1 XMIT Clock RCV Clock Tail End Circuit MX 2100 Figure 1 35 Cl...

Page 62: ...and you cannot attain the conditions for master timing as described above do not use DTE2 clock mode MX 2100 External Timing Digital Data Network Master Clock KHS 1 DTE XMIT Clock XMIT Clock RCV Clock RCV Clock Modem Modem Mode DTE 2 Figure 1 36 Clock Mode 3 DTE2 Timing Modes of ISDN Channels ISDN basic rate access channels are available on the KHS U and KVF 4 S0 modules These channels provide the...

Page 63: ... Recovered Receive Clock The recovered receive clock of the sub link can be selected as the reference for the MX 2100 nodal timing If this option is not used the equipment connected to the sub link must operate with loopback timing or its timing must be locked to the same source that serves as the reference for the MX 2100 nodal timing Main Link Interface Characteristics V 35 Interface Module KML ...

Page 64: ...plicable to codirectional interfaces This interface supports only data rates of 64 and 128 kbps Standard DDS CSU DSU Module KML 6 The KML 6 main link interface complies with AT T Pub 62310 Standard Digital Data Service DDS Channel Interface Specifications The interface supports data rates of 9 6 19 2 and 56 kbps T1 Link Interface Module KML 7 The KML 7 module supports both the D4 SF and ESF framin...

Page 65: ...5Ω Fiber Optic Link Interface Module KML F The fiber optic link interface of the KML F module uses a proprietary signaling format which ensures optimum performance To optimally meet a wide range of system requirements the fiber optic interface can be ordered for operation over 62 5 125 micron multi mode fibers typical attenuation 3 5 dB km as well as over low loss 9 125 micron single mode fibers t...

Page 66: ...512 768 1024 1536 kbps Interface and Connector Type KML 1 Module V 35 34 pin female connector KML 2 Module V 24 RS 232 25 pin D type female connector KML 3 Module V 36 RS 422 RS 530 25 pin D type female connector KML 4 Module X 21 15 pin D type female connector KML 5 Module G 703 codirectional RJ 45 8 pin connector KML 6 Module Standard DDS RJ 48 8 pin connector KML 7 Module T1 link 100Ω balanced ...

Page 67: ...ion 18 slot card cage 4 slot card cage Slot Use 2 power supply slots 2 main link slots 1 common logic slot 1 optional slot 12 I O slots Built in power supply Built in main link Built in common logic 0 optional slots 4 I O slots Dimensions 19 rack mount front mounting or standalone unit Height 13 26 cm 5 22 in 3U 4 4 cm 1 75 in 1U Width 43 7 cm 17 20 in 43 0 cm 17 30 in Depth 25 25 cm 9 94 in 25 4 ...

Page 68: ... Rates 9 6 19 2 38 4 57 6 kbps For ASCII terminal connection 9 6 kbps only Word Format 7 8 bit even odd no parity 1 stop bit format Interface Type DTE or DCE Connection Type 9 pin female D type Dial Port Connector 9 pin female D type Ethernet Port UTP or BNC Ethernet connector SNMP Management System Interface Provides complete control configuration and monitoring Automatic recognition of all modul...

Page 69: ...511 bit pattern pseudo random sequence ITU T Rec V 54 loop 2 and loop 3 by interface connector pins Tone injection for voice modules Alarms LCD alarm buffer stores one alarm of each type Supervision terminal alarm buffer stores the last 100 alarms Each alarm time and date stamped ALM RLY connector RJ 12 connector For pinout refer to Appendix A Dial Port connector 9 pin female connector Direct conn...

Page 70: ...Chapter 1 General Information MX 2100 2104 Installation and Operation Manual 1 54 Technical System Characteristics ...

Page 71: ...tem it is necessary to configure the system in accordance with the specific user s requirements Refer to the Configuring MX 2100 chapter After the preliminary configuration the system can be managed by MX 2100 s front panel or by means of a SNMP network management station Refer to the User s Reference Manual of the network management station for operating instructions In case a problem is encounte...

Page 72: ...ed to the equipment the case of the MX 2100 unit must be properly grounded at any time Any interruption of the protective grounding connection inside or outside the equipment or the disconnection of the protective ground terminal can make this equipment dangerous Intentional interruption is prohibited Before switching on this equipment and before connecting any cables the protective ground termina...

Page 73: ... unit for interface cable connections and module replacement Ambient Requirements The range of ambient operating temperatures of MX 2100 is 32 to 104 F 0 to 40 C at a relative humidity of up to 90 non condensing MX 2100 is cooled by free air convection Its cooling vents are located in the top and bottom covers To prevent overheating do not obstruct the MX 2100 cooling vents and make sure enough fr...

Page 74: ...S 1 V 35 0 8 0 78 0 12 KHS 2 1 055 0 912 0 084 KHS 703 0 8 KHS U 2 0 KVC 1 E M 0 875 0 18 KVC 1 FXS 1 15 0 396 KVC 1 FXO 0 875 0 06 KVC 1M FXS 1 6 0 72 KVC 1M FXSP 2 45 0 84 KVC 1M FXO 1 05 0 3 KVC 1M E M 1 5 0 36 KVC 1M FXS CAN 2 1 0 72 KVC 1M FXSP CAN 2 95 0 84 KVC 1M FXO CAN 1 55 0 3 KVC 1M E M CAN 2 25 0 36 KVC 3 FXO 2 5 0 3 KVC 3 E M 2 5 0 24 KVC 3 FXS 3 1 2 KVC 3 FXSP 5 1 308 KVC 3M S0 3 1 0...

Page 75: ... 6 E1 31 6 9 KVF 6 T1 12 4 KVF 6 T1 24 5 6 KVF 8 E M 5 6 048 0 44 KVF 8 FXO 6 72 048 0 44 KVF 8 FXS 5 1 7 0 44 KTRE 4 25 0 24 0 24 KMBE 2 45 0 96 KMBE N 2 45 0 96 KCL 1 0 375 0 06 0 036 KCL 1 N 0 5 0 156 0 042 KCL 2 1 95 0 02 0 042 KAI 0 325 0 012 KDI 1 1 KML 1 V 35 1 125 0 42 0 012 KML 2 V 24 1 125 0 42 0 012 KML 3 V 36 1 125 0 42 0 012 KML 4 X 21 1 125 0 42 0 012 KML 5 G 703 1 75 KML 1 2 3 4 N 1...

Page 76: ... of the MX 2100 have load sharing capabilities By installing two KPS modules it is possible to double the allowed loading If the power requirements exceed the capabilities of a single power supply module you cannot consider that the two modules are providing redundancy Any failure must be immediately corrected KPS 4 The nominal output power specified for the KPS 4 module can be safely exceeded to ...

Page 77: ...026 25 Yes If any one of the power supply consumption ratings per voltage or per Maximum Total Power Per Supply is exceeded use one of the following methods The following methods are arranged in decreasing order of preference If any method corrects the power supply current ratings there is no need to proceed with the other methods Method 1 If you are using a MX 2104 exchange it for a MX 2100 If yo...

Page 78: ...8 VDC power supply versions For details see the appropriate Ringer Installation and Operation Manual 2 3 Equipment Needed The following describes the equipment needed to run the MX 2100 Terminal Characteristics Any standard ASCII terminal or PC emulating an ASCII terminal equipped with an RS 232 communication interface can be used to control MX 2100 operation Make sure to initialize MX 2100 for co...

Page 79: ...anagement station modem etc uses the control lines in the MX 2100 SP connector The control lines being used in the DCE and DTE interfacing mode and the direction of the control signals are detailed in the following chart Table 2 3 DCE and DTE Interfacing Mode Control Lines Interface Type Control Line DCE DTE CTS Out Not used DCD Out Out DSR Out Out DTR In In RI Not used In RTS In In Data Terminal ...

Page 80: ...conds when the RI line is ON while the DTR line is OFF If the supervisory port interface is DCE the DSR line can also be configured to be continuously ON However if the DTR line switches to OFF the DSR line will also switch to OFF for 5 seconds In addition MX 2100 always switches the DSR line OFF inactive for 5 seconds when the EXIT command is executed and when the disconnect time out expires AUTO...

Page 81: ... of the control signals are reversed relative to their direction in the SP CONTROL DCE connector when the SP interface is set to DCE The control lines and the direction of the control signals in the MNG connector is detailed in the following chart Table 2 4 MNG Connector Control Lines SP CONTROL DTE Control Line Direction CTS In DCD In DSR Out DTR In RI In RTS Out 2 4 Package Contents The MX 2100 ...

Page 82: ...to orient the unit in accordance with your requirements either with the MX 2100 front panel toward the front of the rack or the module panels toward the front Install Brackets Here if you want the Front Panel toward the Front of the Rack Install Brackets Here if you want Access to Module Panels from the Front of the Rack Figure 2 1 Attachment of Brackets After attaching the brackets fasten the enc...

Page 83: ... signal ground to float with respect to the frame ground If redundant modules are installed make sure that the jumper is set to the same position on both modules SGND FGND YES NO Signal Ground Connected to Frame Ground Signal Ground not Connected to Frame Ground YES NO Figure 2 2 Typical KPS Module Location of Internal Jumper Installing the KPS Module To install the KPS module 1 Insert the KPS mod...

Page 84: ... describes switch and jumper functions Figure 2 3 Module KCL 2 Internal Switch and Jumpers In addition to the switches and jumpers described in this section the KCL 2 module has other switches and jumpers that are set by the manufacturer and may not be changed by the user Table 2 5 Module KCL 2 Internal Switch and Jumper Functions Item Function Enables disables the internal watchdog function durin...

Page 85: ... Sets MX 2100 as a Master Should always be set to OFF Master only Database initialization Should always be OFF Determines whether MX 2100 requires a password when working with a terminal ON requires password OFF does not require password Not in use Should always be set to OFF For MX 2104 the access to DIP Switch SW3 is through a hole in the upper cover You should load the default supervisory port ...

Page 86: ...ection offered by fuses has been impaired the instrument must be made inoperative and be secured against any unintended operation KPS Module HIGH VOLTAGE Dangerous voltages are present inside the KPS module when it is connected to power Do not connect the KPS module to power before it is properly installed within the MX 2100 enclosure and disconnect the input power from the module before removing ...

Page 87: ...ONTINUED PROTECTION AGAINST RISK OF FIRE REPLACE ONLY WITH SAME TYPE AND RATING OF FUSE PS 4 100 240VAC 3A T 250V POWER ON OFF Switch Grounding Terminal 48 24 0 0 VDC IN VDC IN 48V Figure 2 4 KPS Modules Rear Panels Power Connection 3 Check that the ON OFF switches on the KPS modules are set to OFF Refer to Figure 2 4 4 Connect the power cable first to the connector on the KPS module then to the m...

Page 88: ...Push button Pressing the RESET push button causes the reinitialization of all the modules in the MX 2100 enclosure TEST Indicator Indicates that a test or test loop is being performed on one of the local MX 2100 modules or on the main link modem When downloading is activated the TEST indicator lights when a test is activated by the remote MX 2100 modules ALARM Indicator Indicates that a fault has ...

Page 89: ...ng cable to the MNG connector on the KCL 2 module Connections to the Alarm Relay Connector KCL 2 Module Connect the external equipment to the RJ 12 Alarm Relay connector according to the pin assignment described in Appendix A The connector functions as a dry contact relay Under normal conditions the Normally Closed NC pin is shorted with the Common contact When a MX 2100 alarm occurs the Common co...

Page 90: ...OL connector 9 pin D type female connector for connection to an optional ASCII supervision terminal or to a SNMP network management station Connector pin assignment is given in the Alarms appendix 6 MNG connector 9 pin D type female connector used as a Dial Port dial in dial out Connector pin assignment is given in the Alarms appendix 7 External DIP Switch SW2 Described in Table 2 5 8 ALM RLY conn...

Page 91: ...ON and then press the RESET push button of the KCL 2 module if not the change will take effect the next time MX 2100 is turned on The default values are then loaded and stored After performing this procedure return the switch sections to OFF Supervision Terminal Configure the terminal for the communication parameters you selected for the MX 2100 SP port default values are listed above select the f...

Page 92: ... completing the procedure given above the supervisory port of MX 2100 uses the default values If necessary change the configuration of the SP supervisory port of MX 2100 by entering the command DEF SP Refer to the Command Set Description appendix for more information You will see the supervisory port configuration data form A typical form with the default values is shown below SPEED DATA PARITY IN...

Page 93: ... When main link bandwidth is allocated to the MX 2100 management channel the parameters that must be used by both MX 2100 units connected by the main link can also be downloaded from one of the units to the other unit After the operating parameters have been selected a process called configuration set up the MX 2100 no longer requires operator attendance The configuration stored in the MX 2100 mem...

Page 94: ...lue that conflicts with the current operating mode the MX 2100 rejects the erroneous selection displays for a few seconds an error message that identifies the error and then the display returns to its previous state You will find detailed instructions for operating the MX 2100 in Chapter 4 Operation The configuration error messages and instructions for correcting the problem that is indicated by t...

Page 95: ...link parameters Configuring the Main Link Parameters on page 3 11 CH PARM Display and selection of parameters for the various types of modules and module channels Configuring the Channel Parameters on page 3 11 SP PARAMETERS Display and selection of the supervisory port parameters Data rate Number of data bits Parity Interface type Management by SNMP network management stations Configuring the SP ...

Page 96: ...AMETER DL_BW_A SYSTEM PARAMETER ML_MODE SINGLE SYSTEM PARAMETER ACTIVE_ML AUTO POWER UP MESSAGE ALARM BUFFER SYSTEM PARAMETER SYSTEM PARAMETER DL_BW_B TEST OPTION See Figure 3 2B SP PARAMETER SPEED 9600 SP PARAMETER PARITY NONE SP PARAMETER INTERFACE DCE SP PARAMETER DATA 8 SP PARAMETERS LINK PARAMETERS CH PARM A B See Figure 3 3C See Module Manuals in Part II Legend A B Module Channel Identificat...

Page 97: ...OPTION A B PRBS TEST OPTION A B LOOP2 V 54 OFF TEST OPTION A B LOOP3 V 54 OFF TEST OPTION ML TEST OPTION A B TEST OPTION A B BERT GOOD ON Only for Voice Channels Legend A B Module Channel Identification TEST OPTION ML REMOTE LOOP OFF TEST OPTION ML LOCAL LOOP OFF TEST OPTION ML LOOP2 V 54 OFF TEST OPTION ML LOOP3V 54 OFF TEST OPTION A B PRBS GOOD ON TEST OPTION A B PRBS BAD ON TEST OPTION A B BERT...

Page 98: ...INK PARAMETER CRC 4 YES LINK PARAMETER CODE B8ZS LINK PARAMETER START TS 00 LINK PARAMETER BPTS 16 YES LINK PARAMETER MODE SWITCHED LINK PARAMETER EURO_ISDN LINK PARAMETER B CH B1 LINK PARAMETER KML 1 to KML 6 only KML 1 to KML 3 only KML 1 to KML 5 KML 7 KML 8 KML 7 only KML 8 only KML 7 only KML 7 KLM 8 only KML 8 only KML 10 only LINK PARAMETER FRAME ESF LINK PARAMETER SYNC FAST LINK PARAMETER ...

Page 99: ... this order 1 Select the system parameters 2 Select the main link parameters 3 Set the channel parameters In addition when a supervision terminal is used to control the MX 2100 the communication parameters of the supervisory port must also be defined For control of MX 2100 test options refer to the Diagnostics chapter General Configuration Procedure The following steps are used to perform any conf...

Page 100: ...t hand field the parameter value in the second row CURSOR 6 Scroll to set the required value for the displayed parameter SCROLL The second row shows the available values 7 Repeat steps 3 through 6 until values are assigned to all the parameters in the group SCROLL The second row shows the current selection 8 When the last parameter in this group is displayed select the new parameter values Note Yo...

Page 101: ...one of the channels of a KLS 1 KHS 1 KVF 4 S0 KHS U S KHS U D KVF 5 E1 M or KVF 5 T1 M module In this case you must select the CLOCK MODE of this channel as DTE2 otherwise you will see CONFIG ERROR 01 CLK_FBACK Select NONE or a source different from that selected as master If you select as external source a channel that is not configured for operation in the DTE2 mode you will see CONFIG ERROR 02 ...

Page 102: ... Only the SINGLE and REDUND modes can be actually configured from the front panel The other modes appear only for compatibility with the supervision terminal If one of the other modes is selected you will see CONFIG ERROR 19 If the MX 2100 is equipped with only one KML module and you are trying to select any mode except SINGLE you will see CONFIG ERROR 51 ACTIVE_ML When redundancy is enabled you m...

Page 103: ...problem change the channel parameters as required TIMING Select the timing mode specified for your MX 2100 When the installed module is KML 1 KML 2 KML 3 or KML 4 the available selections are DTE DCE or E DCE With DCE and E DCE a reference timing source must be selected as explained for the system parameters When the installed module is KML 5 or KML 6 the available selections are INT and LBT When ...

Page 104: ...n by pressing ENTER three times to ensure positive identification of terminal data rate The automatic baud rate recognition procedure should be repeated after the DTR line in the SP connector had been switched to OFF and then ON again DATA Select the required number of data bits same as on the terminal PARITY Select the required parity same as on the terminal Select DCE when directly connected to ...

Page 105: ...ways be performed by means of a supervision terminal connected to its supervisory port using the procedures described in the System Installation and Setup chapter However after initial configuration MX 2100 can also be managed by means of a SNMP network management station 4 2 MX 2100 Supervision Language The following presents the MX 2100 supervision language syntax usage and commands Command Lang...

Page 106: ...pe C You will obtain the MX 2100 prompt again To repeat the previous command press CTRL A To repeat the previous command followed by pressing ENTER press CTRL D Command Options The following general types of options shown in Table 4 1 are available with some commands For details refer to the relevant appendix Table 4 1 General Command Options Option Meaning Example of Usage A All CLR ALM A Clears ...

Page 107: ...pe of terminal connected to MX 2100 is essential to proper display of the information sent by MX 2100 on the terminal screen certain combinations of codes can lead to unclear displays If the information on your screen is unclear issue the INIT F command If there are no parameters use the F command to set the desired control codes Command Evaluation and Execution After the working prompt is display...

Page 108: ... applicable to the current command the field shows N A and scrolling is not possible N A will appear in fields of a DEF command that specify parameters not used in the selected operating mode Ending a Session If an idle disconnect time out is specified MX 2100 will automatically disconnect the ongoing session if no command is received from the terminal for the specified time out interval The EXIT ...

Page 109: ...efine manually the allocation of main link bits DEF MANAGER LIST Define or modify the network management stations to which the SNMP agent sends traps DEF ML Define parameters for the main link DEF ML CALL Define the switched backup connection setup parameters for use in the switched backup mode DEF NAME Define the logical name of MX 2100 DEF NODE Define the node number of MX 2100 DEF NP Define the...

Page 110: ...AME DSP ST FR Display information on current frame usage current bit allocation as defined in the active database DSP ST ML Display active main link status information DSP ST SLOT Display I O module status information DSP ST SYS Display system status EDIT DB Select the alternate not active database for editing EXIT End the current control session F Select the codes for clear the screen cursor home...

Page 111: ...lock UPDATE DB 1 2 Updates the MX 2100 database from a file with a database package that was received from a remote MX 2100 via FTP 4 3 Front Panel Controls and Indicators Table 4 3 lists the functions of the MX 2100 controls connectors and indicators located on the MX 2100 front panel The index numbers in Table 4 5 correspond to the item numbers in Figure 4 1 and Figure 4 2 1 6 9 8 7 2 3 4 5 10 1...

Page 112: ... detected in one of the MX 2100 modules 7 ON LINE indicator Lights steadily when the module is operating properly and is active For KML modules flashes when the module is operating properly but is in standby the other module of the same type is active Off when the corresponding module is defective or is not installed ON LINE indicators are located on the KML and KPS modules 8 TXD indicator Indicat...

Page 113: ...100 operation is controlled by means of the display and the three pushbuttons designated CURSOR SCROLL and ENTER The same control actions are consistently used for all the activities CURSOR You use this push button to indicate what you want to change Pressing the CURSOR push button moves the cursor among the fields in the current display The cursor is a bar that underlines the selected field Some ...

Page 114: ...ate and shows the ALARM BUFFER SCROLL CLEAR message Note that in such a case any changes made on the display without pressing the ENTER key are discarded Appendix B Alarms explains the codes and what to do to correct the error Chapter 5 Diagnostics explains the use of the test options Checking Current Operating Configuration Refer to Chapter 3 Configuring MX 2100 for an explanation of the MX 2100 ...

Page 115: ... 3 4 to see the other main link parameters SCROLL 8 Scroll to display CH PARM in the top row SCROLL The right hand field of the top row identifies the channel being handled now in the format i j where i is the I O module slot number 1 through 12 and j is the module channel number Thus the first channel number is 1 1 9 To change the number of the displayed channel move the cursor under the top row ...

Page 116: ...f the MX 2100 operates normally but event alarm messages are still displayed you can clear the event alarm messages by the following procedure 1 Bring the cursor under the second row under the CLEAR message 2 Press ENTER to clear the event messages stored in the alarm buffer If no state alarms are present the second row will now show empty 4 4 Operating Instructions The MX 2100 can be operated thr...

Page 117: ...I O 8 OK I O SLOT 9 I O 9 OK I O SLOT 10 I O 10 OK I O SLOT 11 I O 11 OK I O SLOT 12 I O 12 OK If you see FAILED for any module replace that module Starting a Session Single MX 2100 When the terminal is used to control a single MX 2100 always assign node address 0 to MX 2100 Use the following start up sequence to connect to a MX 2100 assigned node number 0 1 If you use the AUTO Autobaud mode press...

Page 118: ... 2100 is under remote control 3 Before you continue use the F command to select the proper cursor control codes otherwise the DEF commands may not work properly While the supervision terminal is in session with MX 2100 the MX 2100 local operator can regain control by disconnecting the cable from the MX 2100 SP connector or by sending the EXIT command MX 2100 will automatically return to front pane...

Page 119: ...mand Otherwise you will see PASSWORD Control Session 1 During the control session type the desired commands at the terminal keyboard You must see the MX 2100 echo character by character 2 When you see the correct and complete command in the echo line press ENTER to execute the command MX 2100 will process the command and display the appropriate response At the end of the command execution MX 2100 ...

Page 120: ...ccessfully completing the self test procedure the MX 2100 switches to the default display the ALARM BUFFER If the MX 2100 fails the power up self test the LCD displays the detected failure for example TEST RESULTS EPROM FAILURE Try to scroll the second line to see if there are additional fault messages The MX 2100 must be repaired before it can be used again Refer to the Diagnostics chapter for tr...

Page 121: ...ff as soon as the link with the remote unit is established If the ALARM indicator continues to light this indicates the presence of alarms in the alarm buffer After the alarms are cleared the ALARM indicator should turn off What to do in Case of Malfunction In case a malfunction occurs perform the following preliminary checks and actions Check that the modules are properly installed and inserted i...

Page 122: ...eck all the configuration parameters against the prescribed set of parameters Press the RESET push button of the KCL module If these actions do not correct the problem refer to Chapter 5 Diagnostics to identify the fault and replace the corresponding module Turn Off To stop equipment operation use the following procedure 1 If the MX 2100 includes a KM Ringer module first turn the KM Ringer off bef...

Page 123: ...tore one alarm event of each type The MX 2100 operator can view the contents of the alarm buffer and can clear event alarms This procedure is explained in the Front Panel Controls and Indicators section of the Operation chapter Using the DEF ALM DEBOUNCE command the MX 2100 operator can define the debounce time in seconds for each alarm code or mask the alarm Refer to the Alarms appendix for more ...

Page 124: ...ns pay attention to the following points When you select a channel for monitoring the monitoring of any previously selected channel is automatically interrupted Generally at any time only one loop of a given type can be activated on the main link and on each of the user channels However the signal paths formed when certain loops or tests are active inherently disconnect the signal paths required b...

Page 125: ...nnel loop Activating deactivating PRBS transmission on a data channel Activating deactivating BERT testing on a data channel Activating deactivating tone injection on a voice channel Displaying the state of channel ITU T Rec V 54 loops for KLS 1 also activation deactivation Displaying the state of loops initiated at the remote MX 2100 unit Table 5 1 Deactivating all the Tests Step Action Key Displ...

Page 126: ...in the top row SCROLL Second row displays the state of the monitoring function MONITOR OFF no channel is being monitored MONITOR i j the front panel LED s show the status of channel B of the module installed in slot A 3 To change bring the cursor under the right hand field in the second row and scroll to display the desired module channel number or OFF CURSOR SCROLL 4 Press ENTER ENTER If this is ...

Page 127: ...le selections are REMOTE LOOP if downloading is disabled the remote loop is connected on the local MX 2100 toward the remote unit If downloading is enabled the remote loop is connected on the remote MX 2100 LOCAL LOOP LOOP3 V 54 commands the modem connected to the main link interface to activate a local loop LOOP2 V 54 commands the remote modem that communicates with the modem connected to the mai...

Page 128: ... the downloading function is enabled 4 To change the state of the selected loop bring the cursor under the right hand field in the second row and scroll to display the desired state ON or OFF CURSOR SCROLL 5 Press ENTER ENTER If this is the only active test on this MX 2100 the state of the front panel TEST indicator changes Activating Deactivating PRBS Transmission on a Data Channel After the pseu...

Page 129: ...he desired voice I O module channel Note that no tests are available for the KCL 2 module because this module controls the management interface i e the front panel controls and the interfacing with a supervision terminal or an SNMP network management station and the MX 2100 operation Therefore the KCL 2 module is inherently tested when a proper response is obtained to any operator request and the ...

Page 130: ...unit and the other system elements these loops also provide information on the functioning of the complete unit Test loops activated on the modem serving the main link provided the modem supports ITU T Rec V 54 loops These loops provide information on the transmission equipment that provides the connection between the two MX 2100 units The following explains the main link loops describes the front...

Page 131: ...0 is defective The SYNC LOSS indicator of the local MX 2100 must be off If it lights the local MX 2100 is defective Do not set up a local loop in a remote MX 2100 with in band management Doing so could cause the main link connection to be lost Remote Main Link Loop As a rule connect the remote main link loop only if both MX 2100s pass the local main link loop test successfully Remote Main Link Loo...

Page 132: ...remote MX 2100 unit lights but the RXD indicator of the local MX 2100 unit does not light probably there is a problem in the transmit path to the local unit There is however a low probability that the fault occurred in the local or remote MX 2100 units check by performing local main link loops 3 If the RXD indicator of the local MX 2100 unit lights but its TXD indicator is off the local MX 2100 un...

Page 133: ...th The loop signal path is shown in Figure 5 3 Local Modem Remote Modem User or Test Equipment Local MX 2100 User or Test Equipment Remote MX 2100 Figure 5 3 Main Link Modem Loop 3 Signal Path Main Link Loop 3 Normal Indications and Fault Location The TEST indicator of the MX 2100 lights The TXD and RXD indicators of the local MX 2100 must light and the LOCAL SYNC LOSS indicator must be off If not...

Page 134: ...support local and remote channel loops and the monitoring of the transmit and receive activity and of the main control signals by means of the front panel indicators In addition the MX 2100 supports module specific tests For data I O modules the MX 2100 provides PRBS transmission and BERT testing on individual channels PRBS transmission allows supplying a test signal to a data channel and the BERT...

Page 135: ...ick check of the connections to the local user equipment Remote MX 2100 Local MX 2100 User or Test Equipment User or Test Equipment CHANNEL 1 Typical Module Figure 5 5 I O Module Local Loop on Individual Channel Remote Channel Loop The remote loop is connected on the local MX 2100 unit i e the local I O module returns the receive signal of the tested channel toward the remote MX 2100 The loop sign...

Page 136: ...r as GOOD no error has been detected during the last interval or BAD at least one error has already been detected Note that if no loop is present along the signal path the BAD result is expected and does not indicate any problem On a supervision terminal the test results are displayed as a number in the range of 0 no errors detected during the current measurement interval through 9999 The number o...

Page 137: ...ere applied to the input of the channel codec The test tone is connected directly to the output of the tested channel transmit path instead of transmitting the subscriber transmit signal The tone can be connected to only one channel of a voice module at a time Tone injection automatically disconnects the local subscriber signal Figure 5 7 shows the signal paths Remote MX 2100 Local MX 2100 User or...

Page 138: ...Chapter 5 Diagnostics MX 2100 2104 Installation and Operation Manual 5 16 Diagnostic Tests ...

Page 139: ...TROL DCE The allocation of pins in the Supervisory Port Connector with DCE emulation used for direct connection to the supervisory terminal is given in Table A 1 The pin functions with DTE emulation used when a cross over cable is used for connection to a modem that provides the link to the supervisory terminal is given in Table A 2 Table A 1 Common Logic Module KCL 2 Supervisory Port Connector Pi...

Page 140: ...r RI To MX 2100 22 Pins 9 10 are connected to the 12V and 12V lines through a 300Ω 1 2W series resistor Direction IN input to MX 2100 OUT output from MX 2100 Table A 2 Common Logic Module KCL 2 Supervisory Port Connector Pin Allocations for DTE Emulation Pin Designation Direction Function 1 FGND Frame ground 2 TD IN TX data 3 RD OUT RX data 4 DCD IN Carrier detect 5 CTS Not connected 6 DTR OUT Dat...

Page 141: ... made by means of a straight cable The connection to a dial up modem with 25 pin connector should be made using a cable wired in accordance with the Connection to Dial up Modem with 25 pin Connector column of Table A 3 Table A 3 Common Logic Module KCL 2 MNG Connector Pin Allocations Pin Line Direction Connection to Dial Up Modem with 25 pin Connector 1 Data Carrier Detect DCD IN 8 2 Receive Data ...

Page 142: ...ble Table A 4 Alarm Relay Connector Pinout Pin Direction Designation Function 1 Out 5V 5 VDC output 2 In Out Relay F Main relay Common contact 3 In Out Relay M Main relay NC Normally Closed contact 4 In Out Relay B Main relay NO Normally Open contact 5 In Out FGND 6 In FAN Fan status input active low TTL A 5 DC Power Input Connector The DC input power connector used on the MX 2104 and the KPS 3 KP...

Page 143: ...DWARE FAILURE SLOT i State A technical failure has been detected in the module installed in the specified slot ML A ML B 1 through 12 Replace the module 2 LOC SY LOSS LOCAL SYNC LOSS State The KML module installed in the specified slot ML A ML B lost synchronization to the incoming data stream May indicate a configuration error or a technical failure 3 B R G FAIL B R G FAILURE SLOT i The baud rate...

Page 144: ...in the MX 2100 alarm buffer exceeds the maximum allowable number 100 New alarms are now written over previous alarms 12 FALLBACK CLK USE CLOCK WAS CHANGED TO FALLBACK State The fallback timing reference source has been selected for use 13 INTERNAL CLK USE CLOCK WAS CHANGED TO INTERNAL State The internal oscillator is now used as a timing reference source as a result of the simultaneous failure of ...

Page 145: ...E SWITCHED BACKUP ML IS ACTIVE Event The switched backup link has been successfully connected and is actively carrying traffic This message can be displayed only when the switched backup mode is selected 23 ML RECOVERY MAIN LINK RECOVERY Event The main link has returned to normal operation This message can be displayed only when the switched backup or priority bumping mode is selected 24 PB FP TO ...

Page 146: ...er up test only 32 VOICE S LOS VOICE SYNC LOSS CH State The channel specified by j 1 or 2 of the voice module installed in the I O slot specified by i 1 through 12 of the local MX 2100 unit lost synchronization 33 MODEM LOOP TAIL END MODEM ON LOOP CH State The tail end modem connected to the channel specified by j 1 or 2 of the KLS 1 module installed in the I O slot specified by i 1 through 12 of ...

Page 147: ... the specified slot reports a hardware problem on the T1 interface board 43 NETWORK LLB NETWORK LLB SLOT i Event A network initiated line loopback has been activated This loopback cannot be disconnected by the system management 44 NETWORK PLB NETWORK PLB SLOT i Event A network initiated payload loopback has been activated This loopback cannot be disconnected by the system management 45 DRIVER FAIL...

Page 148: ...t On an E1 link operating with 256S framing the local module has lost multiframe synchronization 54 R MF ALARM REMOTE MF S LOSS SLOT i Event On an E1 link operating with 256S framing the remote equipment has lost multiframe synchronization 55 YELLOW ALM YELLOW ALARM SLOT i State Remote equipment lost synchronization to the incoming data stream May indicate a configuration error or a technical fail...

Page 149: ...DP DIAL FAIL DP CYCLE DIAL FAILED Event The dial out cycle failed and the redial attempts stopped until a new alarm reported 65 DP PRI CALL FAIL DP PRIMARY CALL FAILED Event The call setup attempts to the primary dial out directory number failed 66 DP ALT CALL FAIL DP ALTERNATE CALL FAILED Event The call setup attempts to the alternate dial out directory number failed 67 FRAMER CARD FAIL FRAMER CA...

Page 150: ...s 79 RED ALARM RED ALARM SLOT State Local KVF 5 master module lost synchronization to incoming data stream For KVF 5 T1 M card condition is red alarm 80 YELLOW ALARM YELLOW ALARM SLOT State The remote PBX that connects to KVF 5 module lost synchronization to incoming data stream For KVF 5 T1 M card condition is yellow alarm 81 FRAME SLIP FRAME SLIP SLOT State The number of the SLIP detected in the...

Page 151: ...amed all ones sequence is received on the I O module 92 AIS RED ALARM AIS RED ALARM SLOT State The local frame synchronization has been lost because of AIS reception 93 COMP ERROR COMPRESSION ERROR PORT Event The compression device related to the port specified by j 1 8 as the voice module installed in the I O slot specified by i 1 12 of the local MX 2100 has a technical failure 94 TDM ERROR TDM D...

Page 152: ...L ML LOOP COMBINATION You are trying to activate simultaneously local and main link loops or both types of ITU T Rec V 54 main link loops LOOP 2 and LOOP 3 This combination is not allowed refer to the Diagnostics chapter ERROR 04 ILLEGAL I O MODULE LOOP COMBINATION You are trying to activate simultaneously both a local and remote loop or PRBS transmission or BERT test or tone injection on the same...

Page 153: ...tion is not allowed therefore you must either increase the main link data rate or reduce the channel rate You are trying to connect a KVC 1 card when the main link data rate is 768 kbps This combination is not allowed ERROR 10 ILLEGAL LOOP COMBINATION INVOLVING ML REMOTE LOOP You are trying to activate on either MX 2100 an illegal combination of loops which includes the remote main link loop refer...

Page 154: ...g to select a timing mode and or speed that is not supported by the installed KML module ERROR 19 ILLEGAL ML MODE FOR WORKING WITH LCD The main link mode selected by the operator on the MX 2100 front panel is not allowed because the required parameters cannot be defined using the front panel controls and the LCD ERROR 20 ILLEGAL COMMAND MODULE NOT INSTALLED The slot whose number has been specified...

Page 155: ... COMMAND DOWNLOAD NOT SUPPORTED The command you have entered cannot be executed when downloading is disabled ERROR 32 ILLEGAL PROTOCOL AND TIMING COMBINATION You are trying to select a channel timing mode for a data channel configured for asynchronous operation ERROR 33 REDUNDANT ML NOT INSTALLED No redundant KML module is installed ERROR 34 DISCONNECT LOOP BEFORE CONFIGURATION CHANGE You are tryi...

Page 156: ...e the timing mode of the other main link cannot be DTE or LBT If both main links use LBT or DTE timing the LINK_CLK parameter must be set to NONE ERROR 50 ILLEGAL COMBINATION OF INTERFACE AND ECHO CANCELLER You are trying to disable the echo canceller of a voice module e g KVC 2 etc when its interface is 2 WIRE This is not allowable because when the link connecting between the subscribers includes...

Page 157: ...AL AND REM MUX ML MODES NOT COMPATIBLE Incorrect main link configuration of MX 2100 connected in a link For drop insert configuration check that the main link mode for the dropping MX 2100 is dual link and that the other units are configured for single link For other configurations check that identical modes are used at both ends ERROR 205 ML B ML A PRIORITY SHOULD EQUAL ML A ML B PRIORITY Select ...

Page 158: ...define a second link on a MX 2104 This is not supported ERROR 214 LOCAL REM SLOTS OP HIGHWAY OR ML PRIORITIES INCOMPATIBLE Check configuration of main link priorities for all the modules ERROR 215 KM2104 OFFSET EDIT AGENT MISMATCH The current offset and the offset in the edited data base are different ERROR 218 ONLY ONE KDI KDI CH IS ALLOWED IN A MUX Only one KDI or KDI CH can be installed or prog...

Page 159: ...he management traffic is initiated by the SNMP based network management station except for trap messages which addresses the managed entities in its management domain Only the addressed managed entity answers the polling of the management station The managed entities include a function called an SNMP agent which is responsible for interpretation and handling of the management station requests to t...

Page 160: ...ect forming one leaf located at the end of a branch of that tree Each leaf in the MIB is reached by a unique path therefore by numbering the branching points starting with the top each leaf can be uniquely defined by a sequence of numbers The formal description of the managed objects and the MIB structure is provided in a special standardized format called Abstract Syntax Notation 1 ASN 1 Since th...

Page 161: ...tity this term includes both managed entities and management stations can be assigned by its user community names Access Restriction Using SNMP Communities In general SNMP agents support two types of access rights Read only The SNMP agent accepts and processes only SNMP getRequest and getNextRequest commands from management stations which have the same read only community name Read write The SNMP ...

Page 162: ...nment General The SNMP agent of the MX 2100 can communicate either out of band or in band Out of Band Out of band communication is performed via the serial ports Serial Link Internet Protocol SLIP or Ethernet of the KCL 2 module In Band The user can select the main bandwidth allocated to management and the transmission and routing management protocols The bandwidth for management can be one of the...

Page 163: ...bers Authority IANA There are five IP address classes A B C D and E However only the classes A B and C are used for IP addressing Consult your network manager with respect to the class of IP addresses used on your network The network portion of an IP address can be one two or three bytes long in accordance with the IP address class This arrangement is illustrated in Figure C 1 IP Address Byte 1 By...

Page 164: ...r the subnet number The mask is a 32 bit word that includes ones in the positions used for net and subnet identifications followed by zeros up to the end of the IP address For example the subnet mask corresponding to the Class C IP address 194 227 31 67 is 255 255 255 000 Recommendations for the Selection of IP Addresses When the MX 2100 SNMP agent and its management station are connected to the s...

Page 165: ... A MBE RAS A MBE RAS A Network B Network A Network C Management Station Management Station Figure C 2 Management System Topology Using Subnetting For this purpose the IP router function of MX 2100 SNMP agents supports learning filters A learning filter is defined by means of a subnet IP address and a subnet mask The IP router will learn only addresses of agent IP addresses which when viewed throug...

Page 166: ...s the MIB II authentication trap and in addition generates the following enterprise specific traps Each alarm message The result of each sanity check The following commands are used to set the SNMP traps DEF AGENT DEF NAME DEF MANAGER LIST After using DEF AGENT you must reset MX 2100 Identifying a remote agent takes about 1 minute Note Note ...

Page 167: ...ew KCL 2 module e g a repaired module This installation method is called cold or local software installation The cold software installation process must be performed from the DOS prompt only use a DOS window under Windows 95 The program DL EXE is required for performing the cold installation On line use TFTP software directly or through other MX 2100 systems without stopping the operation of the M...

Page 168: ...the DL EXE program After the program starts select the option C and configure the PC for downloading as follows Select the option P and then select the PC serial port COM1 or COM2 which is connected to the KCL 2 module Press ESC Select the option F and type KM2100 ARJ as the file name Press ESC 7 Start sending the file by selecting the option S The software file is sent to the MX 2100 You can moni...

Page 169: ...his command is available with version 2 0 and up Downloading Procedure 1 Run the TFTP application 2 Set the parameter values in the TFTP client software as follows Time out 20 sec Total Retransmission 200 sec if available Host IP address of MX 2100 Remote File KM2100 ARJ Local File Enter full path for the KIM2100 ARJ file Transfer Mode Binary 3 When done press the OK button 4 The file KM2100 ARJ i...

Page 170: ...Appendix D Software Download MX 2100 2104 Installation and Operation Manual D 4 Warm Installation Upgrading Procedure Windows Based Stations ...

Page 171: ...e only with the KML 1 KML 2 KML 3 KML 4 and KML F modules using the TE mode It is not displayed when a KML 5 KML 6 KML 7 KML 8 KML 10 module is installed INT Internal oscillator i j Locked to the external clock received from the indicated data channel This selection is available only when the MX 2100 enclosure includes I O modules with synchronous data channels which support the DTE2 timing mode e...

Page 172: ...n band management channel A Controls the use of the in band management channel B NO Disables the in band management channel In band management channel data rate 0 8 kbps 1 6 kbps 2 4 kbps 3 2 kbps 4 8 kbps 9 6 kbps 19 2 kbps Default NO ML_MODE Controls the main link operating mode SINGLE single main link operation REDUND the two KML modules operate as a redundant pair DUAL_LNK the two KML modules ...

Page 173: ...ameters The following table lists the available main link parameters that can be configured from the front panel and their functions The table also lists the parameter values included in the MX 2100 default configuration The available parameters depend on the type of main link module installed in the MX 2100 enclosure for a complete description of all the configuration parameters of main link modu...

Page 174: ...loopback timing DCE DCE timing BUFFER_SIZE Determines the size of the main link receive buffer used in the DTE and E DCE modes supported by modules KML 1 through KML 6 only This parameter is not displayed when the main link interface is DCE 8 8 bits 256 256 bits recommended for use on satellite links Default 8 INTERFACE Displays the physical interface selected by means of an adapter cable for the ...

Page 175: ...nization CCITT Complies with ITU T Rec G 732 on the KML 8 module only 62411 As required by AT T TR 62411 after 10 seconds FAST After 1 second Default FAST CRC 4 Enables the generation of check bits in accordance with the CRC 4 polynomial specified by ITU T Rec G 704 for the frames transmitted on the E1 line and the checking of the check bits carried by the received E1 frames This parameter is avai...

Page 176: ...000 133 266 133 266 399 266 399 533 399 533 655 533 FCC68A Compliance with FCC Rules Part 68A Default 0 133 For link interfaces with CSU 0 No attenuation 7 5 Attenuation of 7 5 dB relative to the nominal transmit level 15 Attenuation of 15 dB relative to the nominal transmit level 22 5 Attenuation of 22 5 dB relative to the nominal transmit level Default 0 MODE Selects the operating mode of the KM...

Page 177: ...mission must start with three consecutive Carriage Returns Do not select AUTO when connecting to an SNMP network management station Default 9600 DATA Selects the number of data bits in the word format 7 or 8 data bits Default 8 PARITY Controls the use of parity ODD Odd parity EVEN Even parity NONE Parity disabled only with 8 data bits Default NONE INTERFACE Selects supervisory port interface DCE T...

Page 178: ...ameters Cont Designation Function Values POP_ALARM Controls the automatic display of alarms on the terminal NO YES Default NO PWD Controls password protection NO YES Default NO LOG_OFF Selects idle disconnect time NO 10 MIN 10 Default NO AUXILIARY_ DEVICE Selects auxiliary device NMS_SLIP AGENT_SLIP TERMINAL Default TERMINAL ...

Page 179: ...ose an optional entry parameter braces enclose a list of entries parameters from which one must be selected ENTER indicates the pressing of the ENTER key SP indicates the pressing of the space bar i indicates an I O slot number OP indicates the options slot j indicates the channel number within the selected I O slot The ML B option is for MX 2100 only Some commands may include fields not be releva...

Page 180: ...s command is not used you will need to wait 10 minutes to start new TELNET session CLR ALM Purpose Clear the alarm buffer Format CLR ALM LOC A Use 1 To clear only the event alarms on the local MX 2100 type CLR ALM LOC ENTER or CLR ALM ENTER To clear all the alarms on the local MX 2100 type CLR ALM A ENTER or CLR ALM LOC A ENTER 2 After the desired parameter values are selected press ENTER to end M...

Page 181: ...V 54 3 ML ENTER For main link A it is not necessary to specify the link e g you can type CLR LOOP L ML ENTER instead of CLR LOOP L ML A ENTER 2 To deactivate a specific type of loop on main link B type CLR LOOP L ML B ENTER or CLR LP L ML B ENTER CLR LOOP R ML B ENTER or CLR LP R ML B ENTER CLR LOOP V54 2 ML B ENTER or CLR LP V54 2 ML B ENTER CLR LOOP V54 3 ML B ENTER or CLR LP V54 3 ML B ENTER 3 ...

Page 182: ...ule channel Format CLR MONITOR or CLR M Use To deactivate the monitoring of the currently selected I O channel type CLR MONITOR ENTER or CLR M ENTER You will see the time and date followed by the MX 2100 prompt CONNECT SWITCH Purpose Dials and connects to the remote MX 2100 from the local MX 2100 s main link over the ISDN switch line when the following is true The MX 2100 s main link is configured...

Page 183: ...LL The link will remain connected until the use of the command DISCONNECT SWITCH or MX 2100 is reset DATE Purpose Set the date for the MX 2100 internal real time clock Format DATE Use 1 To set the date type DATE ENTER MX 2100 sends the date entry form Date Day 06 Month 06 Year 2000 2 Bring the cursor to the first field to be changed by pressing ENTER 3 To change the selected field press F to incre...

Page 184: ...cal data form is shown below Zone 1 Zone 2 Zone 3 Zone 4 START END START END START END START END 00 00 hh mm hh mm hh mm 24 00 where hh hour 00 through 23 mm minutes 00 through 59 2 Change parameters as follows Bring the cursor to the beginning of the first field to be changed by pressing the space bar Change the selected field by pressing F or B to scroll among the available selections When the d...

Page 185: ...F AGENT Use 1 Type DEF AGENT ENTER MX 2100 displays the following SNMP data form OLD AGENT PARAMETERS IP ADDRESS IS XXX XXX XXX XXX SUBNET MASK IS XXX XXX XXX XXX DEFAULT GATEWAY IS XXX XXX XXX XXX READ COMMUNITY IS public WRITE COMMUNITY IS private TRAP COMMUNITY IS public TELNET_APATHY_TIME 10 MIN IP_ADDRESS 999 999 999 999 SUBNET MASK 999 999 999 999 DEFAULT GATEWAY 999 999 999 999 SNMP READ CO...

Page 186: ...he SNMP agent in the dotted quad form four groups of digits ranging 0 through 255 separated by periods SUBNET MASK Type in the subnet mask in the dotted quad format The mask consists of four groups of digits in the range of 1 through 255 separated by periods The net section must consist of 1 s DEFAULT GATEWAY Type in the IP address assigned to the DXC SNMP agent in the dotted quad format four grou...

Page 187: ...bounce number The debounce number can be one of the following 0 Default of debounce e g after initiate database 255 Mask the alarm and do not report to the user 1 to 254 Debounce in seconds 4 Press ENTER The alarm string with debounce number will display DEF CALL Purpose Define the call out parameters for the MX 2100 dial out port connector CONTROL DTE The call out function is enabled by means of ...

Page 188: ... Call out Parameters Designation Function Values NUM_OF_RETRIES Controls the number of dialing tries and applies to both the primary and the alternate numbers If the call is not established after dialing the primary directory number the specified number of times MX 2100 attempts to establish the call by dialing the alternate directory number provided the use of an alternate number is enabled by me...

Page 189: ...number In this case MX 2100 stops the call attempts after the specified number of call attempts on the primary number failed YES The use of an alternate number is enabled 3 When done press ENTER The second page of the call out parameters data form is displayed A typical display is shown below NEW PRIMARY NUMBER MAX 20 CHARS CURRENT PRIMARY NUMBER primary number The second page is used to enter a n...

Page 190: ...e module channels type DEF CH i ENTER The data form of the selected module or module channel is displayed The form presents the current parameter values as defaults 3 Change the parameters as follows Bring the cursor to the beginning of the first field to be changed by pressing the space bar To change the selected field press F or B to scroll among the available selections When the desired selecti...

Page 191: ...re 2 Use the space bar to move the cursor to the desired slot number and press the F or B key to change the main link used by this I O slot If priority bumping is used the third row shows the priority assigned to each module when a flip occurs from main link A to main link B If priority bumping and switched backup are disabled this row shows N A for all the I O slots 3 Use the space bar and the F ...

Page 192: ... AUTO 5 When the desired selections are obtained for all the I O slots press ENTER If system mode is not SWITCH the SWITCH line show N A for all the I O slots DEF DB FLIP Purpose Define the times of day hour and minutes for switching from one database to the other or cancel this function This command can be used only when an alternate database has already been defined Format DEF DB FLIP Use 1 Type...

Page 193: ...uld always select NA if the switched backup database is ALTERNATE see DEF ML CALL command 5 After the desired values are selected press ENTER key to end MX 2100 displays the time and date fields followed by the MX 2100 prompt DEF DP Purpose Define the communication parameters of the dial out port The communication parameters depend on the KCL 2 module version For KCL 2 modules with RS 232 interfac...

Page 194: ...lections When the desired selection is displayed press the space bar to move to the next field When done press ENTER The second line of parameters is displayed The following is a typical display LOG_OFF AUXILIARY_DEVICE ROUTING_PROTOCOL NO NMS_SLIP NONE Table F 2 shows the dial out parameters and their values Table F 2 Dial out Parameters Designation Function Values SPEED Selects the dial out port...

Page 195: ...ept the PPP protocol is used AGENT PPP Same as AGENT SLIP except the PPP protocol is used ROUTING PROTOCOL Controls the transmission of routing tables which allows management traffic to be routed through the dial out port NONE Routing not supported PROPRIET Routing of management traffic by means of the MX 2100 proprietary protocol DEF FRAME Purpose Define manually the allocation of bits in the mai...

Page 196: ... perform the change bring the cursor to the desired field and then scroll using the F and B keys to display the desired number Appendix B in the Installation and Operation Manual of the KDI module contains planning forms to help you in the allocation task 3 When the allocation is completed press ENTER The supervision terminal will display the time and date fields followed by the MX 2100 prompt 4 T...

Page 197: ...dditional management stations 2 through 10 The current list in the following format appears CURRENT MANAGERS LIST PARAMETERS IP ADDRESS 1 IS 999 999 999 999 SUBNET MASK 1 IS 999 999 999 999 IP ADDRESS 2 IS 999 999 999 999 SUBNET MASK 2 IS 999 999 999 999 IP ADDRESS 3 IS 999 999 999 999 SUBNET MASK 3 IS 999 999 999 999 IP ADDRESS 10 IS 999 999 999 999 SUBNET MASK 10 IS 999 999 999 999 DEF ML Purpos...

Page 198: ...R to end MX 2100 displays the time and date fields followed by the MX 2100 prompt DEF ML CALL Purpose Define the parameters used to control the setup of a backup dial up connection when MX 2100 operates in the switched backup mode The switched backup mode is selected by means of the DEF SYS command Before using this command define the configuration parameters of the two main link modules using the...

Page 199: ...f other standards not US ISDN standard is shown below IN_NUM_MODE CALL_TIME_OUT SW_BACKUP_DB NONE 45sec ONLINE LOCAL SUB ADDRESS LOCAL DIRECTORY NUMBER BACKUP SUB ADDRESS BACKUP DIRECTORY NUMBER 2 Select the parameter values as follows IN_NUM_MODE Controls the handling of incoming calls For the MX 2100 unit configured as master always select NONE to cause the KML 10 module to reject all incoming c...

Page 200: ...d DEF ML commands need to be configured in the background database After the main link returns to normal operation and the backup link is disconnected MX 2100 automatically returns to the main database SUB ADDRESS Enter the sub address of the local ISDN directory number DIRECTORY NUMBER Enter the ISDN directory number of the line connected to the KML 10 module up to 20 digits SPID The Service Prof...

Page 201: ...T BACKUP SUB ADDRESS and FIRST BACKUP DIRECTORY NUMBER For the US standard if the calling number is composed of two abstract terminals enter the first expected number in the FIRST BACKUP SUB ADDRESS and FIRST BACKUP DIRECTORY NUMBER and the second in the SECOND BACKUP SUB ADDRESS and SECOND BACKUP DIRECTORY NUMBER 3 After the desired selections are made press ENTER to end The supervision terminal ...

Page 202: ...ype DEF NAME ENTER MX 2100 displays the node name entry form ENTER NODE NAME MAX 8 CHARACTERS CURRENT NODE NAME name 5 Type the desired node name and then press ENTER The name appears on the second line DEF NODE Purpose Define the node number of the MX 2100 The allowable range of node numbers is 0 through 255 Format DEF NODE Use 1 To define the MX 2100 node number type DEF NODE ENTER MX 2100 displ...

Page 203: ...here is only the ROUTING_PROTOCOL field Format DEF NP Use 1 Type DEF NP ENTER If the KCL 2 module has an Ethernet interface the following is displayed ROUTING_PROTOCOL NONE where NONE is the default value If the KCL 2 module has RS 232 interfaces the following is displayed SPEED DATA PARITY CALL_OUT_MODE 9600 8 NONE NO where the parameter values are the default values 2 Change the parameter values...

Page 204: ... disconnection after 10 minutes if no input data is received by the network port AUXILIARY DEVICE Selects the management mode supported by the network port Note At any time only one of the two ports of the KCL 2 module can be used for management access NMS_SLIP the network port connects to an SNMP management station and or TELNET host using the SLIP protocol AGENT_SLIP The network port is connecte...

Page 205: ...his command you can declare an IP address on the list as an Ethernet address When an agent searches for this IP address it will be directed to the Ethernet Format DEF ROUTE Use Type Def route ENTER The MX 2100 displays the following data form KM2100 def route CURRENT ROUTE PARAMETERS ROUTE IP ADDRESS 1 IS 000 000 000 000 ROUTE IP ADDRESS 2 IS 000 000 000 000 ROUTE IP ADDRESS 3 IS 000 000 000 000 R...

Page 206: ...as follows Bring the cursor to the beginning of the first field to be changed by pressing the space bar To change the selected field press F or B to scroll among the available selections When the desired selection is displayed press the space bar to move to the next field 3 After the desired parameter values are selected press ENTER to end MX 2100 will display the time and date fields followed by ...

Page 207: ...ys every 10 minutes the alarm status or whenever a new ON alarm is received or an ON OFF alarm changes state from OFF to ON NO The automatic display feature is disabled AUXILIARY DEVICE Selects the management mode supported by the Control port Note At any time only one of the two ports of the KCL 2 module can be used for management access NONE Control port is not operational TERMINAL Control port ...

Page 208: ...r When using a KDI module for drop and insert purposes it may be necessary to lock the main link timing by selecting ML A or ML B for the LINK_CLK parameter in this case this field shows N A not applicable DWLD_BW_A DWLD_BW_B Controls the use of management channels A or B Note These parameters must be set in order to allow in band configuration of a remote MX 2100 When selecting a speed for the do...

Page 209: ...k is corrected MANUAL Recovery upon manual command AUTO Automatic recovery The criterion for recovery is controlled by means of the FLIP_INTEG time FRAME_MODE Selects the main link bit allocation mode MANUAL Manual allocation This is the mode required for using the bypassing and multidrop functions supported by the KDI module AUTO Automatic allocation LINK_CLK When a KDI module is installed in MX ...

Page 210: ...red mode select the desired module type for each empty slot as mentioned above You can select a module type only if the slot is empty If the slot is not empty it automatically shows the type of the module physically installed in the slot If the installed module is changed the module type is automatically changed in the database 4 After the desired modules are selected press ENTER The last line of ...

Page 211: ...itch_mode MANUAL and the main link is master in_num_mode NONE set by the command DEF ML CALL DSP AGENT Purpose Display the IP and SNMP agent parameters Format DSP AGENT Use Type DSP AGENT The following is displayed NAME KM RAD CURRENT AGENT PARAMETERS IP ADDRESS IS 192 115 71 44 SUBNET MASK IS 255 255 255 192 DEFAULT GATEWAY IS 192 115 071 033 READ COMMUNITY IS public WRITE COMMUNITY IS private TR...

Page 212: ...node number and name and it serves as an easily identified separator between the alarms transmitted by different MX 2100 units The contents of the alarm buffer are displayed as a table with four columns ALARM NUMBER ALARM SYNTAX ALARM STATE and ALARM OCCURRENCE TIME For a description of the alarm messages that can be displayed by the terminal refer to the Alarms appendix DSP BERT Purpose Display t...

Page 213: ... C DSP CH CON Purpose Display the configuration of all the connected channels i e all the channels for which a main link bandwidth allocation has been defined even if not actually used Format DSP CH CON Use Type DSP CH CON ENTER The connected channels configuration table is displayed A typical screen is shown below ML SPEED CONTROL SIGNALS CH A 1 ML A 9 6KBPS LOCAL CH A 2 ML A 19 2KBPS LOCAL COMP ...

Page 214: ...redundancy mode Format DSP FLIP Use Type DSP FLIP ENTER The following message is displayed LAST FLIP CAUSED BY cause The following cause descriptions can be displayed NO FLIP No flip occurred FORCED FLIP Flipping occurred as a result of operator s command FLIP ML ML CTS OR DSR IS OFF Flipping occurred because the CTS or DSR line in the interface of the KML module serving the previously used link h...

Page 215: ...hecks good or lists the detected problem DATABASE 1 CHKSUM ERROR DATABASE 2 CHKSUM ERROR I O EXPANDER ERROR COUNTER ERROR PS A 5 VOLT FAILURE PS A 12 VOLT FAILURE PS B 5 VOLT FAILURE PS B 12 VOLT FAILURE Refer to the Alarms appendix for an interpretation of the error messages DSP MANAGER LIST Purpose Display the network management stations to which the SNMP agent of MX 2100 sends traps Each networ...

Page 216: ...K 3 IS 000 000 000 000 IP ADDRESS 10 IS 000 000 000 000 SUBNET MASK 10 IS 000 000 000 000 DSP KVF5 or DSP PBX Purpose Display the configuration parameters of the KVF 5 modules that comprise a group connected to the PBX interface Format DSP PBX or DSP KVF5 Use Type DSP PBX ENTER or DSP KVF5 ENTER Display Format A typical data form for a T1 group is shown below I O CARD SLOT TYPE TS_GROUP FROM_PBX T...

Page 217: ...lected signaling mode is CAS any bits selected except CCS then the default A B C D to be transmitted to the PBX is displayed in this field POLARITY Polarity of a bit Normal Inverted for master module only For the slave modules displays N A EXIST Indicates whether the module includes a sub interface DSP KVF6 Purpose Display the configuration parameters of the KVF 6 modules in the MX 2100 Format DSP...

Page 218: ... NOT_A NOT_B NOT_C NOT_D 0 or 1 EXIST Indicates whether the module exists in the MX 2100 or not DSP SIGNALING or DSP SIG Purpose Display the signaling bits state in KVF 5 or KVF 6 modules Format DSP SIGNALING i or DSP SIG i Use Displays the 4 CAS bits A B C D of signaling for KVF 5 and KVF 6 modules for connected time slots For each card that carries CAS information signaling mode is CAS all the c...

Page 219: ...92 115 71 38 up 006 3 TIME HH MM SS DATE Day MM DD YY DSP REV Purpose Display the list of modules installed in the MX 2100 module and the hardware and software versions of each module Format DSP REV i Use 1 To display information on all the modules type DSP REV ENTER The supervision terminal displays the list of slots in which modules that include programmable components can be installed the type ...

Page 220: ...le main link bandwidth Refer to the General Information chapter for additional information Format DSP ST FRAME A B or DSP ST FR A B Use 1 To display frame information for main link A type DSP ST FRAME A ENTER or DSP ST FR A R If MX 2100 is equipped with only one main link module it is not necessary to identify the main link 2 To display frame information for main link B type DSP ST FRAME B ENTER o...

Page 221: ...ART 16 BYPASS_SIZE 20 I O CH1_START CH1_SIZE CH2_START CH2_SIZE CNTRL_START CNTRL_SIZE LAST_BIT SLOT 01 000 012 000 000 012 001 012 06 014 012 000 000 000 000 025 The display shows the number of bits in the frame and the bit weight main link bandwidth allocation unit followed by the bypass information and bandwidth utilization of each slot BYPASS_START The number of the first bit in the block of b...

Page 222: ...KML module installed in slot 3 ML B for the module installed in slot 4 or BOTH for a MX 2100 operating in the dual link priority bumping or switched backup mode SOFTWARE REVISION The software revision of the KML module HARDWARE REVISION The hardware revision of the KML module ALARMS Displays the alarms related to the corresponding main link NONE No alarm has been reported LOCAL SYNC LOSS The local...

Page 223: ...ed in slot 4 or BOTH for a MX 2100 operating in the dual link priority bumping or switched backup mode SOFTWARE REVISION The software revision of the KML 10 module HARDWARE REVISION The hardware revision of the KML 10 module ALARMS Displays the alarms related to the corresponding main link NONE No alarm has been reported LOCAL SYNC LOSS The local MX 2100 lost frame synchronization REMOTE SYNC LOSS...

Page 224: ...ich the KML 10 module is engaged DIALING The call is being set up CONNECTED The call is connected DISCONNECTING The call is in the process of being disconnected DISCONNECTED The call has been disconnected ISDN LAYER1 Displays the current state of the layer 1 protocol CONNECTED Layer 1 is connected DISCONNECTED Layer 1 is not connected ISDN LAYER2 Displays the current state of the layer 2 protocol ...

Page 225: ...Module connected to the bus of main link A ML B Module connected to the bus of main link B NC PB Module is not connected to a main link bus displayed only when the priority bumping or the switched backup mode is used In addition the display provides the following information for each of the channels available on this module The channel number B is identified in the left hand column CH i j If the m...

Page 226: ...AME G732S CRC4 NO OOS F I GAIN LIMIT SHORT_H dsu E1 T1 LOOP NONE ECHO CODING TX RX FAX CH TIME_SLOT SPEED CNCL LAW GAIN GAIN GAIN TYPE LOOP GROUP CH 01 1 4 4 8 OFF a_Law 0dBm 0dBm 9 5dBm V F NONE 1 2 3 4 CH 01 2 4 4 8 OFF u_Law 0dBm 0dBm 9 5dBm V F NONE 5 6 7 8 CH 01 3 4 4 8 OFF u_Law 0dBm 0dBm 9 5dBm V F NONE 9 10 11 12 CH 01 4 4 4 8 OFF u_Law 0dBm 0dBm 9 5dBm V F NONE 13 14 15 16 For an explanat...

Page 227: ...CK Indicates the source for the link transmit clock the internal oscillator a module channel or the main link ML ML can only appear when the main link timing mode is DTE Refer to the Configuration Parameters appendix for additional information ACTIVE ML Indicates the currently active KML module s ML A for the KML module installed in slot 3 and or ML B for the module installed in slot 4 or BOTH for...

Page 228: ... ENTER The working prompt changes to ALT_DB 2 To select the on line database while working on the alternate database type at the ALT_DB prompt EDIT DB ENTER The working prompt changes to KM2100 or KM2104 When you exit the configuration program and return the control to the LCD the database currently defined to be on line irrespective of the database being edited is forced to remain the on line dat...

Page 229: ...F command to select automatically the corresponding control sequences Format F Use 1 To display the current codes type F ENTER The terminal function entry screen is displayed The screen includes three separate lines displayed one after the other A typical screen showing all the three lines is shown below CLEAR SCREEN hhhhhhhh clear screen code CURSOR HOME hhhhhhhh cursor home code CURSOR RIGHT hhh...

Page 230: ...t H 1 2 3 4 Use To display all the pages of the HELP system type H ENTER To display a specific page of the HELP system e g page 1 type H 1 ENTER INIT DB Purpose Load the default parameters values instead of the user configuration in the MX 2100 database see Table F 6 This command is available only on a master MX 2100 Format INIT DB Use 1 To load the default parameters type INIT DB ENTER 2 MX 2100 ...

Page 231: ...EVEL OOS ASYNC NC 6 DCE LOCAL ON MIN 4 WIRE 8dBm 2dBm F B SP Supervisory Port SPEED_BPS DATA PARITY INTERFACE 9600 8 NONE DCE General CLEAR SCREEN CURSOR HOME CURSOR RIGHT 00000000 00000000 00000000 INIT F Purpose Set all the terminal control codes cursor home cursor right and clear screen to 0 or select the control codes corresponding to one of the supported terminals VT 52 VT 100 TV 920 FREEDOM ...

Page 232: ...ands for the terminal name 2 To reset the control codes to 0 type INIT F ENTER LOAD DB 1 2 Purpose Loads the MX 2100 database to a file to enable transfer to a remote MX 2100 via TFTP This enables you to control a remote MX 2100 database and to configure other MX 2100s with the same database Refer to the Update DB 1 2 command Loading the database is performed from a file named CNFG DAT Configure t...

Page 233: ...p combinations Refer to the Diagnostics chapter for a description of the loops available on the MX 2100 main link Refer to the relevant module Installation and Operation Manual for a description of the tests available on the corresponding module Format LOOP loopname ML A ML B i j or LP loopname ML A ML B i j Use 1 To activate a specific type of loop on main link A type LOOP L ML A ENTER or LP L ML...

Page 234: ...urn to normal operation Format ML RECOVERY ENTER Use To initiate return to normal operation type ML RECOVERY ENTER MONITOR Purpose Select the desired I O module channel for monitoring Format MONITOR i j or M i j Use To select a module channel type MONITOR i j ENTER or M i j ENTER where i is the number of the I O slot number 1 through 12 REBUILD FRAME Purpose Rebuild the MX 2100 frame The MX 2100 f...

Page 235: ...l MX 2100 Format RESET LOC Use To reset the local MX 2100 type RESET LOC ENTER RESET IO Purpose Reset I O module Format RESET IO i Use To reset the I O module installed in the MX 2100 type RESET IO i ENTER where i is the I O slot number 1 through 12 RESET ML Purpose Reset ML module Format RESET ML A or B Use To reset ML module type RESET ML A or B ENTER where A is referenced to ML_A slot and B to ...

Page 236: ... minute beyond the current time and then press ENTER at the correct instant MX 2100 displays the time and date fields note that time has changed followed by the MX 2100 prompt UPDATE DB 1 2 Purpose Updates the MX 2100 database from a file with a database package that was received from a remote MX 2100 via TFTP This enables you to control a remote MX 2100 database and to configure other MX 2100s wi...

Page 237: ...odes 1 45 CODE E 5 Cold Local Installation Procedure D 1 Commands F 2 Language Syntax 4 1 Options 4 2 Protocol 4 3 Common Logic Module KCL 2 A 1 DP Connector A 3 Communication Port 1 38 Configuration Error Messages B 10 Connection Data Common Logic Module KCL 2 A 1 DC Power Input Connector A 4 Connection Methods 2 9 Control Logic Modules 1 10 Control Session 4 15 CRC 4 E 5 CTS 2 10 E 7 Current and...

Page 238: ...2 10 Data Carrier Detect DCD 2 10 Data Set Ready DSR 2 10 Data Terminal Ready DTR 2 9 Dial up Modem 2 11 Request to Send RTS 2 9 Ring Indication RI 2 10 Hardware Requirements 2 8 Connection Methods 2 9 Supervisory Port Interface Characteristics 2 8 Terminal Characteristics 2 8 I I TS CODE E 5 I O Module Applications 1 50 I O Module Loops and Tests 5 12 I O Modules 1 12 In Band Management 1 5 Index...

Page 239: ...1 4 Remote Management 1 33 System 1 32 Management Communication Port 1 38 Dial Port Connector 1 38 Ethernet Port 1 38 Supervisory Port Connector 1 38 Management Using Supervision Terminal Hardware Requirements 2 8 MASK E 6 Messages Alarm 5 1 ML 5 2 ML_MODE 3 10 E 2 MODE E 6 Modules Control Logic 1 10 I O 1 12 Main Link 1 10 Option 1 12 Power Supply 1 11 Multidrop Configurations 1 26 Multiplexing 1...

Page 240: ...on and Configuration 1 4 Supervision Language 4 1 Command Language Syntax 4 1 Command Options 4 2 Command Protocol 4 3 Commands F 2 Index of Commands 4 4 Supervision Terminal Operating Instructions Control Session 4 15 Ending a Control Session 4 15 Power Up with Supervision Terminal Connected 4 12 Starting a Session Multiple MX 2100 4 14 Starting a Session Single MX 2100 4 13 Supervisory Port Conf...

Page 241: ...cteristics 1 51 Terminal Characteristics 2 8 TIMING 3 11 E 4 Timing Modes of ISDN Channels 1 47 Tone Injection 5 15 Turn Off 4 18 Turn On 4 16 U Using the Front Panel Push buttons 4 9 W Warm Installation Upgrading Procedure Windows Based Stations D 3 Downloading Procedure D 3 ...

Page 242: ...I 6 MX 2100 2104 Installation and Operation Manual ...

Page 243: ...the power supply cable to secure it firmly to the TB plug grip pass the tie through the holes on the grip 4 Isolate the exposed terminal screws wire leads using a plastic sleeve or insulating tape to prevent the possibility of short circuit 5 Connect the assembled power supply cable to the unit by inserting the TB plug into the unit s VDC IN connector until it snaps into place DC Power Supply Wire...

Reviews: