background image

MDT Switch Actuator AKS/AKI

  Technical Data

AKS-0416.01 
AKS-0816.01 
AKS-1216.01

AKS-0410.01
AKS-0810.01 
AKS-1210.01

AKI-0416.01    
AKI-0816.01  
AKI-1216.01

Number of outputs

4

8

12

4

8

12

4

8

12

Output switching ratings

    Ohmic load

16A

10A

16A/20A*

    Capacitive load

max. 100uF at 16A

max. 100uF at 10A

max. 200uF at 16A


Voltage

230VAC

230VAC

230VAC

 Maximum inrush current

400A/150µs 
200A/600µs

400A/150µs 
200A/600µs

600A/150µs 
300A/600µs


Maximum load

    Incandescent lamps

2700W

 2000W

3680W

    Halogen lamps 230V

2500W

1500W

3680W

    Halogen lamps, electronic transformer**

1000W

700W

2000W

    Fluorescent lamps, not compensated

1800W

1600W

3680W

    Fluorescent lamps, parallel comp.

1000W

700W

2500W

    Max. number of electronic transformers

14

14

28

Output life expectancy (mechanical) 

1.000.000

1.000.000

1.000.000

Max. fuse per channel 

16A

10A

20A

Permitted wire gauge 

    Screw terminal

0,5 - 4,0mm²  solid core             

0,5 - 2,5mm²  finely stranded

    KNX busconnection terminal

0,8mm Ø, solid core

0,8mm Ø, solid core

0,8mm Ø, solid core

Power supply***

230VAC/50Hz

230VAC/50Hz

230VAC/50Hz

Power consumption

<0,3W

<0,3W

<0,4W

<0,3W

<0,3W

<0,4W

<0,3W

<0,3W

<0,4W

Operation temperature range

0 to + 45°C

0 to + 45°C

0 to + 45°C

Enclosure

IP 20

IP 20

IP 20

Dimensions MDRC (Space Units)

4/8/12SU

4/8/12SU

4/8/12SU

*     total current carrying capacity neighbouring outputs max. 32 A  
**    low voltage halogen lamps with electronic transformer         
***   AKI/AKS 08/12: Power supply 230VAC, from Q3 2012 via KNX Bus. AKS/AKI 04: Power supply via KNX bus                                             

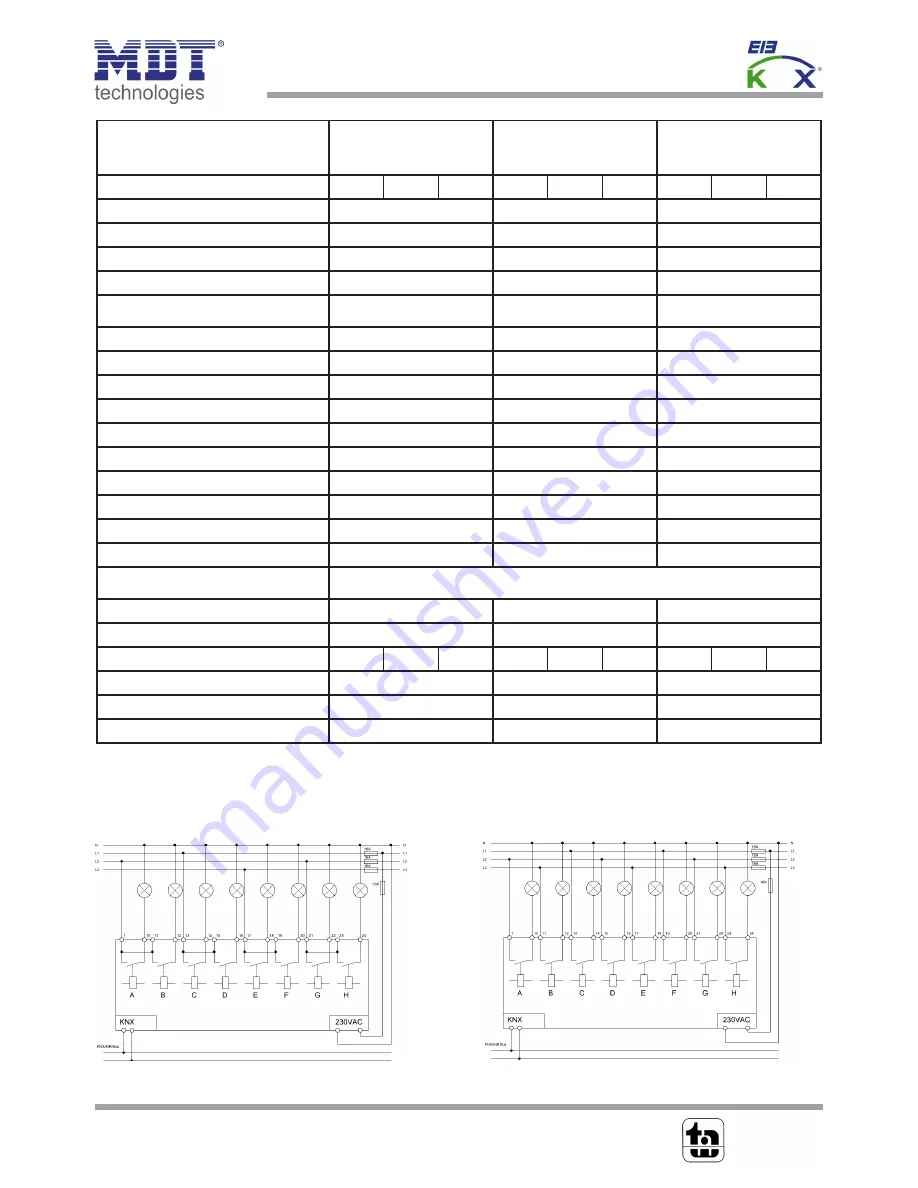
Examplary circuit diagram AKS-0816.01             

Examplary circuit diagram AKI-0816.01      

 
Note:  AKI/AKS 08/12: Power supply 230VAC, from Q3 2012 via KNX Bus.                                                    

MDT technologies GmbH


 51766 Engelskirchen 

 Papiermühle 1 

Tel.: + 49 - 2263 - 880 

• 

Fax: + 49 - 2263 - 4588 

• 

knx@mdt.de 

 www.mdt.de

Stand: 0312

DIN EN ISO 9001

TAW Cert


Zert.Nr.1905606

N

Summary of Contents for AKI-0416.01

Page 1: ...itch Actuators Standard Switch Actuators Series AKS 0410 01 AKS 0416 01 AKS 0810 01 AKS 0816 01 AKS 1210 01 AKS 1216 01 Heavy C loads Switch Actuators Series AKI 0416 01 AKI 0816 01 AKI 1216 01 Compact Switch Actuators Series AKK 01UP 01 AKK 02UP 01 AKK 0216 01 AKK 0406 01 AKK 0810 01 AKK 0816 01 AKK 0810A 01 AKK 1610 01 AKK 1616 01 ...

Page 2: ...tral communication object 10 3 3 Default settings of the communication objects 10 4 Reference ETS Parameter 11 4 1 General Settings 11 4 2 Channel selection 12 4 3 Identical parameter 13 4 3 1 Relay operating mode 13 4 3 2 Central function 14 4 3 3 Behavior at block unblock 14 4 3 4 Behavior at bus power up down 16 4 4 Switching output 17 4 4 1 Overview 17 4 4 2 On Off delay 19 4 4 3 Logical funct...

Page 3: ...rs AKI AKS AKK MDT technologies GmbH 51766 Engelskirchen Papiermühle 1 Tel 49 2263 880 Fax 49 2263 4588 knx mdt de www mdt de 3 6 Attachment 33 6 1 Statutory requirements 33 6 2 Routine disposal 33 6 3 Assemblage 33 6 4 Datasheet 34 ...

Page 4: ...ard design AKS 1210 01 Switch actuator 12 fold 12TE 230V AC 10 A C Load 100µF standard design AKI 0416 01 Switch actuator 4 fold 4TE 230V AC 16 A C Load 200µF industrial design AKI 0816 01 Switch actuator 8 fold 8TE 230V AC 16 A C Load 200µF industrial design AKI 1216 01 Switch actuator 12 fold 12TE 230V AC 16 A C Load 200µF industrial design AKK 0810A 01 Switch actuator 8 fold surface mounted 230...

Page 5: ...cuit diagrams Illustration 1 Exemplary circuit diagram AKS 1216 01 Always 2 channels have common L connections at the standard design Illustration 2 Exemplary circuit diagram AKI 1216 01 Every L connection is brought out separately at the industrial design Illustration 3 Exemplary circuit diagram AKK 1610 01 Always four channels have common L connections at the compact design ...

Page 6: ...r of channels Two buttons are for choosing the channel whereby the chosen channel is indicated by a flashing status LED The buttons up and down are for switching the channel on and off The programming button activates the programming function An activated programing function is indicated by a lit programming LED Illustration 4 Overview hardware module switch actuator e g AKK 1610 01 The lines AKS ...

Page 7: ... configuring the switching process Staircase Now the channel can become a staircase light function This function causes an automatic switch off of the channel after an adjusted time 2 4 1 Overview functions Group of functions Functions Group addresses number of objects connections dynamic freely assignable of the user Reset behavior behavior at bus power breakdown behavior at bus power up startup ...

Page 8: ...icted to the used type e g AKI 1216 01 2 6 Starting up After wiring the allocation of the physical address and the parameterization of every channel follow 1 Connect the interface with the bus e g MDT USB interface 2 Switching the power supply 3 Set bus power up 4 Press the programming button at the device red programming LED lights 5 Loading of the physical address out of the ETS Software by usin...

Page 9: ...ation shows the communication objects for the channels A and B Channel A is selected as switch Logic functions blocking object and scenes are activated Channel B is selected as staircase Only the blocking function is activated Illustration 5 Communication objects per channel Channel A switch Channel B staircase The following communication objects can be shown for a channel selected as switch Nr Fu...

Page 10: ...function The following communication object exists only once and is for channels Nr Function Usage Data type Central function number accords to the hardware design DPT 1 001 In Write Chart 4 Central communication object 3 3 Default settings of the communication objects The following chart shows the default settings of the communication objects Default settings Nr Name Object Function Length Priori...

Page 11: ... Illustration 6 General settings The parameter startup timeout adjusts the time between an upload and the functional start of the device The used hardware reacts only after expiration of the adjusted time All input commands before the startup timeout expire The following chart shows the dynamic range of this parameter ETS text Dynamic range default value comment Startup timeout 1 60s 1s Time betwe...

Page 12: ...ection There are 3 possible states for every channel which can be adjusted at the menu channel preselection The following parameterization accords to the chosen state of a channel But if you chosse a channel as not active there will be no further parameterization options available The chart shows the setting options for everey channel ETS text Dynamic range default value comment Channel A O not ac...

Page 13: ...rcase 4 3 1 Relay operating mode The following illustration shows the setting options for this parameter Illustration 8 Operating mode The following chart shows the dynamic range for this parameter ETS text Dynamic range default value comment Mode normally opened normally closed Relay operating mode of the channel Chart 8 Operating mode The following diagram shows the behavior of the relay operati...

Page 14: ...object all channels with an activated central function are switched on with their current parameterization So switch on delays or staircase functions are still kept The central function can make programming much more easier and your project can become more clear The following chart shows the associated communication object Number Name Length Usage Central function 1 Bit central switching of the ch...

Page 15: ...ailable for the Behavior when unlocked This action is called when the blocking function is deactivated again The following chart shows the corresponding communication object Number Name Length Usage 2 Block 1 Bit blocks the channel Chart 12 Communication object blocking function The following diagram describes the blocking process For the Behavior when locked the action on was parameterized and fo...

Page 16: ...ault value comment Behavior at bus power up Behavior at bus power down On Off no change Adjustment how the channel shall react in case of a bus power breakdown return Chart 13 Behavior at bus power up down Every channel can occupy a certain state as well in case of a bus power breakdown as in case of a bus power return The channel can be switched off or on but also stay in its current state by cho...

Page 17: ... 4 4 Switching output The following parameters which are described at the headings 4 4 x are only available at channels selected as switch 4 4 1 Overview By choosing a channel as switch a sub menu called Channel A Switching appears for this channel at the left drop down menu The sub menu is shown at the following illustration Illustration 12 Switching output ...

Page 18: ...e central function for this channel Behavior when locked Off On no change Action for activating the blocking process Behavior when unlocked Off On no change Action for deactivating the blocking process Behavior at bus power down Off On no change Action for a bus power breakdown Behavior at bus power up Off On no change Action for a bus power return Logic function not active with one object with tw...

Page 19: ...uses a delayed switch of the channel At sending an on signal to the channel first the adjusted on delay time expires and afterwards the channel will be switched on The off delay works on the same principle At sending an off signal first the adjusted off delay time expires and afterwards the channel will be switched off Both functions work as well alone as combined By adjusting 0 seconds for a dela...

Page 20: ... satisfied before switching the channel As long as the logic function is not satisfied the channel does not react to any signal The following chart shows the relevant communication objects Number Name Length Usage 6 Logic 1 1 Bit Logic object 1 is the first input for the logic block 7 Logic 2 1 Bit Logic object 2 is the second input for the logic block Chart 15 Communication objects logic Accordin...

Page 21: ...ub menu for the scenes appears at the left drop down menu There are settings to activate single scenes set values and scene numbers and switch the memory function on off at this sub menu Scenes are activated by receiving their scene numbers at the communication object for the scenes If the memory function of the scenes is activated the current value of the channel will be saved at the called scene...

Page 22: ... GmbH 51766 Engelskirchen Papiermühle 1 Tel 49 2263 880 Fax 49 2263 4588 knx mdt de www mdt de 22 There are up to 8 storage options for scenes at every channel These 8 storage options can get any of the possible 64 scene numbers Illustration 16 Sub function scene ...

Page 23: ...ing value 1 less than the adjusted scene number Scene C Off On Activation of the scene C Scene number C 1 64 1 Scene number Calling value 1 less than the adjusted scene number Scene D Off On Activation of the scene D Scene number D 1 64 1 Scene number Calling value 1 less than the adjusted scene number Scene E Off On Activation of the scene E Scene number E 1 64 1 Scene number Calling value 1 less...

Page 24: ...0x03 3 0x83 131 5 0x04 4 0x84 132 6 0x05 5 0x85 133 7 0x06 6 0x86 134 8 0x07 7 0x87 135 9 0x08 8 0x88 136 10 0x09 9 0x89 137 11 0x0A 10 0x8A 138 12 0x0B 11 0x8B 139 13 0x0C 12 0x8C 140 14 0x0D 13 0x8D 141 15 0x0E 14 0x8E 142 16 0x0F 15 0x8F 143 17 0x10 16 0x90 144 18 0x11 17 0x91 145 19 0x12 18 0x92 146 20 0x13 19 0x93 147 21 0x14 20 0x94 148 22 0x15 21 0x95 149 23 0x16 22 0x96 150 24 0x17 23 0x97...

Page 25: ...et the both communication objects for the scenes to the same group address By sending the calling value both scenes are called Your programming can become much clearer if you divide your group addresses by scene numbers If now one channel shall react to 8 scenes you will have to connect the communication object for the scenes to 8 group addresses The following illustrations shall make the division...

Page 26: ...e 26 4 5 Staircase The following parameters which are described at the headings 4 5 x are only available at channels selected as staircase 4 5 1 Overview By choosing a channel as staircase a sub menu called Channel A Staircase appears for this channel at the left drop down menu The sub menu is shown at the following illustration Illustration 18 Staircase ...

Page 27: ...justment how long the light shall be switched on after the warning Whole duration of the warning process is the sum of the 3 times Staircase time warning and prewarning Only available when warning is activated Manual switching off not active active Activation of the manual turn off of the staircase Extend staircase time not active active Activation of the extension of the staircase Central functio...

Page 28: ...urn off of the channel after an adjusted time called time for staircase The time for staircase can be parameterized freely By sending an on signal at the communication object the channel is switched on and the time runs out After the time is ran out the channel is switched off automatically There are a lot of further functions to adjust the staircase function These functions are described at the f...

Page 29: ...case time ran almost out and the lights are switched off soon This warning happens trough a short turn off the lights The duration of the turn off is indicated by the warning time A value of 1 3s is advisable for this parameter When the warning time runs out the lights will be switched on again for the adjusted prewarning time Now you have the opportunities to extend the staircase time when this p...

Page 30: ...e communication object for switching the staircase function have a look at chart 20 page 27 When this function is not activated the channel switches only off after the staircase time runs out 4 5 5 Extend staircase time The following illustration shows the setting options at the ETS Software Illustration 22 Extend staircase time By activating this function the staircase time is retriggerable That ...

Page 31: ...ion 6 General settings Page 11 Illustration 7 Channel selection Page 12 Illustration 8 Operating mode Page 13 Illustration 9 Central function Page 14 Illustration 10 Blocking function Page 14 Illustration 11 Behavior at bus power up down Page 16 Illustration 12 Switching output Page 17 Illustration 13 On Off delay Page 19 Illustration 14 Logical functions Page 20 Illustration 15 Scene function Pag...

Page 32: ...l settings Page 11 Chart 7 Channel selection Page 12 Chart 8 Operating mode Page 13 Chart 9 Central function Page 14 Chart 10 Communication object central function Page 14 Chart 11 Behavior at block unblock Page 14 Chart 12 Communication object blocking function Page 15 Chart 13 Behavior at bus power up down Page 16 Chart 14 Switching output Page 18 Chart 15 Communication objects logic Page 20 Cha...

Page 33: ...age can occur danger for humans animals or material assets Do not let the packaging lying around careless plastic foil bags etc can be a dangerous toy for kids 6 2 Routine disposal Do not throw the waste equipment in the household rubbish The device contains electrical devices which must be disposed as electronic scrap The casing contains of recyclable synthetic material 6 3 Assemblage Risk for li...

Page 34: ... is selected in dependence on the parameterization The MDT Switch Actuator has separate power supply terminals for each channel AKS 08 12 Two contacts phase from Q3 each contact own phase The MDT Switch Actuator is a modular installation device for fixed installation in dry rooms It fits on DIN 35mm rails in power distribution boards or closed compact boxes For project design and commissioning of ...

Page 35: ...00 000 Max fuse per channel 16A 10A 20A Permitted wire gauge Screw terminal 0 5 4 0mm solid core 0 5 2 5mm finely stranded KNX busconnection terminal 0 8mm Ø solid core 0 8mm Ø solid core 0 8mm Ø solid core Power supply 230VAC 50Hz 230VAC 50Hz 230VAC 50Hz Power consumption 0 3W 0 3W 0 4W 0 3W 0 3W 0 4W 0 3W 0 3W 0 4W Operation temperature range 0 to 45 C 0 to 45 C 0 to 45 C Enclosure IP 20 IP 20 I...

Page 36: ...sition will be restored After bus voltage failure or recovery the relay position is selected in dependence on the parameterization The MRDC Switch Actuators use a common power supply terminal for four channels The surface mounted and flush mounted Switch Actuators have a common power supply terminal This feature simplifies the wiring and increases clarity of the circuit The MDT Switch Actuator AKK...

Page 37: ... core 0 5 2 5mm finely stranded 0 5 4 0mm solid core 0 5 2 5mm finely stranded KNX busconnection terminal 0 8mm Ø solid core 0 8mm Ø solid core 0 8mm Ø solid core Power supply AKK 01 02 via KNX bus AKK 08 16 230VAC 50Hz 230VAC 50Hz via KNX bus Power consumption 0 5W 0 5W 0 5 2W 0 5 4W 0 5 2W 0 5 4W 0 5W 0 5W Operation temperature range 0 to 45 C 0 to 45 C 0 to 45 C Enclosure IP 20 IP 20 IP 20 Dime...

Page 38: ...ation The MDT Switch Actuator has separate power supply terminals for each channel and are very space saving by ideal form factor The MDT Switch Actuator is a modular installation device for fixed installation in dry rooms It fits on DIN 35mm rails in power distribution boards or closed compact boxes For project design and commissioning of the MDT Switch Actuator it is recommended to use the ETS3f...

Page 39: ...mers 20 Output life expectancy mechanical 1 000 000 Max fuse per channel 16A Max total current of the actuator 64A 96A 128A 192A Permitted wire gauge Screw terminal 0 5 4 0mm solid core 0 5 2 5mm finely stranded KNX busconnection terminal 0 8mm Ø solid core Power supply via KNX bus Power consumption 0 3W 0 3W 0 4W 0 5W Operation temperature range 0 to 45 C Enclosure IP 20 Dimensions MDRC Space Uni...

Reviews: