background image


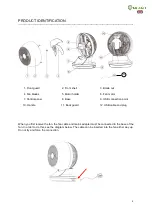
PRODUCT IDENTIFICATION 

----------------------------------------------------------------------------------------------------------------------------- ---------- 


When you first receive the fan, the fan cable and mains adapter must be connected to the base of the 
fan. In order to do this, see the diagram below. The cable can be inserted into the fan either way up. 
Do not try and force the connection.  


 1. Front guard 
 

 2. Front shell 

 3. Blade nut 

 4. Fan blades 
 

 5. Motor holder 

 6. Fan motor 

 7. Control panel 
 

 8. Base 

 9. USB connection point 

10. Handle 

11. Back guard 

12. USB cable and plug 

12 

Summary of Contents for MeacoFan 360

Page 1: ...r Circulator Instruction Manual MeacoFan 360 Personal Air Circulator Please read this instruction manual before using the air circulator and keep safe for future reference Thank you for choosing Meaco...

Page 2: ...eliver the appropriate voltages to the unit Handle with Care Do not drop throw or crash the air circulator Rough treatment can damage the components or wiring and create a hazardous condition Run on S...

Page 3: ...ns potentially dangerous voltages internally and the cover should not be removed All service or maintenance work should be carried out by qualified personnel If you require assistance please contact M...

Page 4: ...of the fan In order to do this see the diagram below The cable can be inserted into the fan either way up Do not try and force the connection 1 Front guard 2 Front shell 3 Blade nut 4 Fan blades 5 Mo...

Page 5: ...to start and stop the sideways oscillation left and right Press the button once to turn the oscillation on and press the button again to stop the motion in doing so you can fix the direction of the fa...

Page 6: ...s 5 C 40 C Humidity operating range Non condensing Fan motor type DC Maximum air flow 360 cubic metres per hour Maximum air velocity c 4 8m sec Rated voltage and frequency 220 240V 50Hz Power consumpt...

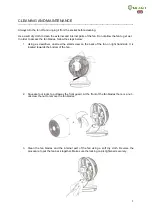
Page 7: ...below 1 Using a screwdriver unscrew the small screw on the back of the fan on right hand side It is located towards the bottom of the fan 2 Squeeze four locks to pull away the front guard At the front...

Page 8: ...e fan from the mains for 40 minutes Increased noise level The fan blades are dirty Clean the fan blades see page 7 The fan blades or fan motor is loose Tighten the locking cap see page 7 There is a fa...

Page 9: ...neglect 6 The warranty does not cover faults caused by dirt or by third party products 7 The warranty does not cover accidental damage 8 All claims for compensation including consequential damage will...

Page 10: ...harm to the environment or human health from uncontrolled waste disposal recycle it responsibly to promote the sustainable reuse of material resources To return your used device please use the return...

Reviews: