background image

The AudioStar Computer Controller provides control 

of virtually every telescope function within a compact 

handbox. AudioStar has soft-touch keys designed to 

have a positive feel. The LCD (Liquid Crystal Display) 

is back-lit with a red LED (Light Emitting Diode) for 

easy viewing in the dark. The back-lit display, key 

arrangement, and sequential database make AudioStar 

extremely user friendly.

1  2-Line LCD Display:

 Provides an interface 

between AudioStar and the telescope. 

• 

Top line: 

Lists the primary category or menu item. 

• 

Bottom line: 

Contains a menu option or 

information about an object or subject, depending 

on which function is being performed. 

2 ENTER 

Key: 

Accesses, in a sequential manner, 

the next menu or data level in the AudioStar 

database. See MOVING THROUGH AudioStar’s 

MENUS, page 10. 


NOTE: 

If ENTER is pressed for two seconds or 

more and then released, AudioStar emits a beep 

and “ENTER to Sync” is displayed. “ENTER to 

Sync” is relevant only after the telescope has 

been aligned and is pointing at an object. If the 

“ENTER to Sync” feature is accessed by mistake, 

press MODE to return to the previous screen. See 

High Precision, page 32, for more details about 

this feature.

3 MODE 

Key: 

Returns to the previous menu or 

data level in the AudioStar database until the top 

level, “Select Item” is reached. The MODE key is 

similar to the back key on a smart phone.


Note: 

Pressing MODE while in the “Select Item” 

level moves AudioStar to the topmost screen: 

“Select Item: Object”. 


If MODE is pressed and held for two seconds or 

more, information about the telescope’s status 

displays. When the status displays, press one of 

the Scroll keys (Pg. 22, Fig. 19a, 7) to display the 

following information:

•  

Right Ascension and Declination (astronomical) 

coordinates 

• 

  Altitude (vertical) and Azimuth (horizontal) 

coordinates 

•  

Date 

• Site 

coordinates

• 

Local Time and Local Sidereal Time (LST) 

• 

Timer and Alarm Status

• Battery 

status 

 Press MODE again to return to the previous menu. 

4 GO 

TO 

Key:

 Slews (moves) the telescope to the 

coordinates of the currently selected object. While 

the telescope is slewing, the operation may be 

aborted at any time by pressing any key except 

GO TO. Pressing GO TO again resumes the slew 

to the object. 

5 Arrow 

Keys:

 6OHZ WKH WHOHVFRSH LQ D VSHFL¿F

direction (up, down, left, and right), at any one 

of nine different speeds. Speed selection is 

explained in “SLEW SPEEDS”, below. The 

following functions are also available with the 

Arrow keys: 


•  Moves the telescope – Use the Up and 


  Down Arrow keys to move the telescope 


vertically up and down. The Left Arrow key  


rotates the telescope horizontally 


counterclockwise, while the Right Arrow key  


rotates it clockwise. 


•  Data entry – When the scope is prompting  


for user entered data, use the Up and Down  


Arrow keys to scroll through the letters of the  


  alphabet and numerical digits. The Down 


Arrow key starts with the letter “A” and the  


  Up Arrow key starts with the digit “9.” The  


  Left and Right Arrow keys are used to 


move the blinking cursor left and right across  


the LCD display. 

6 Number 

Keys: 

Input digits 0 - 9 and changes the 

slew speeds (see Slew Speeds, see below). The 

“0” key also turns on and off the red utility light on 

the top of the handbox.


Slew Speeds


  ETX has nine slew speeds that are directly 


  proportional to the sidereal rate (the rate at 


  which stars appear to drift across the sky) 


  and have been calculated to accomplish 


VSHFL¿F IXQFWLRQV 3UHVVLQJ D 1XPEHU NH\


changes the slew speed, which is shown for  


about two seconds on AudioStar’s display.

   To change the speed, press the 


appropriate key shown below.

AUDIOST

AR HANDBOX

23

Summary of Contents for ETX-125

Page 1: ...Instruction Manual ETX OBSERVER SERIES ETX 125 ETX 90 ETX 80...

Page 2: ...aking care not to mix old and new ones or batteries of different types Clean the battery contacts and also those of the device prior to battery installation Ensure the batteries are installed correctl...

Page 3: ...Instruments Corp Patents US 7 277 223 US 7 079 317 US 7 092 156 US 6 304 376 US 6 369 942 US 6 392 799 2016 Meade Instruments Corp CONTENTS Introduction The ETX Observer Telescope 4 Getting Started A...

Page 4: ...nd observe more of your adventure from afar Mechanics Fork Mount with standard equipment dual axis drive system and AudioStar Controller The rigid fork mounting of the ETX Observer telescope includes...

Page 5: ...models and proceed accordingly Assembling the Tripod 5HPRYH WKH HOG WULSRG IURP WKH VKLSSLQJ FDUWRQ Stand the tripod vertically with the tripod feet down and with the tripod still fully collapsed Gra...

Page 6: ...d lift up the tilt plate so that you can easily access the underside of the plate Re lock the latitude control knob so the assembly doesn t slip while you are attaching the telescope Take the ETX 90 1...

Page 7: ...rs so the ETX can be moved using the AudioStar hand controller Attaching Accessories 7 Be sure the telescope master power switch is in the off position Remove the AudioStar handbox and the coiled inte...

Page 8: ...sed on your view Using the direction keys on the handbox move the telescope until the red dot is on the target you want to view in the eyepiece As you get close to your target select a moderately low...

Page 9: ...he alignment stars a2 Finding North Method 1 Finding True North using the North Star Polaris 7R QG 7UXH 1RUWK LQVHUW WKH EXEEOH level compass into they eyepiece holder and point the telescope tube tow...

Page 10: ...AudioStar database is organized in levels for quick and easy navigation Press ENTER to go deeper into AudioStar s menu levels Press MODE to move back toward the top menu level This is similar to a bac...

Page 11: ...s areas of the world 7 AudioStar then asks for the Telescope Model Using the scroll keys Pg 22 Fig 19a 7 on the AudioStar locate the model of your telescope and press enter 8 System initialization is...

Page 12: ...the brightest star in the area of the sky where the telescope is pointing KLOH ORRNLQJ WKURXJK WKH UHG GRW QGHU XVH the Arrow Keys to move the telescope to place the red dot on the top of the brightes...

Page 13: ...QGV 6DWXUQ You may need to use the Arrow keys to center Saturn precisely in the eyepiece AudioStar then automatically moves the telescope so that it tracks Saturn or whatever other object you may have...

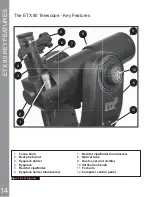
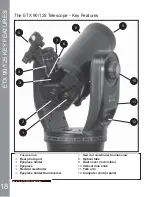
Page 14: ...der 4 Eyepiece 5 5HG GRW YLHZ QGHU 6 Eyepiece holder thumbscrew 7 5HG GRW YLHZ QGHU WKXPEVFUHZ 8 Optical tube 9 Dust cover not visible 10 Vertical lock knob 11 Fork arm 12 Computer control panel 2 5 3...

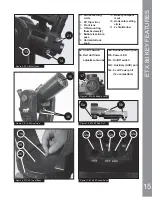
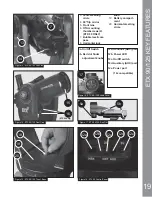
Page 15: ...thumbscrews 2 17 Bubble level com pass 18 Horizontal lock knob 19 Battery compart ment 20 Horizontal setting circle 21 LS DUORZ 5a On Off Switch E 5HG GRW QGHU adjustment knobs 12a Handbox HBX port 12...

Page 16: ...Z XQWLO UP 7 5HG GRW YLHZ QGHU WKXPEVFUHZ Locks the YLHZ QGHU LQ SODFH QVHUW WKH UHG GRW YLHZ QGHU in its mounting bracket and tighten this screw until UP 8 Optical tube The main optical component tha...

Page 17: ...tated by hand about the horizontal axis Tightening the horizontal lock clockwise prevents the telescope from being rotated manually but engages the horizontal motor drive clutch for AudioStar operatio...

Page 18: ...r 4 Eyepiece 5 5HG GRW YLHZ QGHU 6 Eyepiece holder thumbscrew 7 5HG GRW YLHZ QGHU WKXPEVFUHZ 8 Optical tube 9 Dust cover not visible 10 Vertical lock knob 11 Fork arm 12 Computer control panel 2 5 3 1...

Page 19: ...18 15 14 16 20 19 5a 17 5b 13 Vertical setting circle 14 90 LS PLUURU 15 Front lens 16 OTA mounting thumbscrews 2 ETX 90 ONLY 17 Bubble level com pass 18 Horizontal lock knob 19 Battery compart ment...

Page 20: ...QGHU WKXPEVFUHZ Locks the YLHZ QGHU LQ SODFH QVHUW WKH UHG GRW YLHZ QGHU in its mounting bracket and tighten this screw until UP 8 Optical tube The main optical component that gathers the light from...

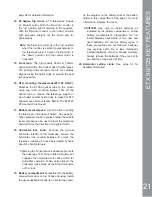
Page 21: ...older the bubble level compass can be used to level the telescope and determine the direction of magnetic North 18 Horizontal lock knob Controls the manual horizontal rotation of the telescope Loosen...

Page 22: ...formative descriptions of over 500 night sky objects as you actually view them in the eyepiece Download the latest software revisions directly from the Meade website www meade com and share software w...

Page 23: ...on Right Ascension and Declination astronomical coordinates Altitude vertical and Azimuth horizontal coordinates Date Site coordinates Local Time and Local Sidereal Time LST Timer and Alarm Status Bat...

Page 24: ...10 Coil Cord Port Plug one end of theAudioStar coil cord into this port pg 22 Fig 19a 10 located at the bottom of the AudioStar handbox 11 Key FFHVVHV WKH HOS OH HOS SURYLGHV on screen information on...

Page 25: ...es Therefore lower power eyepieces provide a steadier higher quality image I WKH LPDJH LV IX RU LOO GH QHG UHGXFH WR D ORZHU power eyepiece where the heat waves do not have such an effect on image qua...

Page 26: ...leave a level e g the wrong menu option is chosen Important Note No matter how many levels into AudioStar are traveled each press of the MODE key moves up a level until the top level Select Item is r...

Page 27: ...as stars planets comets nebulae and so forth When one of these objects is selected from a database by pressing ENTER and then GO TO ETX moves your telescope when properly aligned and points it at the...

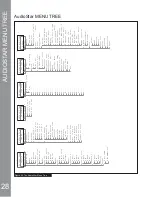
Page 28: ...C D E F G H I J K L M N O P Q R S T U V W X Y Z Timer Se t St a rt Stop Alarm Se t On Off Eyepiece Calc Fi e ld of View Magnification Su ggest Brightest Star Brightness Adj Contrast Adj Beep Battery...

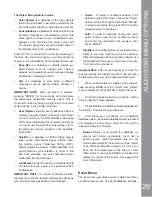
Page 29: ...strial points of interest that you create in the permanent ETX 90 database IMPORTANT NOTE To use the Landmark function the telescope must be located and aligned exactly as when the landmark was added...

Page 30: ...sary menu provides an alphabetical listing of GH QLWLRQV DQG GHVFULSWLRQV IRU FRPPRQ DVWURQRPLFDO terms and AudioStar functions Access directly through the Glossary menu or through hypertext words emb...

Page 31: ...cope option is chosen and the display prompts you to turn off the telescope s power AudioStar is unable to be returned to operation without turning the power off and then back on Cord Wrap when set to...

Page 32: ...up to six sites may be stored Scroll through the list of Countries States Press ENTER when the site you wish to add displays Then choose the desired city in the same manner a value near 0 it takes lon...

Page 33: ...operation the warning Downloading Do Not Turn Off appears Note The Download function requires the optional VWUR QGHU 6RIWZDUH DQG DEOH RQQHFWRU LW See the instruction sheet included with the kit for...

Page 34: ...need to know the latitude and longitude of your location to perform this procedure This information is available on most maps 1 Using the Add option choose a site on the list that is closest to your o...

Page 35: ...ough the menus as previously GHVFULEHG WR QG WKLV RSWLRQ 3UHVV 17 5 3 Object Solar System displays Keep pressing the Scroll Up key until Object User Object displays and press ENTER 4 User Object Selec...

Page 36: ...ust be saved as a text only or as D 06 26 WH W OH The Meade 505 Cable Connector Kit to download Observing Satellites In this procedure you will prepare your telescope to observe a satellite pass 1 Nav...

Page 37: ...ation to the AudioStar handbox Tour Modes The objects chosen for a tour list are selected from AudioStar s database or by entering the object s R A and Dec coordinates The tour is presented in one of...

Page 38: ...description string 7KLV FRPPDQG OLQH DOORZV RX WR DFFHVV D VSHFL F object with your own description Enter USER then the R A and DEC of a desired object and its title and description Use the format de...

Page 39: ...to illustrate in your tour pick 10 to 12 examples spaced across the range of right ascension Bracket them by the PICK ONE PICK END statements One current example displays for the user For example AUT...

Page 40: ...ects again 3 Press MODE once Select Item Setup displays 4 Press the Scroll Down key once and Select Item Object displays Press Enter Object Solar System displays 5 Press the Scroll Up key twice and Ob...

Page 41: ...ntify feature can be used Once aligned it cannot be physically moved from that location Moving the telescope disrupts the telescopes frame of reference to the night sky and will prevent it from identi...

Page 42: ...ext digit to the right will be highlighted Enter the next digit Repeat this process until all 5 digits of your zip code are entered Press ENTER B If you chose the location option the next screen asks...

Page 43: ...d alignment star The telescope is aligned and you are now ready to use AudioStar s GO TO capabilities for a night of observing One Star Alt Az Alignment One Star Alignment requires some knowledge of t...

Page 44: ...KH PDJQL FDWLRQ LV WKHUHIRUH RZ SRZHU H HSLHFHV RIIHU D ZLGHU HOG RI YLHZ EULJKW KLJK FRQWUDVW LPDJHV DQG ORQJ H H UHOLHI 7R QG DQ object with a telescope always start with a lower power eyepiece such...

Page 45: ...DSLR camera In this way the camera body is rigidly coupled to the telescope s optical system which in effect becomes the camera s lens Power Supplies While the ETX will operate with AA cell batteries...

Page 46: ...Erecting Prism ETX 90 125 users will use the 932 45 Erecting Prism 505 Connector Cable Set For all Au dioStar controlled telescopes Allows you to connect your ETX Telescope to a PC se rial port Operat...

Page 47: ...h the vertical and horizontal locks Pg 14 Fig 5 10 and and Pg 15 Fig 8 18 in the unlocked positions If shipping the telescope use the original box and packing material to protect the telescope during...

Page 48: ...take care not to bump or drop the instrument this type of abuse can damage the optical tube and or the objective lens and knock the optics out of alignment Inspecting the Optics IHZ ZRUGV DERXW WKH VR...

Page 49: ...in focus point of a telescope is precise Turning the focus knob too quickly may cause the focus point to pass without notice The optics within the telescope need time to adjust to the outside ambient...

Page 50: ...scope 3 4 6 ENTER Press the scroll up key once Access the Setup menu Multiple presses Access the Telescope menu 5 ENTER 1 Telescope Telescope Model Telescope Train Drive Train Drive Az Train Drive Set...

Page 51: ...ch the beating heart of the universe might be observed Objects in Space Listed below are some of the many astronomical objects that can be seen with the ETX The Moon is on average a distance of 239 00...

Page 52: ...f a house The major division in Saturn s rings called the Cassini Division is occasionally visible through the ETX 90 Titan the largest of Saturn s 18 moons can also be seen as a bright star like obje...

Page 53: ...imiting Visual Stellar Magnitude 11 5 9LHZ QGHU 5HG RW Mount Mount Type Dual Fork Alt azimuth Power 6 AA Cell Batteries or AC Adapter Battery Life Approx 20 hours Tripod Adjustable Height Aluminum Leg...

Page 54: ...ng Power arc seconds 1 3 arc seconds Limiting Visual Stellar Magnitude 11 7 9LHZ QGHU 5HG RW Mount Mount Type Dual Fork Alt azimuth Power 6 AA Cell Batteries or AC Adapter Battery Life 20 hours Tripod...

Page 55: ...onds 0 9 arc seconds Limiting Visual Stellar Magnitude 12 5 9LHZ QGHU 5HG RW Mount Mount Type Dual Fork Alt azimuth Power 8 AA Cell Batteries or AC Adapter Battery Life 20 hours Tripod Adjustable Heig...

Page 56: ...cated very near the North Celestial Pole The celestial equator is a projection of the Earth s equator onto the celestial sphere So just as an object s position on the Earth s surface can be located by...

Page 57: ...H H HSLHFH IRU KDQGV RII WUDFNLQJ Equatorial Mounting Procedure 1 Assemble the tripod as described in Step 2 of Getting Started on page 5 2 Loosen the latitude control latch Fig 27 and lift up the til...

Page 58: ...tal and the Vertical lock levers are unlocked and re engages when the levers are relocked AudioStar Polar Alignment AudioStar provides three different manual methods for polar alignment Easy One Star...

Page 59: ...mount contains a graduated circle mounted behind the knurled knob of the vertical lock without Dec numbers Declination Setting Circle The Dec setting circle Fig 31 has been factory set to read the co...

Page 60: ...d carefully WKH VHFRQG REMHFW ZLOO QRZ EH LQ WKH WHOHVFRSH V HOG of view Note Since the second object i e the object to be located is in constant motion once the R A circle is calibrated step 2 above...

Page 61: ...Oklahoma 35 N Ottawa Ontario 45 N Philadelphia Pennsylvania 40 N Phoenix Arizona 33 N Portland Oregon 46 N Salt Lake City Utah 41 N San Antonio Texas 29 N San Diego California 33 N San Francisco Calif...

Page 62: ...HV H WUHPHO KLJK FRQWUDVW DVWURQRPLFDO LPDJHV DW WKH IRFDO SODQH OPTICAL SYSTEMS REFRACTOR OPTICAL SYSTEM ETX 80 APPENDIX F Refracting Telescopes use a large objective lens as their primary light coll...

Page 63: ...nvironment or human health from uncontrolled waste disposal please separate this from other types of wastes and recycle it as required by law Household users should contact either the retailer where t...

Page 64: ...unauthorized repairs have been attempted or performed or where depreciation of the product is due to normal wear DQG WHDU 0HDGH VSHFL FDOO GLVFODLPV VSHFLDO LQGLUHFW RU FRQVHTXHQWLDO GDPDJHV RU ORVW S...

Page 65: ...in touch MeadeInstruments MeadeInstruments MeadeInstrument Let s Get Social Share your photos with us For special offers and other products visit our website www meade com MeadePhotos Social meade com...

Reviews: