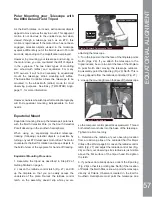
Polar Two-Star Alignment requires some knowledge of
the night sky. AudioStar provides a database of bright
stars and two stars from this database are chosen by
the observer for alignment. First, choose “Polar” from
the “Setup: Telescope: Mount” menu. The rest of the
procedure is almost identical to the Alt/Az Two Star Alt/
Az Alignment, page 42.
Locating the Celestial Pole
To get basic bearings at an observing location, take
note of where the Sun rises (East) and sets (West)
each day. After the site is dark, face North by pointing
your left shoulder toward where the Sun sets. To
SUHFLVHO\SRLQWDWWKHSROH¿QGWKH1RUWK6WDU3RODULV
by using the Big Dipper as a guide (Fig. 30).
Important Note:
For almost all astronomical observing
requirements, approximate settings of the telescope’s
latitude and Polar axis are acceptable. Do not allow
undue attention to precise Polar Alignment of the
telescope to interfere with your basic enjoyment of the
instrument.
Setting Circles
The ETX models are equipped with R.A. and Dec.
setting circles (Pg 15, #13 and #20) to aid in locating
faint celestial objects when the telescope has been
polar aligned. Setting circles emulate the celestial
coordinates found on star charts or in sky catalogs.
Any charted object is easily located by coordinates in
R.A. (in hours, minutes and seconds, from 0h 0m 0s to
23h 59m 59s) and Dec. (in degrees from 0° to ±90°).
With an ETX model polar aligned, use the Arrow keys
to move the telescope in R.A. (left and right keys) and
Dec. (up and down keys).
Note:
The Dec. setting circle is located on the left
arm of the telescope fork mount. The right arm of the
mount contains a graduated circle (mounted behind
the knurled knob of the vertical lock), without Dec.
numbers.
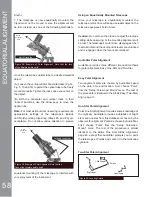
• Declination Setting Circle:
The Dec. setting circle
(Fig. 31) has been factory set to read the correct
Declination of celestial objects.
Because the smooth knob on this fork mount arm
need never be loosened, the Dec. setting circle should
always remain calibrated. If for some reason this knob
becomes loose and the Dec. setting circle must be re-
calibrated, level the optical tube so that it is parallel to
the drive base. Loosen the smooth knob covering the
Dec. setting circle until the setting circle moves freely.
Reposition the setting circle so that the 0 setting aligns
with the Dec. pointer (the molded triangle beneath the
setting circle). Re-tighten the Dec. knob.
• Right Ascension Setting Circle:
Since celestial
objects move in R.A., the R.A. setting circle (Fig. 31)
must be reset as each object is located during an
observing session. The R.A. pointer is located on the
drive base.
7RXVHWKHVHWWLQJFLUFOHVWR¿QGDVWURQRPLFDOREMHFWV
WKH(7;PXVW¿UVWEHSRODUDOLJQHG,WLVDGYLVDEOHWKDW
the motor drive be turned on and that a low-power
eyepiece (e.g., a 26mm eyepiece) be employed. Then
use the following procedure:
1. Identify the celestial coordinates (R.A. and Dec.) of a
EULJKWHDV\WR¿QGREMHFWVXFKDVDEULJKWVWDU$YRLG
using Polaris or any object near Polaris.) Coordinates
of bright stars are listed in astronomy magazines,
text books or star charts. Center this object in the
WHOHVFRSH¶V¿HOGRIYLHZ
2. Manually turn the R.A. circle to read the R.A. of the
object at the R.A. pointer (the molded triangle beneath
this setting circle).
0
10
20
30
40
40
30
20
10
Figure 31: Setting Circles - Dec. and R.A.
14
13
12
11
12
10
Declination
Setting Circle
Right Ascension
Setting Circle
EQUA
T
O
RIAL
ALIGNMENT
59


