36
displays information about an object in its database that is closest to the one you
queried about.
Important Note: For this function to operate properly, you must first set
the telescope in the home position and initialize AutoStar. If you
physically move the telescope after initialization, this function will fail to
operate properly.
In this procedure, you will center an object you wish to have identified by AutoStar in
the telescope eyepiece and use the "Identify" menu to find out information about the
object or the nearest object to it in the AutoStar database.
1.
Center the object you wish to have identified in the telescope's eyepiece.
2.
Navigate to the "Object: Identify" option and press ENTER.
3.
"Searching..." displays. When AutoStar finishes calculating, the name of the
closest object displays.
4.
Press a Scroll key to display information about this object. AutoStar displays
some or all the following information about the object with each press of a Scroll
key:
Displayed information:
Example:
Catalog or common name of object
Messier 107, NGC6171 orion Nebula, etc
Type of object
Globular Cluster, Nebula, Black Hole, etc.
Right Ascension
16:32:4
Declination
13°03'
Constellation
Virgo orion, etc.
Magnitude
3
Size
2'
Scrolling message
"This Globular Cluster is 10,000 light
years away...."
Advanced Alt/Az Alignment
If you would rather choose your own alignment stars from the AutoStar database
during the Alt/Az alignment procedure, AutoStar offers additional alignment methods.
Information for Equatorial (Polar) alignment is discussed in
APPENDIX A,
page 50.
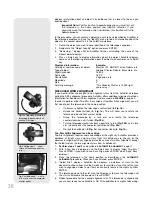
In order to perform either Two-Star, Easy Align or One-Star Alt/az alignment, you will
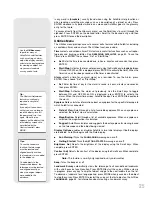
first need to put the telescope in the home position:
•
If necessary, tighten the telescope’s vertical lock (
6, Fig. 1b).
•
Unlock the horizontal lock (
9, Fig. 1a). This will allow you to rotate the
telescope tube and fork arm assembly.
•
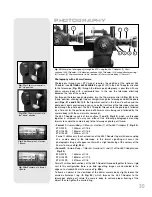
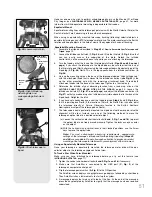
Grasp the telescope by a fork arm and rotate the telescope
counterclockwise until it stops (
Fig. 29a).
•
Turn the telescope clockwise about a quarter of a turn (
Fig. 29b). until a fork
arm is directly over the computer control panel (
Fig. 29c).
•
Re-lock the horizontal (
9, Fig. 1a) and vertical locks (6, Fig. 1b).
Two-Star Alt/Az Alignment and Easy Align
Two-Star Alignment requires some knowledge of the night sky. AutoStar provides a
database of bright stars and two stars from this database are chosen by the
observer for alignment (Easy Align operates the same as Two-Star Alignment, except
that AutoStar picks the two alignment stars from its database).
1.
Perform steps 1 and 2 as described in
AUTOMATIC ALIGNMENT
, page 17.
2.
With "Align: Easy" displayed, use the Scroll keys to display "Align: Two Star."
Press ENTER. (If you wish to use Easy Align, press ENTER when “Align: Easy”
displays.)
3.
Place the telescope in the home position as described in the
AUTOMATIC
ALIGNMENT
procedure. When you have finished, press ENTER.
4
.
"Select Star" displays. AutoStar then displays a database of stars for the
observer to choose from. Use the Scroll keys to scroll to a star on the list that you
wish to align upon. Select a star that you can easily locate in the night sky. Press
ENTER.
5.
The telescope slews to the star. Use the Arrow keys to move the telescope until
the star is centered in the eyepiece. Press ENTER.
6.
Repeat procedure for the second alignment star. The telescope is aligned and
you are now ready to use AutoStar's GO TO capabilities for a night of observing.
Fig. 29c [side view]: ....until a
fork arm is over the computer
control panel.
Fig. 29a [top view]: Rotate the
telescope tube counterclock-
wise until it stops.....
Fig. 29b [top view]: ....then
rotate it clockwise a quarter
turn.....
Summary of Contents for ETX Premier
Page 1: ...Instruction Manual ETX Premier Edition Telescope Series AutoStar LNT SmartFinder ...
Page 2: ......
Page 59: ......


