background image


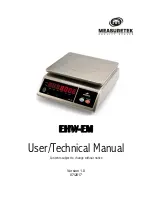
EHW

EM


.


.


5.


Calibration   

1.


Prepare standard weights, and make the scale with no load. 

2.


When the scale is off, press and hold down 

TARE/UNIT

 button, and then press ON/OFF/ZERO button at the same 

time till 

CAL-0

 appears. Release the two buttons.   

3.


Be sure no weight on the scale, and press ON/OFF/ZERO button, 0 in CAL-0 will be flashed; 

4.


When 

CAL-F

 is displayed, press 

TARE/UNIT

 button to choose the unit (kg or lb) of standard weight in calibration; 

load full capacity weight on the weight pan. Then press ON/OFF/ZERO button, F in 

CAL-F

 will be flashed; 

5.


When 

CAL-0

 appears again, remove the weight from the pan, and then press ON/OFF/ZERO button. “0” in 

"

CAL-0

” will be flashed.   

6.


When calibration has been completed properly, the scale will reset to normal working mode. If 

CAL.Er

 is display, 

that means there is an error in calibration, and need being re-calibrated 

7.


In step3 to step5, keep pressing ON/OFF/ZERO to exit during the calibration mode.   


6.


AUTO-OFF function 


When the scale is on, press and hold down 

TARE/UNIT

 and ON/OFF/ZERO buttons for more than 5 seconds till the 

A.oFF.x

” is displayed (x=0,1…9: means when the scale has no weight changing and no key pressed for 1…9 

minutes, the scale will auto power off to save battery power, when x=0, means no auto-power off function); Now, click 

TARE/UNIT

 button to choose the auto-off time and click ON/OFF/ZERO button to confirm and save the setting.   

 
7.


Inner Code display 


1. When the scale starts self-examination (displays 9999999 to 0000000), keep pressing 

TARE/UNIT

 button till “

codE

” 

is displayed, release the button to display inner code(A/D result); 

2. Press ON/OFF/ZERO to exit the inner code display mode.   
3. The proper code range with no load is: 20000-50000 
If the inner code is not within the above range, please adjust the potentiometer on PCB (Pls ask for technical support 
from technicians). 
 

8.


Display symbol meaning 

0

------


:


Power-on zero-point is over (calibration zero-point) +20%FS) when scale is turned on, or the reading 

weight is over (power-on zero-point) +5%FS when pressing ZERO button; 

0

_ _ _ _ _ _

:    Power-on zero-point is below (calibration zero-point) -20%FS) when scale is turned on, or the reading 

weight is + (power-on zero-point) -5%FS when pressing ZERO button; 

_ _ _ _ _ _ _ 

:    The current weight is less than –25% FS; 

-------

:    The current weight is over 102% FS; 

CAL-0

:    Zero point at calibration; 

CAL-F

:    Full capacity at calibration; 

CAL-Er

:  Calibration error; 

A.ch.E r

:    Analog channel error; 

EEP. Er

:    EEPROM accessing error or data in EEPROM is error or not in their normal range; 

Lo.bAt

:    The voltage of internal working    is below 5.7V(+0.1V) 

x.x Udc

:    The voltage of internal working    is x.xV(+0.1V)   

Summary of Contents for EHW-EM-03

Page 1: ...EHW EM User Technical Manual Contents subject to change without notice Version 1 0 07 2017 ...

Page 2: ... 2 3 2 Indicator Display Character Definitions 3 3 3 Key Functions 4 4 OPERATIONS 5 4 1 Power on Power off scale 5 4 2 Zeroing the display 5 4 3 Normal Weighing Mode 5 4 4 Taring 5 4 5 Switching measuring unit 5 5 Calibration 6 6 AUTO OFF function 6 7 Inner Code display 6 8 Display symbol meaning 6 9 Troubleshooting 7 9 1 Troubleshooting 7 9 2 Battery and Charging 7 ...

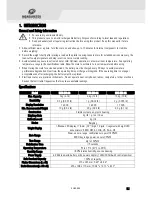
Page 3: ...is no longer acceptable even after recharging the battery must be replaced Electronic scales are precision instruments Do not operate near cell phones radios computers or other electronic devices that emit radio frequencies that may cause unstable readings Specifications Model EHW EM 03 EHW EM 06 EHW EM 15 Max Capacity 3 kg 6 lb 6 kg 12 lb 15 kg 30 lb Readability 0 5 g 0 001 lb 1 g 0 002 lb 2 g 0 ...

Page 4: ...rs before using the scale for the first time Connect the supplied AC adapter to the power input receptacle underneath the scale Plug the AC adapter into a properly grounded power outlet The battery will begin charging If the scale will be stored or transported in the future save the packaging material to ensure the best possible protection for the scale Contents Scale 12Vdc 500mA adapter Manual 3 ...

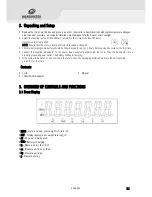
Page 5: ...EHW EM 3 3 2 Indicator Display Character Definitions ...

Page 6: ...3 3 Key Functions Button Functions Short Press when off when on Long Press when on Power on the scale Sets display to zero Power off the scale Short Press Long Press Tare a weight Switch between unit of measure ...

Page 7: ...mal Weighing Mode When scale is powered on and back to 0 place the weighing objects on the platform The display will show the weight and the units of weight currently in use 4 4 Taring Zero the scale by pressing the ON OFF ZERO key if necessary when reading is stable The zero indicator will be on Place a container on the platform a value for its weight will be displayed Press the TARE UNIT key to ...

Page 8: ... off to save battery power when x 0 means no auto power off function Now click TARE UNIT button to choose the auto off time and click ON OFF ZERO button to confirm and save the setting 7 Inner Code display 1 When the scale starts self examination displays 9999999 to 0000000 keep pressing TARE UNIT button till codE is displayed release the button to display inner code A D result 2 Press ON OFF ZERO...

Page 9: ...for load to become stable Service required Lo bAt is shown Battery is discharged Charge battery 9 2 Battery and Charging Power is supplied by an internal rechargeable 6V lead acid battery 4Ah When Lo bAt is displayed the battery must be recharged Plug in the AC power adapter to recharge the battery The scale may continue to be used on AC power during charging Full charging time is approximately 10...

Reviews: