background image

Page 33

3084ES Speed Level

TM

 - Operator’s Manual

August 2020

Secton 10 - Mantenance

Lubrication

Operator may perform routine maintenance only. Lubrication listed as Scheduled Maintenance must 
be performed by a qualified service technician.

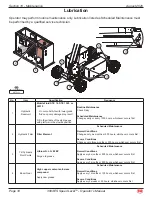
ART_3101

15

1

3

3

2

5

5

5

4

No�����

Item

Specification

Frequency

1

Hydraulic 

Reservoir

Mobile Fluid DTE 10, DTE 13 M, or 
AW32

Do not substtute wth lower grade 

fluds as pump damage may result������

Fill to the middle of the sight gauge 
with platform in the stowed position.

Routine Maintenance

Check Daily

Scheduled Maintenance

Change yearly or every 1000 hours, whichever occurs first

2

Hydraulic Filter

Filter Element

Scheduled Maintenance

Normal Conditions

Change every six months or 500 hours, whichever occurs first

Severe Conditions

Change every three months or 300 hours, whichever occurs first

3

Tilt Cylinders 

Pivot Points

Lithium N�����L�����G����� #2 EP

Purge old grease

Scheduled Maintenance

Normal Conditions

Apply every 6 months or 500 hours, whichever occurs first

Severe Conditions

Apply every 3 months or 250 hours, whichever occurs first

4

Boom Gear

High copper content anti-sieze 
compound�����

Apply new grease

Scheduled Maintenance

Normal Conditions

Apply every 1 months or 100 hours, whichever occurs first

Severe Conditions

Apply every 2 weeks or 50 hours, whichever occurs first

Summary of Contents for 3084ES

Page 1: ...Part 91863 August 2020 3084ES Serial Number Range 11700000 Up Operator s Manual 3084ES Speed LevelTM...

Page 2: ...st 2020 Revision History Date Reason for Update August 2020 Update to ANSI 92 20 2020 1401 S Madera Avenue Kerman CA 93630 USA Toll Free 1 877 632 5438 Phone 1 559 842 1500 Fax 1 559 842 1520 info MEC...

Page 3: ...12 Section 6 Function Tests and Operating Instructions 13 Functions Test 13 Operating Instructions 14 Section 7 Emergency Systems 20 Emergency Systems 20 Section 8 Fold Down Platform Railings 21 Fold...

Page 4: ...wer Controls 39 Section 13 Decals 40 Decals 40 Section 14 Troubleshooting 44 Troubleshooting 44 Section 15 Serial Plate 45 Serial Plate 45 Section 16 Transport and Lifting Instructions 46 Transport an...

Page 5: ...the operator of the aerial work platform is not alone at the workplace during operation Modifications of this machine from the original design and specifications without written permission from MEC a...

Page 6: ...ir necessary tools and materials at overhead work locations The owner user operator of the machine should not accept responsibility for the operation of the machine unless properly trained ANSI and ot...

Page 7: ...esult in minor or moderate injury YELLOW without alert symbol and the word CAUTION Indicates a potentially hazardous situation which if not avoided may result in property damage GREEN and the word NOT...

Page 8: ...orm Lowered 0 4 mph 6 4 km hr Lift Lower Speed Approx 30 sec 40 sec Gradeability 40 21 8 Ground Pressure Wheel Maximum 87 psi 6 1 kg cm Wheel Load 2 610 lb 1 186 kg Tire Size Standard 26 x 12D 380NHS...

Page 9: ...ulations for the minimum safe distances from energized power lines and electrical equipment ART_3060 ART_3070 Minimum Save Approach Distance Voltage Minimum Safe Approach Distance Phase to Phase Feet...

Page 10: ...greater than 133 kV No go zone Spotter required zone Sway 10 10 8 8 FRONT VIEW SIDE VIEW Sag Variations in sag Sag Sag LEGEND CLEARANCES FROM LIVE AERIAL CONDUCTORS No shading in the front views indi...

Page 11: ...e energizing and grounding If there is a question that the power lines may carry more than 50kV consult a qualified person with respect to electrical transmission and distribution before proceeding If...

Page 12: ...care and slow speeds when driving across uneven terrain debris unstable or slippery surfaces and near holes or drop offs Driving with the platform elevated DO NOT drive on or near uneven terrain unst...

Page 13: ...ight or specification DO NOT modify or alter the work platform without written permission from MEC as modifications can increase weight and or surface area resulting in instability ART_3059 DO NOT USE...

Page 14: ...tors must comply with employer job site and governmental rules regarding the use of personal protective equipment ART_3058 DO NOT EXIT PLATFORM WHEN ELEVATED Collision Hazards ART_3072 ART_3062 ART_30...

Page 15: ...iner located in the platform All manuals must be complete undamaged and readable Bodily Injury Hazards DO NOT operate the machine when there is a hydraulic fluid or air leak Hydraulic fluid or air und...

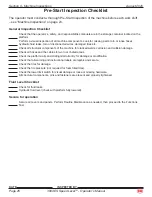
Page 16: ...hazards while operating the machine Operators must comply with employer job site and governmental rules regarding the use of personal protective equipment see Fall Protection on page 3 Workplace Insp...

Page 17: ...ine before each work shift to check that all machine systems are working properly Test the machine on a firm level surface with no debris drop offs potholes or overhead obstructions Perform each test...

Page 18: ...ied and authorized to use it New operators must perform a Pre Start Inspection see page 25 and Functions Test prior to operating the machine Operators must comply with employer job site and government...

Page 19: ...and the platform will not lift when the sensor detects too much weight on the platform Refer to the platform capacity labels and adjust the platform load accordingly Do not elevate the platform if th...

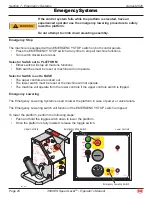
Page 20: ...to the ON position ART_2361 R1 Press the horn button to verify proper operation optional ART_2507 R2 Emergency Stop Press the EMERGENCY STOP switch at any time to stop all machine functions Turn switc...

Page 21: ...e Emergency Systems on page 20 ART_3259 Elevate Platform Place the MODE SELECT switch in the LIFT position Squeeze the enable bar and move the joystick toward you Test Operation Rate of lift is propor...

Page 22: ...m h MID RANGE allows speeds up to 0 4 m p h 0 6 km h HIGH TORQUE use to drive up or down a slope that is too steep for normal speed ART_3258 Drive Forward Place the MODE SELECT switch in the DRIVE pos...

Page 23: ...ilt the platform to the desired position Tilt to Rear Move and hold the toggle switch to the RIGHT to tilt the platform to the desired position ART_3240 Manual Level Side to Side Tilt to Left Move and...

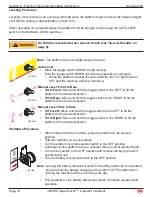
Page 24: ...ches must be reset or machine will not operate Selector Switch is set to BASE The upper controls are locked out The lower switch must be reset or the machine will not operate The machine will operate...

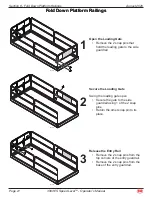
Page 25: ...RT_3138 2 Secure the Loading Gate Swing the loading gate open Secure the gate to the side guardrail using 1 of the 2 snap pins Return the other snap pin to its place ART_3139 3 Release the Entry Rail...

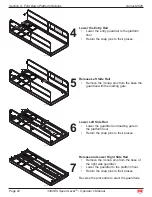
Page 26: ...Rail Remove the 3 snap pins from the base the guardrail with the loading gate ART_3142 6 Lower Left Side Rail Lower the guardrail and loading gate to the platform floor Return the snap pins to their...

Page 27: ...epairs are completed the operator must perform a Pre Start Inspection before proceeding to the Functions Test Never perform service on the machine with the platform elevated without first blocking the...

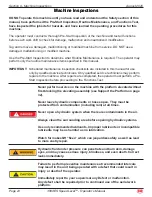
Page 28: ...t 2020 Section 9 Machine Inspections Inspection and maintenance should be performed by qualified personnel familiar with the equipment Fluid leaks under pressure may not always be visible Check for pi...

Page 29: ...uctural components of the machine for cracked welds corrosion and collision damage Check all hoses and the cables for worn or chafed areas Check the platform rails and sliding mid rail entry for damag...

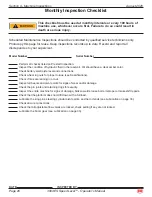
Page 30: ...dition of hydraulic fluid in the reservoir Oil should have a clear amber color Check battery electrolyte level and connections Check wheel lug nuts for proper torque see Specifications Check if tires...

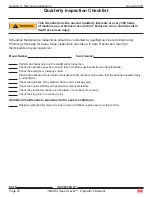
Page 31: ...Serial Number Perform all checks listed on Prestart Monthly Inspection Check the operation speeds to ensure they are within specified limits see Specifications Check the emergency lowering system Clea...

Page 32: ...thole Bars Extending Platform Lug Nuts Torqued Properly Operate Smoothly Slides Freely Steering Cylinder Pins Secure Lock In Place Latches In Stowed Position Pivot Points Lubed Limit Switches Adjusted...

Page 33: ...he machine with the platform elevated without first blocking the elevating assembly see Support the Platform on page 32 Never leave hydraulic components or hoses open They must be protected from conta...

Page 34: ...Page 30 3084ES Speed LevelTM Operator s Manual August 2020 Section 10 Maintenance Fluid leaks under pressure may not always be visible Check for pin hole leaks with a piece of cardboard not your hand...

Page 35: ...rt Inspection Checklist on page 25 Scheduled Maintenance Maintenance performed monthly quarterly annually and biannually must be performed by a qualified service technician trained and authorized to p...

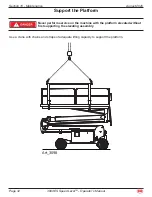
Page 36: ...20 Section 10 Maintenance Support the Platform Never perform service on the machine with the platform elevated without first supporting the elevating assembly Use a crane with chains and straps of ade...

Page 37: ...ce Change yearly or every 1000 hours whichever occurs first 2 Hydraulic Filter Filter Element Scheduled Maintenance Normal Conditions Change every six months or 500 hours whichever occurs first Severe...
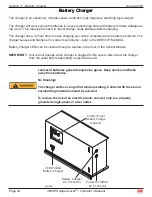
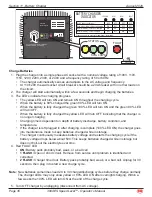
Page 38: ...ttery charger LEDs can be viewed through a window in the door of the Control Module IMPORTANT Unit will not operate when charger is plugged in Be sure to disconnect the charger from the outlet before...

Page 39: ...tery is 80 charged the green 80 LED will turn ON When the battery is fully charged the green 100 LED will turn ON and the green 80 LED will turn OFF When the battery is fully charged the yellow LED wi...

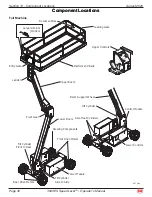
Page 40: ...y Gate Boom Support Wheel Lift Cylinder Upper Controls Pivot Gear Tilt Cylinder Front to Rear Upper Boom Control Module Lower Controls Platform and Rails Loading Gate Lower Boom Power Module Tilt Cyli...

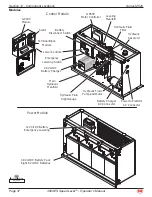
Page 41: ...odule GP400 Module 48 Volt DC Battery Pack Eight 6 Volt DC Batteries 12 Volt DC Battery Emergency Lowering 48 Volt DC Battery Charger Emergency Lowering Switch Lower Controls Hydraulic Reservoir Batte...

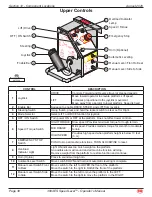
Page 42: ...or OFF at the platform Does not affect lower controls 6 Speed Torque Switch HIGH TORQUE Slow speed Provides maximum torque for rough terrain MID RANGE Mid speed Provides medium torque for smooth to mo...

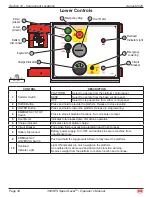
Page 43: ...evation 3 LOWER Button Press and hold to lower the platform Release to stop lowering 4 EMERGENCY STOP Switch Press to stop all machine functions Turn clockwise to reset 5 Hour Meter Indicates total el...

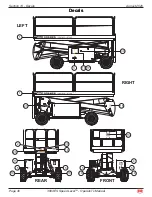
Page 44: ...Page 40 3084ES Speed LevelTM Operator s Manual August 2020 Decals RIGHT LEFT FRONT REAR 1 1 21 2 20 3 30 16 17 4 15 30 5 5 19 5 10 10 10 13 10 5 11 Section 13 Decals Decals...

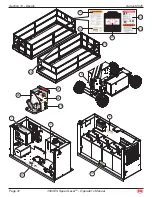
Page 45: ...Page 41 3084ES Speed LevelTM Operator s Manual August 2020 Section 13 Decals 9184 3 6 7 8 14 19 28 29 20 24 27 25 26 23 22 12 18 9...

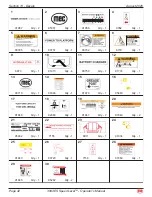
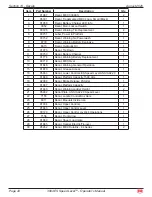
Page 46: ...y 1 7 90732 Qty 1 8 8779 Qty 1 9 6873 Qty 1 10 91973 Qty 4 11 90750 Qty 1 12 91774 Qty 1 13 90719 Qty 1 14 91846 Qty 1 15 91870 Qty 1 16 95463 Qty 1 17 91848 Qty 1 18 92089 Qty 1 19 91847 Qty 2 20 918...

Page 47: ...Battery Replacement 1 13 90719 Decal MEC Oval 1 14 91846 Decal Warning General Operation 1 15 91870 Decal Grease Access 1 16 95463 Decal Lower Controls ES Speed Level ANSI A92 20 1 17 91848 Decal Plat...

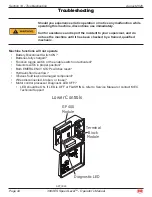
Page 48: ...ns will not operate Battery Disconnect Switch ON Batteries fully charged Function toggle switch or the enable switch not activated Selector switch in proper position Both EMERGENCY STOP switches reset...

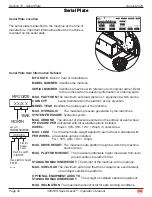
Page 49: ...odel year of the machine MAX HYDRAULIC SYSTEM PRESSURE The maximum pressure generated by the machine s hydraulic system MAX GROUND PRESSURE PER WHEEL The amount of pressure exerted on the surface at e...

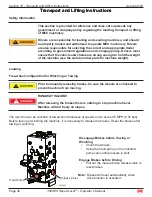
Page 50: ...Loading Free wheel configuration for Winching or Towing Prior to manually releasing brakes be sure the wheels are chocked to prevent machine from moving RUNAWAY HAZARD After releasing the brakes there...

Page 51: ...hine to a winch Remove all machine tie downs Remove wheel chocks Driving Turn the base key switch to PLATFORM Check that the EMERGENCY STOP switch is reset by turning it clockwise Enter the platform a...

Page 52: ...etermine the center of gravity of the machine Attach rigging to the designated lift points only Adjust the rigging to prevent damage to the machine and to keep the machine level Securing to Truck or T...

Page 53: ...Page 49 3084ES Speed LevelTM Operator s Manual August 2020 Notes...

Page 54: ...ount number Part Number Description Quantity Price All back ordered parts will be shipped when available via the same ship method as original order unless noted below Ship complete order only No Backo...

Page 55: ...on MEC Aerial Platform Sales Corp s then current flat rate provided the defective part in question is shipped prepaid to MEC Aerial Platform Sales Corp and is found upon inspection by MEC Aerial Plat...

Page 56: ...1401 S Madera Avenue Kerman CA 93630 USA Toll Free 1 877 632 5438 Phone 1 559 842 1500 Fax 1 559 842 1520 info MECawp com www MECawp com MEC Aerial Work Platforms...

Reviews: