background image

28000

12MXT

M1

57

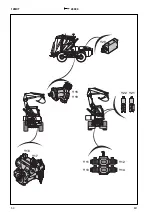
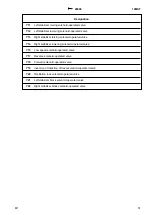
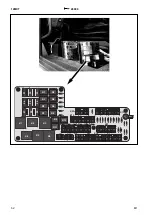
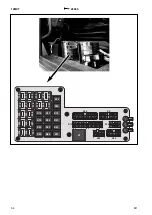
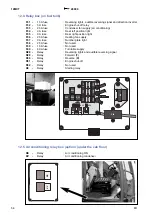
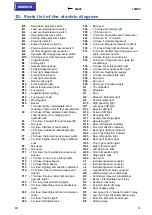
13. Parts list of the electric diagram

BP

-

Dehydrator pressure switch

B1

-

Load overload pressure switch

B2

-

Load overload pressure switch

B3

-

Stop lights pressure switch

B4

-

Parking brake pressure switch

B5

-

Proximity detector

B6

-

Engine oil pressure switch

B7

-

Power-assistance oil pressure switch

B8

-

Air filter clogged pressure switch

B9

-

Hydraulic filter clogged pressure switch

B10

-

Cold start coil control pressure switch

E1

-

Cigarette lighter

E2

-

Ceiling light

E3

-

Number plate lighting

E4

-

Front left dipped beam

E5

-

Front right dipped beam

E6

-

Front left main beam

E7

-

Front right main beam

E9

-

Rear working light

E10

-

Front working lights

E11

-

Water temperature probe

E12

-

Fuel gauge

E13

-

Cigarette lighter lighting

E14

-

Fuel gauge / radio

E15

-

Working light

E16

-

Buzzer

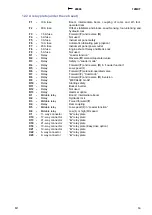
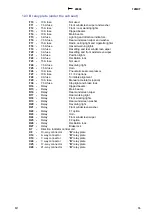
F1

-

10 A fuse: Boom, intermediate boom,
coupling of rams and 4th foot-operated ram

F2

-

20 A fuse: Offset, stabilizers and blocks,
Load Sensing, tool unlocking and
hydraulic lock

F3

-

7.5 A fuse: Forward (

F

) and reverse (

R

)

F4

-

Not used

F5

-

3 A fuse: Instrument panel safety

F6

-

7.5 A fuse: Automatic lubricating pump
(option)

F7

-

20 A fuse: Instrument panel power outlet

F8

-

5 A fuse: Engine shut-off relay and Meck
Lock

F9

-

Not used

F10

-

Not used

F11

-

7.5 A fuse: Front windscreen wiper and
washer

F12

-

15 A fuse: Front / rear working lights

F13

-

10 A fuse: Dipper beams

F14

-

10 A fuse: Main beams

F15

-

5 A fuse: Lighting and direction indicators

F16

-

7.5 A fuse: Rear windscreen wiper and
washer

F17

-

15 A fuse: Radio, ceiling light and and
cigarette lighter

F18

-

7.5 A fuse: Hazard warning lights

F19

-

3 A fuse: Resetting and rear windscreen
wiper

F20

-

3 A fuse: Resetting and front windscreen
wiper

F21

-

5 A fuse: Position lights

F22

-

5 A fuse: Oscillation lock

F23

-

Not used

F24

-

7.5 A fuse: Revolving light

F25

-

7.5 A fuse: Horn

F26

-

10 A fuse: Pneumatic seat compressor

F27

-

10 A fuse: F1 / F2 option

F28

-

3 A fuse: Turntable alignment

F29

-

10 A fuse: Manual accelerator (option)

F30

-

7.5 A fuse: Stop light and brake lock

F31

-

15 A fuse: Audible reversing signal and
lights, direction inverter

F32

-

5 A fuse: Engine shut-off relay

F33

-

25 A fuse: Condenser fan supply (air
conditioning)

F34

-

3 A fuse: Rear left position light

F35

-

3 A fuse: Rear right position light

F36

-

25 A fuse: Heating fan supply

F37

-

3 A fuse: Number plate light

F38

-

Not used

F39

-

Not used

F40

-

60 A fuse: Turntable supply

G1

-

12 volt battery

G2

-

Alternator

H1

-

Horn

H8

-

Direction indicators light

H9

-

Position lights light

H10

-

High speed (

I

) light

H11

-

Low speed (

II

) light

H12

-

Reverse (

R

) light

H13

-

Forward (

F

) light

H15

-

Revolving light

H17

-

Audible reversing signal

H18

-

Reversing light

H19

-

Rear left direction indicator

H20

-

Front left direction indicator

H21

-

Rear right direction indicator

H22

-

Front right direction indicator

H23

-

Rear left position light

H24

-

Rear right position light

H25

-

Front right position light

H26

-

Right clearance light

H27

-

Left clearance light

H28

-

Front left position light

H31

-

Stops lights light

H40

-

Not used

J1

-

Instrument panel connector

J3

-

Instrument panel connector

J4

-

Instrument panel connector

J5

-

3-pushbutton module connector

KE

-

Starting relay (air conditioning)

KV

-

Condenser relay (air conditioning)

K1

-

Boom / intermediate boom relay

K2

-

Hydraulic lock relay

K3

-

Forced forward (

F

) relay

K4

-

Ram coupling relay

K5

-

Low speed (

I

) in “Loader function” relay

K6

-

Low (

I

) or high (

II

) speed option relay

K7

-

Direction indicators central unit

K8

-

Starting relay

6895018

Summary of Contents for 12 MXT

Page 1: ...HANDBOOK OF REPAIR MANUFACTURER MECALAC SAS...

Page 2: ......

Page 3: ...transverse position with standard stabilizers 13 5 4 Lifting and handling in the transverse position without stabilizers 14 5 5 Lifting and handling in the transverse position with telescopic stabiliz...

Page 4: ...5 Volvo tool holder option 43 9 16 Additional hydraulic electrical control of the additional function option 44 10 Parts list of the hydraulic diagram 45 11 Installation of the electric bundles 47 12...

Page 5: ...ed to familiarise the user with the machine and its designated use The instruction manual contains important information on how to operate the machine safely properly and most efficiently Observing th...

Page 6: ...and slewing movements 2 4 Transmission The transmission is of the permanent 4x4 type with a limited slip differential on both axles 2 5 Turntable The turntable is connected to the front chassis sectio...

Page 7: ...he dipper is the tool holder permitting the instant changing of the bucket or tool from the cab without manual intervention Buckets or tools are taken up automatically Only their unlocking requires hy...

Page 8: ...wheel reducer 4 planet wheels 1 6 Self blocking differential limited slip 45 Integrated oil bath disc brakes 6 discs at the front 6 discs at the rear 3 3 Capacities Hydraulic oil tank 82 l Total capa...

Page 9: ...control L site between 0 and 6 kph H road between 0 and 26 kph Possibility of control in loader mode L or H and F or R using the right manipulator Inching slow approach control Allows reducing the dis...

Page 10: ...nt Hydraulical assisted proportional function controls by manipulators or foot operated controls supplied at low pressure with standby accumulator 3 5 3 Slewing and hydrostatic steering circuit Hydros...

Page 11: ...28000 12MXT M1 9 4 Equipment s travel curves 4 1 In back hoe bucket position 7 m 6 m 5 m 4 m 3 m 2 m 1 m 0 m 1 m 2 m 3 m 4 m 0 m 1 m 1 m 2 m 2 m 3 m 3 m 4 m 5 m 6 m 7 m 7560 5580 3720 6860 6740 2500...

Page 12: ...12MXT 28000 10 M1 4 2 In loading bucket position 0 m 1 m 1 m 2 m 2 m 3 m 3 m 4 m 5 m 6 m 7 m 7 m 6 m 5 m 4 m 3 m 2 m 1 m 0 m 1 m 2 m 3 m 4 m 3620 7450 6100 6735 6620...

Page 13: ...ent used without any offset Front and rear chassis sections aligned Without any tool bucket loader etc with handling plate hook Stability loads and hydraulic limits according to standard ISO 10567 5 T...

Page 14: ...und Equipment used without any offset Front and rear chassis sections aligned Without any tool bucket loader etc with handling plate hook Stability loads and hydraulic limits according to standard ISO...

Page 15: ...used without any offset Front and rear chassis sections aligned Rear axle oscillation locked Without any tool bucket loader etc with handling plate hook Stability loads and hydraulic limits according...

Page 16: ...sed without any offset Front and rear chassis sections aligned Rear axle oscillation locked Without any tool bucket loader etc with handling plate hook Stability loads and hydraulic limits according t...

Page 17: ...d Equipment used without any offset Front and rear chassis sections aligned Rear axle oscillation locked Without any tool bucket loader etc with handling plate hook Stability loads and hydraulic limit...

Page 18: ...gned Without any tool bucket loader etc Bucket ram always full extended with hook fixed on tool holder rod Stability loads and hydraulic limits according to standard ISO 10567 7 m 6 m 5 m 4 m 3 m 2 m...

Page 19: ...aligned Without any tool bucket loader etc Bucket ram always full extended with hook fixed on tool holder rod Stability loads and hydraulic limits according to standard ISO 10567 7 m 6 m 5 m 4 m 3 m 2...

Page 20: ...e oscillation locked Without any tool bucket loader etc Bucket ram always full extended with hook fixed on tool holder rod Stability loads and hydraulic limits according to standard ISO 10567 7 m 6 m...

Page 21: ...xle oscillation locked Without any tool bucket loader etc Bucket ram always full extended with hook fixed on tool holder rod Stability loads and hydraulic limits according to standard ISO 10567 7 m 6...

Page 22: ...ssis sections aligned Rear axle oscillation locked Without any tool bucket loader etc Bucket ram always full extended with hook fixed on tool holder rod Stability loads and hydraulic limits according...

Page 23: ...e parking brake only after connecting the machine to the tractor s towing bar Note If the accumulator pressure is not sufficient to release the parking brake red indicator light 1 fig 4 unscrew the ra...

Page 24: ...e brake is filled with oil Connect the grease gun 4 fig 6 Operate the gun until the pressure gauge reads 30 bar 1 fig 6 Align the turntable and lock it mechanically 1 fig 7 Tow the machine Cause the p...

Page 25: ...exceed 30 if the trailer is not equipped with them originally Fastening points A B C fig 3 Lock the chassis 1 fig 1 Lock the turntable 1 fig 2 Lower the equipment to the ground using the control mani...

Page 26: ...Lock the oscillation 1 fig 5 The machine will not be articulated Lock the chassis sections using the links 1 fig 1 Lock the turntable 1 fig 2 Note If necessary correct the machine s balance by adjusti...

Page 27: ...nents 3 4 5 6 7 10 9 8 12 11 1 2 1 Tool holder ram 2 Bucket ram 3 Dipper ram 4 Offset ram 5 Intermediate boom ram 6 Boom ram 7 Accelerator ram 8 Oscillation locking ram 9 Steering ram 10 Stabilizer ra...

Page 28: ...valve 2 Solenoid operated oscillation locking valve 3 Transfer movement engine 4 Transfer movement pump 5 Stabilizers solenoid operated valve 6 Equipment pump 7 Orientation pump 8 Telescopic stabiliz...

Page 29: ...28000 12MXT M1 27 1 6 2 3 4 5 7 1 SX14 valve block 2 High pressure function block 3 Priority valve 4 Orientation engine 5 CROSS OVER valve 6 Low pressure driving unit 7 Braking block...

Page 30: ...Rotary coupling 2 Left manipulator 3 Additional functions foot control 4 Brake Inching foot control 5 ORBITROL steering device 6 Accelerator foot control 7 Right manipulator 8 Parking brake control le...

Page 31: ...28000 12MXT M1 29 9 Hydraulic diagrams 9 1 Travel circuit F B S T1 A B X T T G M1 A PS A2 A1 A3 A1 Hydraulic reservoir A2 Transfer movement engine A3 Transfer movement pump...

Page 32: ...A3 B10 B9 A1 B1 B3 B2 B8 B11 A1 Hydraulic reservoir A3 Transfer movement pump B1 Parking brake control B2 Brake foot control B3 Accelerator foot control B4 Parking brake ram B5 Front axle B6 Rotary c...

Page 33: ...P M1 M2 Z2 Z1 A B P2 E B6 B13 B12 C7 C6 C1 C2 C4 C3 C5 E8 A1 C8 A1 Hydraulic reservoir B6 Rotary coupling B12 Drain block B13 Turntable rotation C1 SX14 valve block C2 Left manipulator C3 Priority val...

Page 34: ...1 T2 LS B B B B 3 4 5 T P T P P T G P1 F2 T M MS F3 F A1 PS LS X 5 5 1A 2 1 A B E8 B12 B13 B6 B11 C1 D1 C2 B6 Rotary coupling B11 Functions block High pressure B12 Drain block B13 Turntable rotation C...

Page 35: ...T P 2A 1A P1 A B A3 B6 C1 E1 E9 E2 E8 E3 E4 A1 E7 E7 E5 E6 A1 Hydraulic reservoir A3 Transfer movement pump B6 Rotary coupling C1 SX14 valve block E1 Left stabilizer ram E2 Left electric manipulator E...

Page 36: ...B1B B1A PD2 BF2 B2A B1 B2 3 01 B2B F1 BF1 C2 B11 B12 F1 C1 D1 F3 F2 F5 F4 F6 B11 Functions block High pressure B12 Drain block C1 SX14 valve block C2 Left manipulator D1 Right manipulator F1 Addition...

Page 37: ...28000 12MXT M1 35 9 7 Bucket circuit A B 2 4 G1B G1A G2A G2B F5 D1 G1 C1 C1 SX14 valve block D1 Right manipulator F5 Piloting unit Low pressure G1 Bucket ram...

Page 38: ...ntrol element H3 Equipment supply inlet element H4 Boom control element H5 Intermediate boom control element H6 Bucket control element H7 Dipper control element H8 Additional functions control element...

Page 39: ...28000 12MXT M1 37 9 9 Additional hydraulic equipment for fitting of the hammer return on the equipment option A B T I1 C1 C1 SX14 valve block I1 Hammer return hose...

Page 40: ...12MXT 28000 38 M1 9 10 Tool holder circuit option A2 J2 B11 J1 B11 Functions block High pressure J1 Tool holder ram J2 Tool holder...

Page 41: ...28000 12MXT M1 39 9 11 Air conditioning circuit option K1 K2 K3 B11 B6 B6 Rotary coupling B11 Functions block High pressure K1 Compressor K2 Solenoid valve K3 Priority block...

Page 42: ...C2 C4 PC GC A B GC PC A B GC PC C1 L1 L3 B6 E1 E2 E5 L3 L2 E3 E4 B6 Rotary coupling E1 Left stabilizer ram E2 Left electric manipulator E3 Right stabilizer ram E4 Right electric manipulator E5 Stabili...

Page 43: ...M5 C1 G1 F3 B11 Functions block High pressure C1 SX14 valve block F3 Dipper ram F4 Intermediate boom ram F5 Piloting unit Low pressure F6 Boom ram G1 Bucket ram M1 Boom ram valve M2 Load detector M3...

Page 44: ...7 F2 3 1 2 T 10 10 A P T F P M1 M2 B9 B12 B13 B10 B6 B3 N1 B11 B3 Accelerator foot control B6 Rotary coupling B9 Diesel engine B10 Accelerator ram B11 Functions block High pressure B12 Drain block B1...

Page 45: ...ool holder option A B T P M1 A2 D1 D2 T2 1 X T1 O2 B11 O1 C6 C5 B11 Functions block High pressure C5 Hydraulic turntable slewing motor C6 CROSS OVER block with damped valve O1 Tool holder ram O2 Tool...

Page 46: ...ontrol of the additional function option 2 1 P T 3 PD2 PD1 01 02 C2 A T B 2 C1 F5 P2 P1 B12 F1 B11 B11 Functions block High pressure B12 Drain block C1 SX14 valve block F1 Additional functions foot co...

Page 47: ...tion locking ram 34 Left stabilizer ram 35 Stabilizer block 36 Rotary coupling 37 Hydraulic reservoir 38 Service brake ram 39 Check valve ARQ 0 5 bar 40 Auxiliary pedal control 41 Accelerator ram 42 H...

Page 48: ...12MXT 28000 46 M1 13 12 10 14 14 11 9 15 16 7 8 6 3 2 4 18 5 17 1...

Page 49: ...Cab connection 7 Solenoid operated valves bundle 8 Left front headlight connection 9 Driver station bundle 10 Steering column bundle 11 Instrument panel connection 12 Foot controls bundle 13 Right fr...

Page 50: ...12MXT 28000 48 M1 Y3 Y2 Y4 Y3A Y5 Y5A Y1 Y10 Y9 Y100 Y8 Y7...

Page 51: ...ng of rams solenoid operated valve Y4 MECALAC 2 option solenoid operated valve control unit Y5 Boom inter boom solenoid operated valve control unit Y5A Boom inter boom solenoid operated valve control...

Page 52: ...12MXT 28000 50 M1 Y18 Y17 Y15 Y20 Y19 Y11 Y13 Y12 Y14 Y22 Y21...

Page 53: ...ed valve Y14 Right stabilizer lowering solenoid operated valve Y15 Low speed solenoid operated valve Y17 Reverse solenoid operated valve Y18 Forward solenoid operated valve Y19 Inversion of direction...

Page 54: ...12MXT 28000 52 M1 R1 R5 R6 R4 R7 R2 R8 R10 R9 R11 K3 K4 K5 K6 K2 K1 R3 15 F1 F3 F4 F6 F7 F2 F8 F9 F5 X10 X23 X13 X22 X18 X1 X21 R1 R2 R3 R4 R5 R6 R7 R11 K1 K2 K3 K6 K5 K4 R8 R9 R10 X16 R12 R13...

Page 55: ...F and reverse R in Loader function R5 Relay Low speed I R6 Relay Forward F solenoid operated valve R7 Relay Forward F Commodo R8 Relay Forward F and reverse R inversion R9 Relay MECALAC mode R10 Rela...

Page 56: ...5 R19 R21 R20 R16 R18 R17 R25 R27 R26 R22 R24 R23 F10 F12 F16 F18 F22 F11 F23 F24 F17 F13 F15 F19 F21 F14 F20 F25 F27 F28 F30 F26 F29 15 30 30 X24 X19 X26 K7 R14 R15 R16 R17 R18 R19 R20 R21 R22 R23 R2...

Page 57: ...light F25 7 5 A fuse Horn F26 10 A fuse Pneumatic seat compressor F27 10 A fuse F1 F2 options F28 3 A fuse Turntable alignment F29 10 A fuse Manual accelerator option F30 7 5 A fuse Stop light and bra...

Page 58: ...e Heating fan supply F37 3 A fuse Number plate light F38 25 A fuse Not used F39 15 A fuse Not used F40 60 A fuse Turntable supply R28 Relay Reversing lights and audible reversing signal R29 Relay Forw...

Page 59: ...creen wiper F20 3 A fuse Resetting and front windscreen wiper F21 5 A fuse Position lights F22 5 A fuse Oscillation lock F23 Not used F24 7 5 A fuse Revolving light F25 7 5 A fuse Horn F26 10 A fuse P...

Page 60: ...under the seat s right hand console S18 Tool unlocking pushbutton S19 Heating fan switch S20 Air conditioning switch S21 Pushbutton for hammer on left manipulator option X1 A relay plate connector X9...

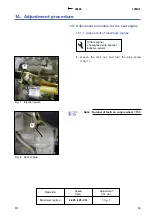
Page 61: ...ime 1 Loosen the lock nut and turn the stop screw 1 fig 1 Note Number of teeth on engine wheel 159 1 13 flat spanner 4 hexagonal male spanner Inductive sensor Operation Speed rpm Adjustment ref no Max...

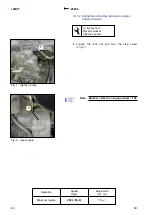
Page 62: ...down 1 Loosen the lock nut and turn the stop screw 1 fig 1 Note Number of teeth on engine wheel 159 1 13 flat spanner Flat screwdriver Inductive sensor Operation Speed rpm Adjustment ref no Minimum r...

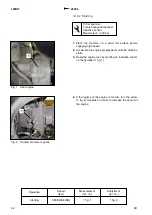
Page 63: ...e ground speed in neutral engine in maximum regime 2 Measure the pressure 1 fig 1 using the manometer 3 If the pressure is too low turn the screw 1 fig 2 clockwise in order to increase the pressure Op...

Page 64: ...monting an inductive sensor on the flywheel 1 fig 1 4 If the regime of the engine is too low turn the screw 1 fig 2 clockwise in order to increase the speed of the engine 13 flat spanner 4 male hexago...

Page 65: ...e manometer 3 If the pressure is too low turn the screw 1 fig 2 clockwise to increase the pressure Note The H P shock absorbers 1 fig 3 for forward and reverse movement are tared at 490 bar 10 10 bar...

Page 66: ...lacing an optoelectronic sensor on the fan pulley 4 Measure the high pressure 1 fig 1 using the manometer 5 If the regime of the engine is too high turn the screw 1 fig 2 clockwise in order to reduce...

Page 67: ...flex 3 The pressure 1 fig 1 in the transfer movement engine rises slowly and then drops sharply 4 Turn the screw 1 fig 2 clockwise to slow down the sharp fall in pressure in the transfer movement eng...

Page 68: ...the speed in rpm by placing an optoelectronic sensor on the universal gear joint 3 Turn the screw 1 fig 1 anti clockwise to increase the number of rpm 19 flat spanner 6 male hexagonal spanner Optoelec...

Page 69: ...the high pressure while the wheels are rotating 1 fig 1 using the manometer Note The pressure should not rise sharply when the wheels begin to rotate again 4 If the manometer reading indicates a shar...

Page 70: ...S OVER unit 3 Point the tower to the right in order to put the flex under pressure engine in maximum regime 4 Measure the pressure 1 fig 2 using the manometer 5 Loosen the lock nut and turn the pressu...

Page 71: ...P of the right side Left side 4 Place the machine equipment in a blocked position and turn the direction to the left engine in maximum regime 5 Measure the difference in pressure between 1 fig 1 and 2...

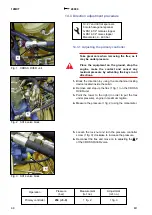
Page 72: ...n for example the bucket ram 2 Measure the pressure on the assistance pressure unit 1 fig 1 using the manometer 3 Remove the stopper and turn the controller screw 1 fig 2 clockwise in order to increas...

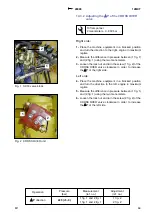
Page 73: ...t manipulator to the right blocked position to allow oil to circulate 4 Measure the difference in pressure between 2 fig 1 and 1 fig 2 using the two manometers 5 Loosen the lock nut and turn the screw...

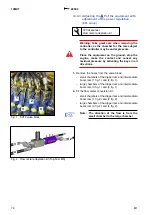
Page 74: ...the hoses from the valve block small chambers of the dipper ram and intermediate boom ram 1 fig 1 and 2 fig 1 large chambers of the dipper ram and intermediate boom ram 3 fig 1 and 4 fig 1 2 Fit the f...

Page 75: ...ters 5 Turn the screw 1 fig 5 clockwise in order to increase the P Note The flow meter kit shall remain installed for adjusting the power regulation 28000 12MXT M1 73 17 flat spanner 3 male hexagonal...

Page 76: ...ime 3 Measure the pressure 1 fig 2 using the manometer 4 Loosen the lock nut and turn the pressure controller screw 1 fig 3 clockwise in order to increase the pressure Note After this step it is monda...

Page 77: ...1 fig 1 using the manometer 3 Loosen the L S controller 1 fig 2 previously over tared then adjust the pressure by turning the screw clockwise in order to increase the pressure 19 flat spanner 5 male h...

Page 78: ...ed 5 Measure the pressure 1 fig 2 using the pressure gauge 6 Undo the lock nut and turn the L R valve s screw 1 fig 3 clockwise to increase the pressure 7 Remove the connector with the hose and refit...

Page 79: ...ometer 5 Loosen the lock nut and turn the pressure controller screw 1 fig 3 clockwise to increase the pressure 6 Reduce the flow 87 l min using the tap on the flow meter 1 fig 1 7 Measure the pressure...

Page 80: ...owards the right blocked position 3 Screw the tap on the flow meter 1 fig 1 until the flow is cut off completely Note During this operation check that the regime of the engine does not exceed 2 000 rp...

Page 81: ...0 50 0 Slewing Primary controller 250 5 0 P right 225 5 0 P left 225 5 0 Equipment Assistance pressure 35 3 0 Equipment D P 15 1 1 Equipment pressure L R 22 1 1 Maximum pump pressure D R 310 10 0 Maxi...

Page 82: ...12MXT 28000 80 M1...

Page 83: ...x MT 4010 2 Male union 4DL8 7 16 unf 20 3 Pressure sensor 4 20 mA 0 600 4 Pressure sensor 4 20 mA 0 60 5 Pressure limiter 50 bar taring calibration 6 Reduction mounting of the turbine on 14MXT 7 Flexi...

Page 84: ...4 1 Flexible hose connection from the turbine to the SX18 valve block 2 Turbine flow meter 3 Connecting cable 4 Flexible hose connection from the turbine to the SX18 valve block Fig 3 TOP TEST MX too...

Page 85: ...28000 12MXT M1 83 1 5180102 2 5180103 3 5180104 4 6525004 5 6525003 6 572A0003 1 2 3 4 5 6 Fig 4 Special connector tools...

Page 86: ...12MXT 28000 84 M1 T13 T14 T15 T16B T16C T16A 1 5 2 3 T19 T21 T22 4 1 5450060 2 5450061 3 5450062 4 5450063 5 5450064 Fig 5 Axles tool DANA...

Page 87: ...28000 12MXT M1 85...

Page 88: ...GROUPE MECALAC MECALAC S A S Parc des Glaisins 2 av du Pr de Challes F 74940 Annecy le Vieux T l 33 0 4 50 64 01 63 Fax 33 0 4 50 64 02 79 www mecalac com...

Reviews: