


F1050/F1200
6-3
Attachments
6
1
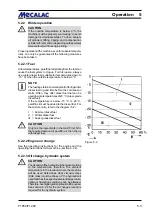
3
2
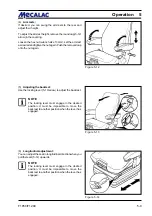
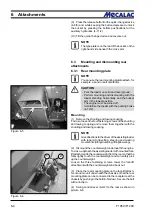
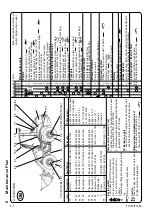
Figure 6-4
(6) Shut down the engine.
(7) Depressurise the hydraulic lines by alternately pressing
both buttons (4-11/2) at the pilot valve for working and
auxiliary hydraulics (4-10/1) several times.
(8) Pull off the protective caps from the hoses of the quick-
change device (6-4/1).
(9) Swing up the protective flaps of the quick-change
couplings on the multi-purpose bucket (6-4/3) and connect
them with the hoses of the quick-change device (6-4) by
tightly pushing them in.
CAUTION
When making connections, make sure that the
hydraulic connections are clean and completely
connected.
Dismounting
NOTE
When the uncoupled attachment remains in the
sun for a longer period of time, the hydraulic oil
in the cylinders will heat up. This will build up a
pressure in the hydraulic cylinder that makes it
much more difficult to connect the hydraulic lines
to the hydraulic connectors later.
To avoid this issue, we recommend the following
procedure of depositing the multipurpose bucket
on the ground:
(1) Completely lower the bucket arm.
(2) Fully tilt up the multipurpose bucket.
(3) Close multipurpose bucket to approx. 20 cm.
(4) Shut down the engine.
(5) Depressurise the hydraulic lines by alternately pressing
both buttons (4-11/2) at the pilot valve for working and
auxiliary hydraulics (4-10/1) several times.
NOTE
The multipurpose bucket closes unpressurised.
(6) Open the protectors of the quick-change couplings on
the multi-purpose bucket (6-4/3) and separate them from
the hoses of the quick-change coupling by strongly pulling
the knurled rings on the hoses of the multi-purpose bucket
(6-4/2).
(7) Fit the protective caps on the hoses of the quick-
change device (6-4/1).
(8) Start the engine and set the bucket safely to the
ground.
Summary of Contents for AF 1050
Page 9: ...Safety regulations...
Page 21: ...Signs...
Page 24: ......
Page 25: ...Protection against theft...
Page 28: ...F1050 F1200 3 4 3 Protection against theft...
Page 29: ...Description...
Page 43: ...Operation...
Page 55: ...Attachments...
Page 60: ......
Page 61: ...Rescue towing lashing lifting by crane...
Page 67: ...Maintenance...
Page 69: ......
Page 88: ...F1050 F1200 8 20 8 Maintenance Figure 8 47...
Page 89: ...Circuit diagrams...
Page 114: ......
Page 115: ...Technical Data Equipment...
Page 122: ......
Page 123: ...TechnicalData Attachments...
Page 132: ......
Page 133: ...Optional Extras...
Page 135: ...F1050 F1200 13 3 Optional Extras 13...
Page 136: ...F1050 F1200 13 4 13 Optional Extras...
Page 137: ...F1050 F1200 13 5 Optional Extras 13...
Page 138: ...F1050 F1200 13 6 13 Optional Extras...
Page 139: ...F1050 F1200 13 7 Optional Extras 13...
Page 140: ...F1050 F1200 13 8 13 Optional Extras...
Page 141: ...F1050 F1200 13 9 Optional Extras 13...
Page 142: ...F1050 F1200 13 10 13 Optional Extras...
Page 143: ...F1050 F1200 13 11 Optional Extras 13...
Page 144: ...F1050 F1200 13 12 13 Optional Extras...
Page 145: ...F1050 F1200 13 13 Optional Extras 13...
Page 146: ...F1050 F1200 13 14 13 Optional Extras...
Page 147: ...F1050 F1200 13 15 Optional Extras 13...
Page 148: ...F1050 F1200 13 16 13 Optional Extras 23131461 KL C 31632...


