background image

21

This mode contains two parts: the drum pad trigger settings and drum 

module settings.

The Drum Pad Trigger Settings

As a professional drummer, you may be very pleased to set your drum 

triggers carefully corresponding to your playing habits and feelings, 

making your performance more interesting and professional. At the 

meantime, your digital drum will be more operable.

1. 

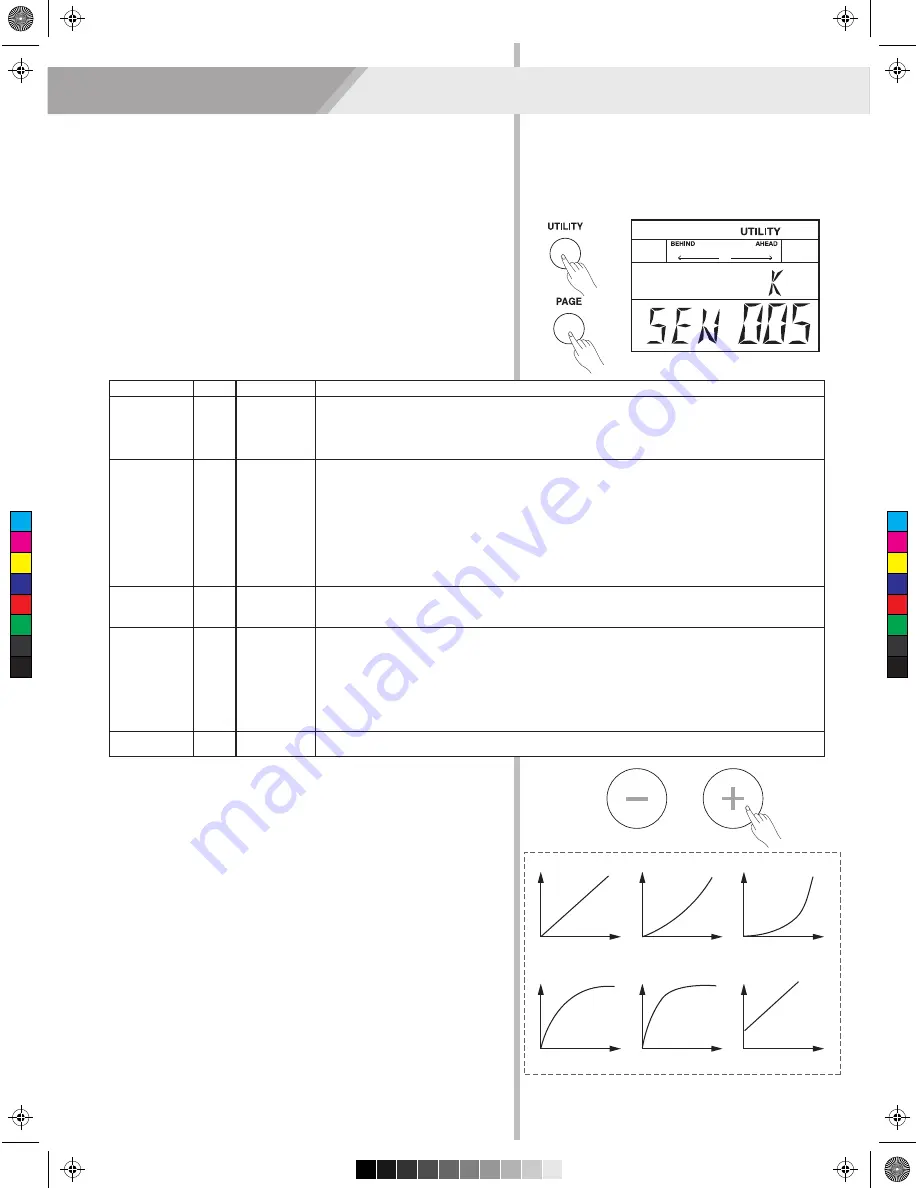
Press the [UTILITY] button, the LCD will display the UTILITY menu.

2. 

Repeatedly press the [PAGE] button to select the trigger parameters 

     that you want to edit.


The drum pad trigger settings are shown below:

3. 

Striking the specified pad, select the pad that you want to edit.

4. 

Use the [+] / [-] button to adjust the parameter value.


Note:

The Curve descriptions are shown below:


Curve 1: 

The most natural setting. There is a linear change between 

playing dynamics and volume response.

Curve 2, 3: 

Compared to Curve 1, heavily strikings make greater 

change.

Curve 4, 5: 

Compared to Curve 1, gentle strikings make greater 

change

Curve 6: 

Even a soft strike can make strong volume, and the range of 

dynamic response is small. Especially when a drum trigger is used as 

an external pad, reliable triggering can be made.

Utility Mode (UTILITY)

Parameter

SENSITIVITY

XTALK 

CURVE

RETRIG 

CANCEL

MIDI NOTE

Value

1~16

1~8

1~6

1~16

0~127

LCD Display

SEN XXX

XTK XXX

CUR XXX

RTG XXX

MID XXX

Description

Adjust the sensitivity of the pad to regulate the pad response. Higher settings result in 

higher sensitivity, so that the pad will produce a loud volume even when struck softly. 

Lower sensitivity will keep the pad to producing a low volume even when played forcefully. 

You can also adjust the sensitivity of the splash in Splash Sensitivity.

When two pads are mounted on the same stand, the vibration produced by hitting one 

pad may trigger the sound from another pad unintentionally (This is called crosstalk.) You 

can avoid this problem by adjusting Crosstalk on the pad that is sounding inadvertently. If 

the value is set too high, then when two pads are played simultaneously, the one that is 

struck less forcefully will not sound. So be careful and set this parameter to the minimum 

value required to prevent such crosstalk. With a setting of "0”, crosstalk prevention does 

not function. 

You can control the relation betweeen striking force and response volume by this setting. 

Adjust the curve to satisfy your playing requirement.Refer to the CURVE description.

This setting avoids “re-triggering”, which means that when you strike a pad once, maybe 

you can hear two hits coming from one strike. This may happen when pad vibrating.Adjust 

the “Retrigger Cancel” value and strike the pad to see if there is any re-triggering. Be 

careful to set it to a suitable value. If too high, some sounds may be omitted when played 

fast; if too low, retrigger can’t be prevented effectively. It is best to set it to a value just 

prevented retriggering.

MIDI output key mapping.

VOL

Striking

Curve1

VOL

Striking

Curve2

VOL

Striking

Curve3

VOL

Striking

Curve4

VOL

Striking

Curve5

VOL

Striking

Curve6

C

M

Y

CM

MY

CY

CMY

K

AW_DD620_manual_G04_150508.pdf   21   2015/5/13   16:09:48

Summary of Contents for DD 620 BX

Page 1: ...C M Y CM MY CY CMY K AW_DD620_manual_G04_150508 pdf 1 2015 5 13 16 09 46...

Page 2: ...outlet of the correct voltage Do not connect it to an AC outlet of voltage other than that for which your instrument is intended Unplug the AC power adaptor when not using the instrument or during ele...

Page 3: ...a Song 14 Metronome 14 Record Preparing Record 15 Start Stop Recording 15 Auto Fill In AFI Turn the AFI Function On Off 16 Rules of AFI trigger 16 Coach About Coach Mode 17 Coach Mode Control 17 Qut...

Page 4: ...ur house Interesting AFI Function There is an interesting way to suddenly become a master drummer AFI means the auto fill in function use this function you can play a professional cool solo without an...

Page 5: ...um solos without striking a pad 6 CLICK Button Start Stop the metronome enter the metronome parameter setting mode 7 KIT VOICE Button Shortly press enter drum kit mode Press and hold enter voice mode...

Page 6: ...playing the drum along with your favorite songs 18 AFI Terminal Connect the AFI trigger 19 PHONES jack 1 8 Connect stereo headphones here 20 DC IN jack Connect the AC adaptor here Plug the AC adaptor...

Page 7: ...ernal Device and Strike Strength Display the connected external device and current striking strength 5 Pad Name Display the current selected pad name 6 Parameter Type Display current parameter type fo...

Page 8: ...iguration KICK SNARE Double trigger TOM 1 3 CRASH 1 Choke RIDE Choke HI HAT HI HAT CONTROL PEDAL AFI Triggers Note 1 Using the cables provided connect each Trigger input jack on the rear panel of the...

Page 9: ...Note 1 Make sure that you have made all necessary connections right trigger audio and so on turn down all volume controls of the module and other audio equipments Turning the power off 1 Minimize the...

Page 10: ...he button to select your desired drum kit Refer to Drum Kit List Selecting a voice While striking the pads you can enjoy the ensemble sound effect If you are not satisfied with the voice of any pads c...

Page 11: ...hoke Play Both Ride and Crash cymbals have cymbal choke But hi hat don t have the cymbal choke Choking the crash ride edge with the hand immediately after hitting the crash ride mutes the crash ride s...

Page 12: ...parameters of one pad will not affect others For example if you increased the volume of snare the other pads wouldn t change 1 Press the KIT VOICE button for 2 seconds and the LCD will display the vo...

Page 13: ...o select a user drum kit From No 21 to 25 The number of kit starts flashing at the same time 3 Press the SAVE ENTER button again the LCD will display OK which indicates all data has been saved success...

Page 14: ...or your learning performance require Starting Stopping the Metronome and Its Feature 1 Press the CLICK button The metronome will start playing and the light of the CLICK button will blink with the tem...

Page 15: ...ile in the preparing record menu there are two ways to start record Press the START STOP button Strike one pad 2 Recoding begins after 4 beats count in 3 While recording the light of the REC button ke...

Page 16: ...light of the AFI button starts flashing when playing the intro fill or ending 4 Press the AFI button again to turn AFI function off Rules of AFI trigger When the accompaniment is off 1 Real time resp...

Page 17: ...he TEMPO button to adjust practice speed at any time 5 Pay attention to the LCD indicators of hitting accuracy when you are practicing Note 1 Set the automatic grading function to ON only playing with...

Page 18: ...y a length of one measure count in before starting This system automatic change the style every two measures In addition to the next rhythm will flash for times on the LCD when the rhythm type is read...

Page 19: ...lt score setting is OFF 5 Press the START STOP button to start practicing There will play a length of one measure count in before starting 6 If the score setting is ON Auto stops practicing and displa...

Page 20: ...ton 2 Use the button to adjust tempo value 3 Without any operation within 3 seconds the system will be back to previous menu automatically 3 As you play the bass drum it can produce a double bass tech...

Page 21: ...ty so that the pad will produce a loud volume even when struck softly Lower sensitivity will keep the pad to producing a low volume even when played forcefully You can also adjust the sensitivity of t...

Page 22: ...LITY Parameter GM MODE AUTO POWER Range ON OFF 30 60 OFF Description ON The channel 10 will respond GM drum kit OFF The channel 10 will respond local drum kit Factory settings approximately 30 minutes...

Page 23: ...r in Windows and MAC OSX environments The digital drum will be recognized as a USB Audio device to receive and transmit MIDI messages through a single USB cable The USB port is used only for MIDI mess...

Page 24: ...95 H mm Module Weight 0 5 kg All specifications and appearances are subject to change without notice Possible Cause and Solution 1 Rotate the VOLUME knob to be sure that the volume isn t down 2 To be...

Page 25: ...0 PRESET KIT Acoustic 1 Funk Band 1 Jazz Brush 1 Rock 1 808 909 Indian 1 Percussion 1 Acoustic 2 Funk Band 2 Jazz Rock 2 Timbales Electro Indian 2 Percussion 2 Marimba FX Mix 1 Stardust FX Mix 2 C M Y...

Page 26: ...1 Rock Tom 2 Rock Tom 3 Rock Tom 4 Rock Tom 5 Rock Tom 6 808 Tom 1 808 Tom 2 808 Tom 3 808 Tom 4 808 Tom 5 808 Tom 6 909 Tom 1 909 Tom 2 909 Tom 3 909 Tom 4 909 Tom 5 909 Tom 6 909 Tom 7 909 Tom 8 El...

Page 27: ...b4 Marimba D4 Marimba Eb4 Marimba E4 Marimba F4 Marimba Gb4 Marimba G4 Marimba Ab4 Marimba A4 Marimba Bb4 Marimba B5 Marimba C5 Marimba Db5 Marimba D5 Marimba Eb5 Marimba E5 Marimba F5 Marimba Gb5 Mar...

Page 28: ...n Jazz1 Salsa 80 s Metal BossaNova Raggae1 Punk Swing Latin Jazz2 Bigband1 3 4 Jazz Standard Jazz 6 8 Ballad Pop Ballad Pop Bossa 16bt Dance Pop shuffle Samba2 Mambo Latin Rock Latin Pop Gtr Bossa Cou...

Page 29: ...rd Ride Chinese Cymbal 1 Ride Bell Tambourine Splash Cymbal Standard Cowbell Standard Crash 2 Vibra slap Ride Cymbal Hi Bongo Low Bongo Mute Hi Conga Open Hi Conga Low Conga High Timbale Low Timbale H...

Page 30: ...30 GM Backing Instrument List C M Y CM MY CY CMY K AW_DD620_manual_G04_150508 pdf 30 2015 5 13 16 09 49...

Page 31: ...31 MIDI Implementation Chart YES NO C M Y CM MY CY CMY K AW_DD620_manual_G04_150508 pdf 31 2015 5 13 16 09 50...

Page 32: ...DD620 _G04 C M Y CM MY CY CMY K AW_DD620_manual_G04_150508 pdf 32 2015 5 13 16 09 50...

Reviews: