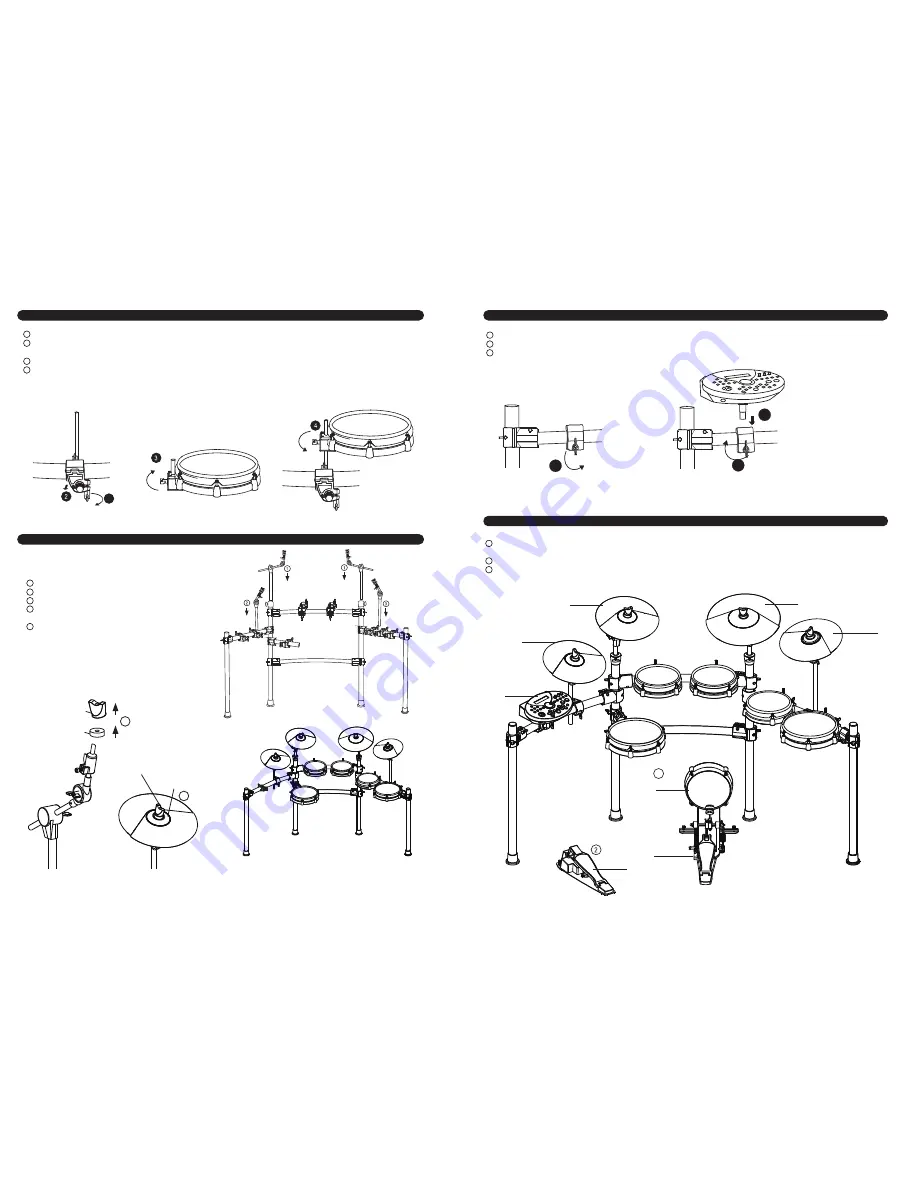
Loosen the wing screw on the clamp
Insert the drum module to the clamp
Tighten the wing screw on the clamp
Loosen L-rod wing nuts on drum pad clamp.
Insert textured plastic end of L-rod into tom clamp and tighten wing nuts.
Repeat for each drum pad clamp.
Loosen wing nut on pad.
Attach pads to L-rods and tighten wing nuts. Repeat for each pad.
1
2
3
4
Attaching pads to rack
Attaching module
Attaching cymbals
Bass drum and Hi-Hat pedal
1
2
3
Place the kick pad on the floor in the center of rack.
Attach your kick pedal to the kick pad.
Place the hi-hat control pedal on the floor on your left side.
Please connect the clearly marked cables from the pads to the correct inputs on the drum module, and you are ready to play!
1
2
3
Insert each boom cymbal arm into pillar(L1) and pillar(R1).
Insert cymbal holder(short) on the left side-arm cymbal clamp.
Insert cymbal holder(long) on the right side-arm cymbal clamp.
Remove wing nut and felt washer from cymbal tilter.
Place cymbal pad on tilter assembly.
Re-attach the felt washer and wing nut. Tighten wing nut.
Note: Cymbals are arranged as follows: 12" Hi-Hat on left-side
short arm, 12" crash on left-side boom arm, 14" ride on right-side
boom arm, 14" crash2 on right-side long arm.
1
2
3
4
5
2
3
side arm(L1)
Insert the drum module
Tighten the wing screw
Loosen the wing screw
1
12" Cymbal Pad
12" Cymbal Pad
Drum module
14" Cymbal Pad
10” Pad
Kick pad
Hi-Hat Control
Pedal
12” Cymbal Pad
10”
12"
12"
14"
12”
1
Wing Nut
Felt Washer
3
Wing Nut
Felt Washer
4
10”
8”
8”
8”
10” Pad
8”
Pad
8”
Pad
8”
Pad
DD518DX_Setup_G02_120217
kick pedal
1


