background image

Memory

Memory feature can be used to memorize 32 complete control-panel setups(8 banks, 4 setups each)
that you can recall whenever needed.

Data stored by the Memory

Voice Right 1, Voice Right 2, Voice Left, Sustain, Style, Tempo, Function parameter, Mixer parameter,
ACCOMP volume and the Octave.

Select a Memory

Press the

button to display:" XXX MEM BANK".

[BANK]

Press the

or

button to display 1-1 or 1-4.

[M1]

[M4]

Select the desired memory bank with the

,

,

,and

.

dial [BANK],[+/YES] [-/NO]

[0]-[9]

3

2

3

4

1

Store memory

[STORE]

[M1]-[M4]

Holding down the

button and press the

button.You can store your desired memory.

Recall your memory

[M1]-[M4]

First select your desired memory bank and press the

button.You can recall your desired

memory.

24

Summary of Contents for mc 620

Page 1: ...3 FD DRIVE ...

Page 2: ...o accompaniment Only drum Using auto accompaniment All tracks The accompaniment section Selecting a style Accompaniment operation Chord recognize Volume control Accomp volume control keyboard volume Adjust the tempo Metronome One touch setting Memory Data stored by the memory Select a memory Store memory Recall your memory Synth Select a user voice Edit a PCM voice Demo Song ALBUM Function Metro o...

Page 3: ...cording Step recording DISK Recording Specification Appendix 1 Voice list Appendix2 Style list Appendix3 Demo list Appendix4 Song list Appendix5 Chord table Appendix6 MIDI implementation chart Appendix7 album list Split point Pitch bend range Key select Portamento time 32 33 33 33 33 34 34 34 34 35 35 37 37 40 41 42 42 44 44 48 35 42 42 48 49 50 51 51 52 53 54 55 31 31 31 31 ...

Page 4: ...IC KEYPAD 1 2 3 4 5 6 7 8 9 10 11 12 13 14 15 16 17 18 19 20 21 22 23 24 25 29 26 30 27 31 33 28 32 34 DC 12V PHONES AUX OUT DAMPER MIDI OUT MIDI IN VOLUME 2 REAR PANEL JACK MIDI IN MIDI OUT DAMPER VOLUME AUX OUT PHONES DC 12V 3 LCD DISPLAY 1 2 3 4 5 6 7 8 9 10 11 12 13 14 15 16 A B C LOWER DUAL KEYBOARD VOICE LR12 STYLE SONG ALBUM CHORD TEMPO MEASURE BEAT 1 2 3 4 5 6 7 8 9 MEMORY DSP TOUCH SUSTAI...

Page 5: ...ct There are 2 record modes RECORD and STEP RECORD Each record song has 5 tracks 1 ACCOMP track and 4 melody tracks Pitch bend wheel and 12 level pitch bend sensitivity Portamento and Modulation 3 level portamento sensitivity Expect drum kit voice you can edit148 voices with Synth function Mixer function including the volume adjustment of Voice R1 Voice R2 Voice L1 Drum Bass Chord1 Chord2 Chord3 A...

Page 6: ...cohol or thinner to clean the electronic keyboard Always turn power off when making any connections Power supply This electronic keyboard can be powered by current from a standard household wall outlet using the specified AC adaptor or by batteries Using the AC adaptor Make sure that only the specified AC adaptor for this electronic keyboard is used The adaptor shall be 12V DC output 3000mA and ce...

Page 7: ...ery indications Any of the following symptoms indicate low battery power Replace the batteries as soon as possible whenever any of the following occurs A dim and difficult to read LCD display Abnormally low speaker headphone volume Distortion of the sound output Sudden power failure when playing at high volume Abnormal playing of the rhythms or demo songs Dimming of the display when playing at hig...

Page 8: ...ier Stereo System DC 12V PHONES AUX OUT DAMPER MIDI OUT MIDI IN VOLUME The volume jack An optional volume control can be plugged into the VOLUME jack for adjusting the volume of sound DC 12V PHONES AUX OUT DAMPER MIDI OUT MIDI IN VOLUME The MIDI IN OUT jacks The MIDI IN connector receives MIDI data from an external MIDI device The MIDI OUT connector transmit MIDI data generated by the electronic k...

Page 9: ...mber Select the desired voice number with the and dial YES NO 0 9 8 1 2 3 Play two voices synchronously VOICE1 VOICE2 Press key to turn on the DUAL VOICE VOICE R2 and dual flag are both lighten The dual voice name is also displayed on the LCD DUAL Press key the wheel or number key to select the dual voice number The default dual voice number is No 50 Strings2 Press button again to turn off the DUA...

Page 10: ...eys can be set as the split point and stored in memory See function SPLIT POINT SELECT 9 3 4 5 Press button use the wheel or number key to select the lower voice number The default lower voice number is No 50 Strings2 Press again to turn off the lower voice YES NO LOWER VOICE button The Keyboard Function Accomp on The keyboard not only plays three voices at the same time but also has other necessa...

Page 11: ...MENTO holding down the button before playing the keyboard The note will have PORTAMENTO modulation effect Pitch change You can also adjust the tuning octave and change the transposition key of the entire sound with the Transpose and Tuning Octave functions see FUNCTION MENU Pitch bend wheel The PITCH BEND wheel to the left of the keyboard allows to the change of pitch of notes on the keyboard by b...

Page 12: ...there will be duet trio or octave effect Press button to choose your desired style Press button Press or to play the style with accompaniment Press button Play any keys by your right hand above the split point after you press button to modify the harmony setting as follows To turn on the SUSTAIN effect press SUSTAIN button 11 6 The default harmony setting OFF HARMONY is shown on the LCD Press to c...

Page 13: ...ct a style dial YES NO 0 9 Select the desired style number with the or See the appendix 2 style list 3 Press the button to start playing the style only drum Press the button to stop playing the style START STOP START STOP STYLE Using auto accompaninent all tracks Press the button 2 12 ...

Page 14: ...ingers play on the left side of keyboard can be recognized as a chord The recognized chord name will be shown on the display Press the button The Beat display will flash at the current tempo when a synchronized start mode has been selected SYNC Start SYNC The accompaniment style start to play while any keys is pressing on the keyboard Press the button to stop playing the style START STOP 13 ...

Page 15: ...yle INTRO INTRO NORMAL and VARIATION FILL A and FILL B FILL A FILL B ENDING ENDING Selecting a Style The keyboard has 100 different auto accompaniment styles that can be used to provide fully orchestrated accompaniment Its sophisticated Auto Accompaniment system can provide automated bass and chord backing that is perfectly matched to the selected accompaniment style When the keyboard is turned on...

Page 16: ...lly start the intro section and accompaniment Once the intro section finishs the selected main section is currently playing INTRO Sync Start Press the button The Beat display will flash at the current tempo To start the main section and accompaniment play any keys on the keyboard When A B C is turned on play a key or chord on the auto accompaniment section of the keyboard SYNC Playing the intro se...

Page 17: ...t measure ENDING Playing the Main normal variation section the LED lights up above the FILL button Press the button the intro will begin from the first beat of the next measure INTRO Press the button the fill A will begin immediately and smoothly lead into the normal The LED will light up above the button FILL A FILL A Press the button the fill B will begin immediately and smoothly lead into the V...

Page 18: ...easure INTRO In FILL B section press the button and the fill A will begin immediately and smoothly lead into the normal The LED will light up above the button FILL A FILL A In FILL A section press the button the fill B will begin immediately and smoothly lead into the VARIATION The LED will light up above the button FILL B FILL B Press the button the ending will begin from the first beat of the ne...

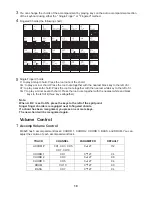
Page 19: ...me by pressing the START STOP button Press the ENDING button if you want to go to the ending section and then stop The ending section will begin from the top of the next measure ABC ON OFF Press the button the A B C icon will appear next to A B C on the display Chords can be produced by pressing any keys below the split point Chord Recognize 1 2 split point 18 ...

Page 20: ...ay a minor seventh chord Press the root note together with the nearest white and black keys to the left of it three keys altogether Note When A B C is set to ON press the keys to the left of the split point Singer finger chords is recogniged next to fingered chords If a chord has been recognized you press one or more keys The new chord will be recognized again Volume Control Accomp Volume Control ...

Page 21: ... at the same time will set the ACCOMP volume to 0 LCD display OFF ACCOP Adjust the volume with and LCD displays XXX ACCOMP dial YES NO 0 9 Press the or the button to select track that you want to adjust They are CHORD 1 CHORD 2 CHORD 3 DRUM BASS NEXT BACK The volume adjustment of other tracks is the same as ACCOMP track Press the button to exit this mixer menu MIXER ...

Page 22: ... 127 80 LOWER Ch15 0 127 48 Press the button to display 100 ACCOMP MIXER How to adjust 2 Press the or button to select track that you want to adjust order VOICE 1 VOICE 2 LOWER NEXT BACK If you adjust the voice1 track LCD displays 112 VOICE1 You can adjust the volume values of voice1 with the and parameter range 000 127 dial YES NO 0 9 3 21 ...

Page 23: ...MPO Holding down the or button to adjust the tempo continuously TEMPO TEMPO Press or at the same time will set the tempo value back to default value TEMPO TEMPO Note Selecting the style when style stops the tempo will change with the style automatically to the default tempo When style is playing the tempo will not change with the style Metronome In the FUNCTION menu you can turn the metronome ON O...

Page 24: ...l OCTAVE How to recall a one touch setting Select one of the styles Each style has four desired settings Press the button LCD displays O T S and turn A B C on automatically O T S Press the button corresponding to the desired setting LCD displays O T S1 4 M1 M4 When the style is playing press to turn on the O T S mode It will inset a Fill in O T S automatically Insert FILL A or FILL B according to ...

Page 25: ...parameter ACCOMP volume and the Octave Select a Memory Press the button to display XXX MEM BANK BANK Press the or button to display 1 1 or 1 4 M1 M4 Select the desired memory bank with the and dial BANK YES NO 0 9 3 2 3 4 1 Store memory STORE M1 M4 Holding down the button and press the button You can store your desired memory Recall your memory M1 M4 First select your desired memory bank and press...

Page 26: ...tton to select SYNTH function Synth 2 1 Select a User Voice Select the desired User Voice number with the and dial YES NO 0 9 3 3 Edit a PCM Voice that be stored as User Voice Press the button to select the desired PCM Voice number with the and NEXT dial YES NO 0 9 Press the or button to select the function PCM Voice Vibrate Rate Vibrate Depth Vibrate Delay Attack Decay Release You can adjust thei...

Page 27: ...STER VOLUME Press the or button to adjust the tempo of the DEMO TEMPO TEMPO There are 3 classic demos at all You can select the demo number with dial YES NO 0 9 and 3 To escape the demo mode press or DEMO START STOP Note Only above mentioned function key can be used in demo mode 26 ...

Page 28: ...e SONG MASTER VOLUME Press the or button to adjust the tempo of the SONG TEMPO TEMPO There are 50 songs at all You can select the song number with the dial YES NO and 0 9 3 Press the or button to stop playing this song SONG START STOP Press the button again to play current song circularly START STOP 27 ...

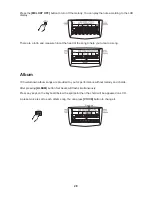
Page 29: ...lp you to learn a song 28 Album 100 well known album songs are provided to you for performance without melody and chords After pressing button four beats will flash simultaneously Press any keys on the keyboard below the split point then the chord will be appeared on LCD A preset voice is set to each album song You can press button to change it ALBUM VOICE Flashing ...

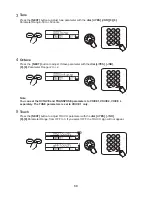
Page 30: ...tronome will sound during the accompaniment is turned on 2 Transpose Press the button to adjust transpose parameter with the Parameter Range 12 to 12 semitones NEXT dial YES NO 0 9 3 Note Only select 0 12 with using 0 9 X pose 1 adjust the transpose parameter of voice1 X pose 2 adjust the transpose parameter of voice 2 X pose L adjust the transpose parameter of voice L 29 ...

Page 31: ...ave parameter with the NEXT dial YES NO 0 9 Parameter Range 2 to 2 Note You can set the OCTAVE and TRANSPOSE parameters to VOICE1 VOICE2 VOICE L separately The TUNE parameters is set to VOICE 1 only Touch Press the button to adjust TOUCH parameter with the Parameter Range from OFF to 3 If you select OFF the TOUCH sign will not appear NEXT dial YES NO 0 9 30 ...

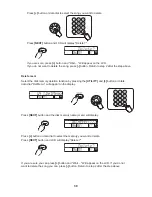
Page 32: ...6 7 8 9 Split point 3 3 3 3 Pitch bend range Press the button to adjust PITCHBEND RANGE parameter with the Parameter Range from 0 to 12 NEXT dial YES NO 0 9 Key select Press the button to portamento or modulation with the NEXT dial YES NO 0 9 31 Portamento time Press the button to adjust PORTAMENTO time with the Parameter Range from 0 to 3 NEXT dial YES NO 0 9 ...

Page 33: ...ter you select the Accomp St pedal it has the same function as pressing the START STOP You can quickly adjust the tempo of songs demos and styles by stepping the pedal four times continuously after you select the TEMPO TAP pedal You can select each memory by stepping on the pedal after you select the MEMORY SELECT pedal A total of 32 memories 32 The default pedal is the sustain pedal All notes pla...

Page 34: ...erb type Press the button to adjust REVERB TYPE parameter with the NEXT dial YES NO Parameter Range from 0 to 7 Reverb level Press the button to adjust REVERB LEVEL parameter with the Parameter Range from 0 to 127 NEXT dial YES NO Chorus type Press the button to adjust CHORUS TYPE parameter with the Parameter Range from 0 to 7 NEXT dial YES NO 0 9 ...

Page 35: ...YES NO 15 16 17 18 3 3 3 3 Receive Press the button to adjust receive channel with NEXT dial YES NO 0 9 Parameter Range 1 16 ALL If you select All the instrument can receive midi message from all 1 16 midi channel Transmit Press the button to adjust transmit channel with Parameter Range 1 16 NEXT dial YES NO 0 9 Only select one channel to transmit the midi message at the same time 34 ...

Page 36: ...sing Floppy Disks List Song Names of Disk DISK DISK Insert the floppy disk that containing standard midi file into the disk drive and then press the Button Wait will display and disk icon will flash on the LCD during loading disk song names After finishing it a song name of disk and disk icon is appeared on the LCD display Only the names which extension is MID in disk will be displayed and max num...

Page 37: ...floppy disk from disk drive while disk icon is flashing The disk icon will stop flashing and light it after loading There are enough memory to store the disk song data in MC420 Playing any one of disk song will load nothing after all disk songs data have been loaded No Disk will appear on the LCD when taking out floppy disk from disk drive in disk mode Caution Do not take out floppy disk from disk...

Page 38: ... exit press the button UTILITY NEXT BACK 2 Disk utility Play mode Press button the LCD will display UTILITY Press button to enter Play mode Loop One appearing on the LCD indicates NEXT the disk songs will playback repeatedly Press button or data dial the Loop All indicates the disk songs will playback from the first songs to the end and then return to start first song again Press button or data di...

Page 39: ...isk icon will flash on the display when format is in process When the disk has been formatted Format OK will display on the LCD Note 1 There will not be any action if you press any buttons when the disk is formatting 2 When a write protected disk is loading Protect Will be displayed Select the disk midi deletion function by pressing the and button or rotate data dial DelMid will appear on the disp...

Page 40: ...disk memory deletion function by pressing the and button or rotate UTILITY data dial Del Memo will appear on the display Press button and the disk memory name mem will display NEXT Press button or data dial to select the memory you want to delete Press button and LCD will display Delete NEXT If you are sure you can press button and Wait Will appear on the LCD If you do not want to delete the song ...

Page 41: ... edit recorded data by step record or realtime record Load Midi Load Memo 3 3 Note 1 Load MIDI function is only used for the midi files that be saved by it If the midi files saved from PC or other midi devices their names will not display on LCD and this function is closed Select the load disk memory function by pressing the and button or UTILITY rotate data dial LoadMem will appear on the display...

Page 42: ...press the other special keyboard to name the song A song name can consist of up to 8 characters or keyboard to move the position of character you Press button after entering new song name to confirm The OverWri NEXT will appear on the LCD when there is a same song name in the disk Press or button to rename Press button to overwrite the original file BACK Note The DISK FUL will appear on the LCD if...

Page 43: ... record RECORD A track will be selected automatically after entering recording mode You can also press melody track buttons to select other tracks for recording The recording will start as soon as you play a note on the keyboard or press button The TEMPO data will display with current TEMPO value and beat will appear when turn on the LCD START STOP If a track is started to record the data recorded...

Page 44: ...essing the button will stop recording when it is recording If the recorded track has data the flag of this track will display on the LCD RECORD Play back Select track Press the button to select a record track A lighting flag of the track indicates the track you select The flag of the track is not lighten indicating that there are no any record datas and the track is empty Melody1 Melody4 Accomp Au...

Page 45: ...s button to begin new step recording New will be shown on LCD or press Button to return If there is no any recorded datas in the selected track you will enter new step recording in this track by pressing button NEXT YES BACK NEXT If ACCOMP track is selected you will direct to enter step recording and ABC will be set automatically The LCD will display CHORD after pressing button If you enter new st...

Page 46: ...an get other chord and time value 7 8 9 0 1 6 1 semibreve semiquaver tercet 3 4 5 9 6 10 7 8 2 minim demisemiquaver rest quarter note dot quaver slur 3 45 Example Dotted note Play keyboard to input the note value Then press number key and together to input the time 7 1 value to get dotted semibreve Tercet note Play keyboard to input the note value Then press and together to input the time value t ...

Page 47: ...chord keyboard and the LCD will display the root note of the chord and its type When you want to record in MELODY track in Step Record mode you must else input the note Play a keyboard to input the single note the LCD will display the note and velocity XXX NOTE X You can change the velocity by pressing button YES NO 3 3 46 Slur Play keyboard to input the note value Then press to input the time val...

Page 48: ...BC will be set automatically when you enter ACCOMP track step record Input the chord mentioned above Input the time value and the measure beat tick will refresh in time Repeat step1 2 to the end If you input the new time value and do not input the new chord the last chord will be accepted Accomp track step record Edit recorded data You can edit either step record data or real time record data Pres...

Page 49: ... and the LCD will display the note velocity value The measure beat tick will refresh You can adjust the velocity and note by pressing button and playing keyboard respectively If the end of record data has reached InputNew will be displayed on the LCD NEXT YES NO Pressing button when you move to a note DELETE will be displayed on the LCD Press the button for yes Press the button for deleting the no...

Page 50: ...ave Touch Split Point Pitch bend range Key select Portamento time Pad assign DSP on off Reverb type Reverb level Chorus type Chorus level Local on off Receive Transmit Default parameters Default parameters Record and Step record Each record has 5 tracks 1 accomp track and 4 melody tracks MIDI IN and MIDI OUT channel receive or transmit Play standard midi music files saves midi files fromrecording ...

Page 51: ...w bar Organ 057 Trumpet 097 FX1 rain 138 Lu shen 018 Percussive Organ 058 Trombone 098 FX2 soundtrack 139 Qu di 019 Rock Organ 059 Tuba 099 FX3 crystal 140 Bang di 020 Church Organ 060 Muted Trumpet 100 FX4 atmsphere 141 Xiao 021 Reed Organ 061 French Horn Brass Section 101 FX5 brightness DRUM SET 022 Accordion 062 102 FX6 goblins 142 Standard Drum Set 023 Harmonica 063 Synth Brass 1 103 FX7 echoe...

Page 52: ...Swing 2 44 Dixieland 45 Jazz Trio COUNTRY 46 Country 47 Country Pop 48 Country 8Beat 49 Country Rock 50 Country Shuffle 51 Blue Grass BALLROOM 52 Tango 53 Cha Cha 54 Beguine 55 Rhumba 1 56 Samba 1 57 Bounce 58 Foxtrot 59 Quick Step 60 Jive Latin 61 Bossa Noval 62 Pop Bossa 63 Guitar Bossa 64 Rhumba 2 65 Guitar Rhumba 66 Samba 2 67 Mambo 68 Salsa 69 Jazz Samba 70 Pop Cha Cha 71 Reggae 72 Pop Reggae...

Page 53: ...Danny Boy 21 My Bonnie 22 Skip To My Side 23 Katyusha 24 Red River Valley 25 The Sideway 26 Dance Of Russia 27 House Of Rising Sun 28 Waltz Of Starlight 29 Home On The Range 30 The Blue Bells Of Scotland 31 AnnieLaurie 32 Trumpet Christmas 33 Ave Maria 34 Joy To The World 35 Santa Claus Is Coming To Town 36 Silent Night Children 37 Amazing Grace 38 Susanna 39 Battle Hymne Of The Republic 40 Carry ...

Page 54: ...1 2 b3 4 5 b7 Cm11 Cm7 11 CmM7 Minor major ninth mM7 1 b3 5 7 CmM7 CmM7 CmM9 Minor major ninth mM9 1 2 b3 5 7 CmM9 CmM7 9 Cdim Diminished dim 1 b3 b5 Cdim Cdim Cdim7 Diminished seventh dim7 1 b3 b5 6 Cdim7 Cdim7 C7 Seventh 7 1 3 5 b7 C7 C7 C7sus4 Seventh suspended fourth 7sus4 1 4 5 b7 C7sus4 C7sus4 C7b5 Seventh flatted fifth 7b5 1 3 b5 b7 C7b5 C7b5 C7 9 Seventh ninth 7 9 1 2 3 5 b7 C7 9 C7 9 C7 1...

Page 55: ... Pedal Soft Pedal ReverbProgram ChorusProgram Reverb Level Chorus Level All SoundOff ResetAllControllers All NotesOff Program Change true O O System Exclusive X O System SongPosition Common Song Select Tune X X X X X X System Clock Real Time Commands X X 1 X X 1 Aux LOCAL ON OFF All Notes Off Messages Active sense Reset X X X X X Notes 1 When the accompaniment is started an FAH message is transmit...

Page 56: ...tle Star Partita 049 Strlight On The Rail 050 Battle Hymn Of The Republic 051 Pop Goes The Weasel 052 Galloper 053 Spain Dance 054 Ten Little Indias Jazz Swing 055 Path 056 Duckling 057 Silent Night 058 Yankee Doodle 059 Chopsticks 060 Hungarian Dance Of Gypsia Style 061 Aloha Oe 062 Twinkle Twinkle Little Star 063 Jingle Bells 064 Night at suburb of Moscow 065 Home Sweet Home 066 Grandfather S Cl...

Reviews: