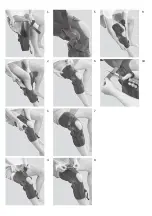
5. Move the brace joint a few times to
ensure that it can move freely and the
wedges are secure.
6. Mount the brace joint on the brace.
Only change the extension and flexion
restrictions under the orders of the
doctor treating you. To avoid hyperex-
tension, extension wedges or 0° wedges
must always be used. The wedges set
the exact radius of movement for the
brace. If soft tissue conditions pose
issues, then it may be necessary to use
a larger wedge, due to soft tissue com-
pression, in order to limit movement of
the knee to the desired radius.
Putting on the brace
Before each use:
•
Open the straps on the front and the
velcro fastenings on the brace. (Fig. 1)
Putting the brace on:
•
Bend your leg at approx. 70° and pull
the brace onto the injured leg. (Fig. 2)
•
Pull the brace up your leg until the
fabric comes to below the kneecap and
ensure that the kneecap is positioned
in the cente
r
of the opening. The cente
r
of the brace joint between the two
lateral joint splints is now sitting
around the same level as the upper
edge of the kneecap.
Please make sure that the brace has
been placed on the leg straight and is
not twisted. (Fig. 3)
•
Now close the velcro fastenings on the
upper part of the brace. (Fig. 4)
•
Once again, ensure that the brace is
sitting correctly.
•
•
P
ull the lower strap (1) through the slot
on the joint and set it to the setting
that was defined by the technician.
Fasten the velcro. Then set the upper
strap (2) and fasten it.
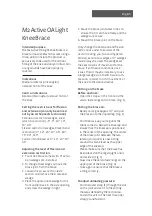
M2 Active OA Light
Knee Brace
Intended purpose
The
M2 Active OA Light Knee Brace
is a
brace for load relief which works using a
three-point principle. The product is
exclusively to be used for the orthotic
fitting of the knee and only on intact skin
or any wounds have been properly
covered.
Indications
Medial or lateral (unicondylar)
osteoarthritis of the knee
Contra-indications
Bilateral (bicondylar) osteoarthritis of
the knee
Setting the restrictions for flexion
and extension (can only be carried
out by an orthopaedic technician)
Extension restriction wedges, silver
(stretch restriction): -5°, 0°, 10°, 20°,
30°, 45°
Flexion restriction wedges, black (bend
restriction) 0°, 10°, 20°, 30°, 45°, 60°,
75°, 90°, 120°
Can be immobilised at: 0°, 10°, 20°, 30°,
45°
Adjusting the level of flexion and
extension restriction
1. Your knee brace comes with 0° exten-
sion wedges pre-installed.
2. To change the wedges, remove the
brace joint from the brace.
3. Loosen the screw on the inside
section and remove the screw and
wedge.
4. Place the appropriate wedge for the
front and/or back in the side opening
and screw the wedge in tight.
Excess strap material can be
trimmed away as needed after initial
fitting.
Air dry only
English
To adjust unloading pressure:


