Chapter 3 - Powering on the Mediatrix 4400
IP Address Discovery or Configuration
14
Mediatrix 4400 – Digital Gateway
To start the Mediatrix 4400 with a dynamic IP address:
1.
If you need to discover the IP address of the Mediatrix 4400, install and start your network packet
sniffer.
2.
Power on the Mediatrix 4400 by connecting the power cord to the unit and then connecting the other
end to an electrical outlet. If this is the very first time you are installing the Mediatrix 4400, it will
restart twice.
You can now access the Mediatrix 4400 web interface. Refer to the
Software Configuration Guide
for more details.
Initial Provisioning Sequence
When starting the Mediatrix 4400 for the first time, it needs to be configured before it can support calls. This
process is known as
provisioning
. This sequence assumes that you have installed the Mediatrix 4400
hardware as per
“Hardware Installation” on page 10
The Mediatrix 4400 requests its configuration only on the first restart. You can change the configuration at will
after the initial provisioning and the provisioning system can refresh the Mediatrix 4400 configuration.
Initial provisioning sequence:
1.
When the Mediatrix 4400 starts, it broadcasts a message requesting DHCP services (if the unit is
configured to start in DHCP mode).
2.
The DHCP server responds with a set of IP addresses and network parameters, one of which is the
Mediatrix 4400 IP address.
The following are some of the network parameters assigned via DHCP:
•
Mediatrix 4400 IP address
•
Subnet Mask
•
Default Router IP address
•
DNS IP addresses
•
Configuration script server IP address and port number (optional)
•
SIP Servers IP address and port number
3.
The Mediatrix 4400 request its configuration by using a configuration file.
Default Static IPv4 Address Configuration
If there is no DHCP server in your network, then the IP address has to be configured statically.
To start the Mediatrix 4400 with a static IP address:
1.
Power on the Mediatrix 4400 by connecting the power cord to the unit and then connecting the other
end to an electrical outlet. If this is the very first time you are installing the Mediatrix 4400, it will
restart twice.
2.
Reconfigure the IP address of your computer to
192.168.0.11
and the Subnet Mask to
255.255.255.0
. Restart the computer.
Warning:
The electrical outlet must be installed near the Mediatrix 4400 so that it is easily accessible.
Note:
If the
Power
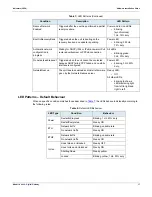
LED is always blinking and never turns on, this means that the Mediatrix 4400 cannot
find a DHCP server. Check that you have a DHCP server properly configured on your network.
Warning:
The electrical outlet must be installed near the Mediatrix 4400 so that it is easily accessible.
Summary of Contents for Mediatrix 4401
Page 6: ...Contents vi Mediatrix 4400 Digital Gateway ...
Page 22: ...Chapter 2 Installation Hardware Installation 12 Mediatrix 4400 Digital Gateway ...
Page 40: ...Appendix B Cabling Considerations RJ 45 Cable 30 Mediatrix 4400 Digital Gateway ...
Page 46: ...Appendix C Standard Hardware Information Warranty 36 Mediatrix 4400 Digital Gateway ...
Page 50: ...Appendix D Glossary Wide Area Network WAN 40 Mediatrix 4400 Digital Gateway ...
Page 52: ...Appendix E List of Acronyms 42 Mediatrix 4400 Digital Gateway ...


