background image

9

6.5.  Monitor settings under Windows Vista

®


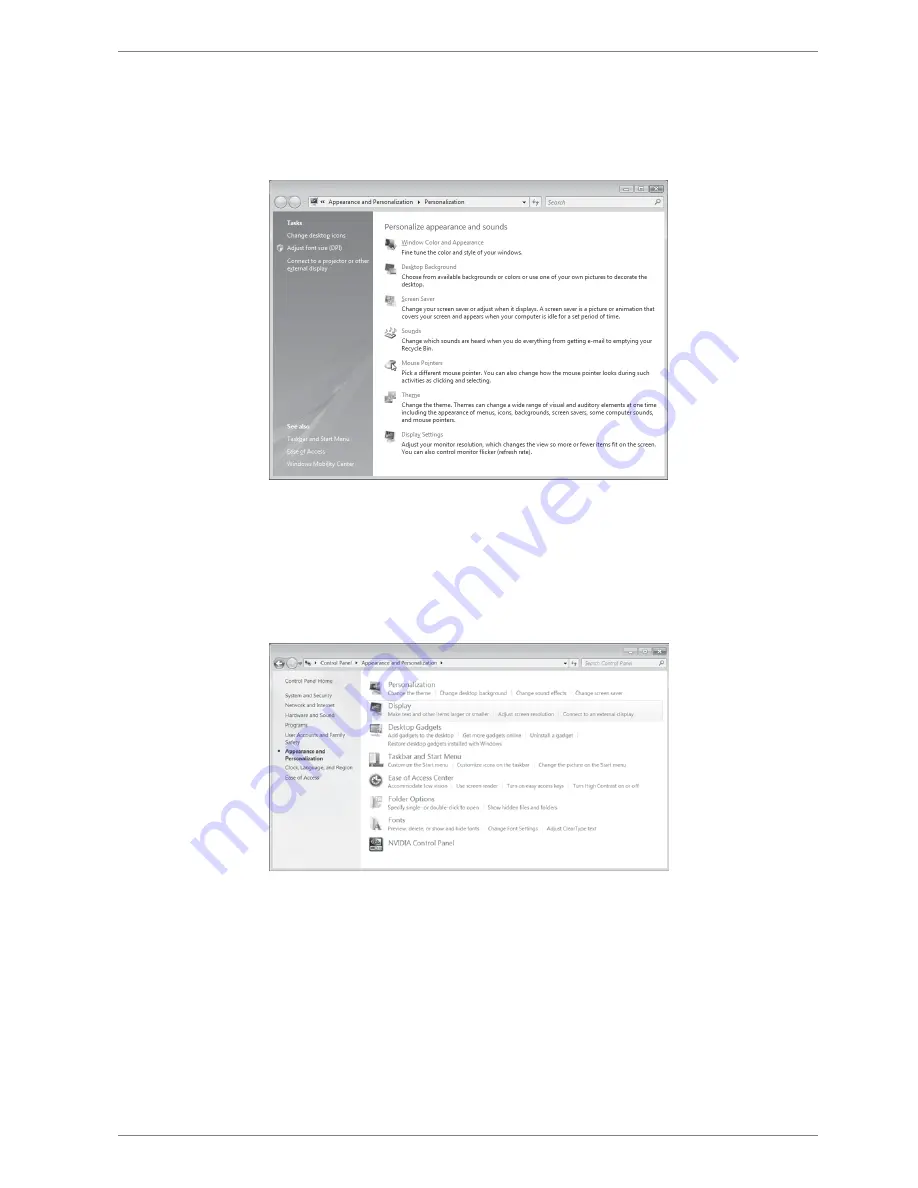
For Windows Vista®, adjust the monitor settings in the Windows program “Customize appearance and sounds”. The pro-
gram can be started as follows:   


Right-click on the Windows desktop and left-click on “Customize”.

Or:


Via Start 

 Control Panel 

 customise appearance and sound with a double left click.


Open the display menu in order to adjust the resolution and frequency.   

6.6.  Monitor settings under Windows

®

 7

For Windows® 7, adjust the monitor settings in the Windows program “Appearance and Personalization”. The program 
can be started as follows:


Right-click on the Windows desktop and left-click on “Customize”.

Or:


Via Start 

 Control Panel 

 Appearance and Personalization by double-clicking the left mouse button.


Choose the menu Display

 Adjust screen resolution in order to adjust the resolution and frequency.  

Summary of Contents for AKOYA X57299

Page 1: ...Instruction manual MEDION AKOYA X57299 MD 21299 70 9 cm 28 LED Backlight Monitor ...

Page 2: ...ings 7 6 3 Supported settings in video mode 7 6 4 Monitor settings for Windows XP 8 6 5 Monitor settings under Windows Vista 9 6 6 Monitor settings under Windows 7 9 6 7 Monitor settings under Windows 8 10 6 8 Rear connections 10 6 9 Connecting the monitor 11 6 10 The monitor work space 11 7 Operating elements 12 8 Setting the screen 13 8 1 Using the OSD menu 13 8 2 The OSD menu 13 9 Power saving ...

Page 3: ...ion on operating steps and results Tasks to be performed 2 Proper use This TFT monitor is designed exclusively for the playback of video and audio signals from external devices such as computers whose connections and screen resolutions match the specified technical data of the TFT monitor Any other use is deemed as improper This device is intended for use in dry indoor areas only This device is in...

Page 4: ...eaked out To avoid damaging the screen do not touch it with your fingers or sharp objects Contact customer services if the power cable is burnt or damaged liquid has penetrated the monitor the monitor is not operating correctly the monitor has been dropped or the housing is damaged 4 2 Installation location Keep your monitor and all connected devices away from moisture and avoid dust heat and di r...

Page 5: ...s plug from the power outlet The power outlet must be close to the monitor and easy to access To prevent non permissible heating up do not cover the mains adapter The socket must be close to the monitor and easy to access Position the cable so that it cannot be stepped on or tripped over To avoid damaging the cable do not place any objects on it Please note The standby switch of this device does n...

Page 6: ...sponds to the physical resolution Monitors achieve full image quality with the physical resolution If you change to a display with different settings the display may not in certain circumstances appear in the full screen area Distortions can also occur especially for fonts Before you connect the new monitor use your old PC monitor to set a resolution and image frequency that is support ed by both ...

Page 7: ...52 x 870 75Hz 1280 x 720 60Hz 1280 x 768 60Hz 1280 x 800 60Hz 1280 x 1024 60Hz 75Hz 1360 x 768 60Hz 1440 x 900 60Hz 1600 x 900 60Hz 1680 x 1050 60Hz 1920 x1080 60Hz 1920 x 1440 60Hz DVI HDMI Displayport 2048 x 1152 60Hz all 2048 x 1536 60Hz 2560 x 1440 60Hz 2560 x 1600 60Hz 2880 x 1620 60Hz 3840 x 2160 30Hz 60Hz Displayport Recommended resolution 3840 x 2160 60Hz via Display Port 6 3 Supported set...

Page 8: ...itor supports a maximum col our depth of 16 million colours which corresponds to 32 bit or real colour The refresh rate can be set under Advanced Depending on the configuration of your computer a window appears displaying the properties of your graphics card Under Graphics card you can set the desired value in the selection field List all modes NOTE If your setting does not comply with the values ...

Page 9: ...uble left click Open the display menu in order to adjust the resolution and frequency 6 6 Monitor settings under Windows 7 For Windows 7 adjust the monitor settings in the Windows program Appearance and Personalization The program can be started as follows Right click on the Windows desktop and left click on Customize Or Via Start Control Panel Appearance and Personalization by double clicking the...

Page 10: ...nection DVI 4 HDMI 2 connection HDMI 5 HDMI 1 MHL connection HDMI 6 Display Port 2 connection DP 2 7 Display Port 1 connection DP 1 8 D Sub mini 15 pin connection VGA 9 PC USB connection to connect the PC 10 Opening for Kensington lock This serves to protect the monitor from theft 11 2x USB connection for two USB devices 5V 900mA max 12 Audio connection 3 5 mm stereo jack 13 Headphone jack WARNING...

Page 11: ...nnecting USB cables to the PC connecting USB devices The product has an inbuilt USB hub offering the facility for the connection of two external USB devices Connect the USB cable to the PC USB port on the product and to a vacant USB port on the computer Then connect USB devices to the USB ports on the side of the product The USB devices will be detected as normal by the operating system of your co...

Page 12: ...e OSD is switched on select a parameter with this button and reduce the value If you are not in the OSD direct call up of the CONTRAST BRIGHTNESS menu 3 When the OSD is switched on select a parameter with this button and increase the value If you are not in the OSD to automatically adjust the picture VGA mode only picture mode standard game video landscape text HDMI DVI only 4 Confirm the choice o...

Page 13: ...E Activate deactivate the overdrive function When the function is activated the reaction time is reduced from 5 ms typ to 2 ms grey to grey typ DCR Here you can switch the dynamic contrast on and off ECO Switch the ECO on and off Contrast and brightness adjust ment as well as DCR are deactivated in ECO mode PIP PBP PIP PBP MODE Set the picture in picture function PiP and the picture by picture fun...

Page 14: ...D SETTING OSD H POSITION For the horizontal setting of the OSD position OSD V POSITION For the vertical setting of the OSD position OSD BACKGROUND Sets the transparency of the menu OSD TIME OUT To automatically switch off the on screen display OSD after a preset time has elapsed SETUP AUTO Automatically adjusts the horizontal and vertical position phase fine tuning and pulse H frequency in VGA mod...

Page 15: ...lems persist then read this chapter for information about possible solutions 10 1 1 Check cables and connections Start by carefully checking all the cable connections If the power indicator lights are not on ensure that the monitor and the computer are properly connected to the power supply 10 1 2 Faults and possible causes 10 1 3 The monitor does not show a picture Check Power supply The mains ca...

Page 16: ... the signal cable pins If the pins are bent contact your customer service Adjust the colour settings in the OSD menu Avoid using monitor extension cables 10 1 8 The display is too bright or too dark Check if the video output level of the computer matches the technical data of the monitor Select Autom adjustment to optimise the settings for brightness and contrast For optimisation the display shoul...

Page 17: ...n the monitor Water can cause permanent discolouration Do not place the screen in strong sunlight or near ultraviolet light Store the packaging material in a safe place always use this box to transport the monitor 12 Disposal Packaging Your device has been packaged to protect it against transportation damage The packaging is made of envi ronmentally friendly material which can be recycled Device A...

Page 18: ...cts MEDION therefore adheres to the strict and transparent requirements of the standard ISO 9241 307 Class II which has been briefly summarised below The ISO standard ISO 9241 307 defines amongst other things the generally applicable guidelines relating to pixel de fects Pixel defects are categorised into four fault classes and three defect types Every individual pixel consists of three sub pixels...

Page 19: ...ons 1x PC USB 3 0 input HUB 2x USB 3 0 connectors for external devices 5V 900mA max Audio input 3 5 mm stereo jack Audio output 2 x 4 W max via loudspeakers 3 5 mm headphone jack User control OSD Temperatures In operation 0 C to 35 C Not in operation 20 C to 60 C Humidity In operation 80 non condensing Not in operation 90 Weight with stand approx 6 8 kg Weight without stand approx 5 5 kg Dimension...

Page 20: ...f the manufacturer Copyright is owned by the company Medion AG Am Zehnthof 77 45307 Essen Germany The operating manual can be reordered via the service hotline and is available for download via the service portal at www medion com gb service start You can also scan the QR code above and download the operating manual onto your mobile device via the service por tal X57299 MD 21299 MSN 30017758 28 70...

Page 21: ...21 ...

Page 22: ...ark Faraday Road Dorcan Swindon SN3 5JF Wiltshire United Kingdom Hotline 0333 32 12 106 National rate Fax 01793 71 57 16 To contact us by email please visit the Service and Support section of our website at www medion co uk www medion co uk ...

Reviews: