background image


29 


EN


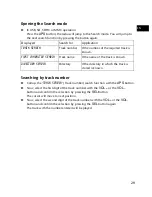
Opening the Search mode   


In USB, SD, SDHC or MMC operation: 
Press the 

APS

 button; the radio will jump to the Search mode. You will jump to 

the next search function by pressing the button again:   

Displayed


Search for


Application


Track search


Track number 

If the number of the required track is 
known.   

First Character search


Track name 

If the name of the track is known.   

Directory search


Directory 

If the directory in which the track is 
stored is known.   

Searching by track number  


Call up the ‘

Track search

’ (Track number) search function with the 

APS

 button.  


Now, select the first digit of the track number with the 

VOL

 + or the 

VOL

 – 

button and confirm the selection by pressing the 

SEL

 Button. 

The cursor will move to next position.    


Now, select the second digit of the track number with the 

VOL

+ or the 

VOL

button and confirm the selection by pressing the 

SEL

 button again 

The track with the number entered will be played.      

Summary of Contents for Life E62007

Page 1: ...Bedienungsanleitung Instruction manual Mode d emploi Handleiding MP3 Autoradio MP3 Car Audio System Autoradio MP3 MP3 autoradio MEDION LIFE E62007 MD 82694 ...

Page 2: ...l 2 Safety information 5 Scope of delivery 8 Installation and bringing the device into operation 9 Control panel 13 Operation 17 Radio functions 20 Playback functions 27 Settings menu 31 Functions that can be set 31 Troubleshooting 34 Disposal information 35 Technical specifications 36 ...

Page 3: ...ithin this menu TA SEEK TA ALARM Setting of the basic volume for traffic information PI SOUND PI MUTE Setting of the sound during a search for stations Retune L Retune S Setting of the searching time for stations MASK DPI MASK ALL Mask certain stations BEEp ON On and off switching sound button OFF DSP NONE Select between the FLAT normal CLASSIC ROCK and POP audio settings here VOL LAST VOL DEFA Se...

Page 4: ...e radio 9 4 RDM Random in the case of USB SD SDHC MMC cards random playback 10 Station memory No 5 see No 4 11 Station memory No 6 see No 4 12 BAND Change between the FM and the AM bands 13 Press down briefly Forwards station search Music track Press down briefly fast forward 14 REL Open up the control panel 15 SD SDHC MMC card slot 16 AS PS Automatic station search play the station 17 PTY program...

Page 5: ... 4 Behind the control panel 24 Red anti theft LED Flashes if the control panel has been removed 25 RESET Set the device back to the factory settings ...

Page 6: ...out of reach of children There is a risk of asphyxiation Intended use The car radio is only suitable for installation and operation in vehicles with 12 V voltage Road safety Traffic safety is the highest precept Only operate your car radio if the traffic situation permits it Get to know the device before starting the first journey with it You should always be able to hear police fire and other eme...

Page 7: ...not introduce any kind of foreign objects into the openings of the car radio USB connection card slot AUX connection The compartments and the connections could be damaged by this Cleaning the unit Use a dry soft cloth to clean the device Do not use chemical solutions or cleaning products because these may damage the unit s surface and or inscriptions Protect the device against moisture Do not touc...

Page 8: ...ou do not bend or twist the cable Insert the unit into the proper shaft or select a location to install the unit that will not affect the driver s ability to drive Connect the cable shortly before finally installing the device Ensure that it has been connected correctly and that the system works properly If changes have to be made to the vehicle consult your vehicle dealer specialist workshop Your...

Page 9: ...if any components are missing The following items are supplied with the product Car radio 2 ISO sockets with cables Control panel Case Installation frame slipped on 2 keys to remove the installation frame and the device Additional attachment material for an individual installation These Operating Instructions Warranty card ...

Page 10: ...or the specialist departments of department stores Compare the Erläuterungen zu den Kabeln Explanations about the cables chapter to this Installing the installation frame in the ISO slot The installation frame 1 is pulled over the car radio 2 in the status at delivery Pull the installation frame off the casing first Push both the keys supplied with the device 3 to the left and the right between th...

Page 11: ...at the installtion frame is held firmly It must be attached so that it cannot become loose even during strong braking Make the electrical connections before you insert the car radio and put on the aperture frame 6 ...

Page 12: ...he car radio during installation You will be able to buy a corresponding adapter in specialist workshops in the specialist trade or in the specialist departments of department stores if the ISO socket block of your vehicle does not match the ISO sockets of the car radio Safe and correct electrical connections will be made with the two ISO sockets of your vehicle for the loudspeakers and for electr...

Page 13: ...o on Carry out an automatic station search by pressing down the APS button for about two seconds also compare the automatic search for the 6 strongest stations APS to this Automatic search for the 6 strongest stations APS Switch off the ignition of the vehicle Switch the ignition on again and establish whether the stations are stilled stored press the Station buttons 1 to 6 for this You can instal...

Page 14: ... theft When the panel is not attached the LED anti theft protection light will flash on the unit Contacts The contacts on the control panel and the radio will lie freely if the control panel has been removed Pay attention that the freely lying contacts do not become dirty The car radio would not be able to function faultlessly then Always keep the control panel in the case for protection Clean the...

Page 15: ...out the the cables will serve if the cables must be laid individually Contact a specialist workshop for this and pass on the ISO connector supplied with the device and the information in this Chapter to the workshop You will not need the following explanations to connect the radio to the ISO connectors of your vehicle Two ISO connectors with cables are supplied with the device A connector with an ...

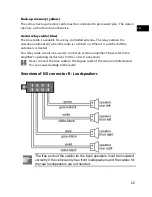
Page 16: ...tched off the antenna is retracted This relay cable can also be used to control an external amplifier Please refer to the amplifier s operating instructions for the correct connections Never connect the blue cable to the engine cable of the relay controlled aerial this can cause damage to the radio Overview of ISO connector B Loudspeakers The free ends of the cables for the back speakers must be i...

Page 17: ... the ignition lock Terminal 15 8 Rear left 8 Mass Terminal 31 Problems due to incorrect cable connections The standard arrangement of the permanent plus and the switched plus cable is reversed in the ISO connector for ISO block A at the factory in some vehicle models If this is the case some functions will be impaired e g the station memory will be lost The cable for switched plus red and the cabl...

Page 18: ...OL buttons Setting Display Function Volume VOL Sets the volume Bass BAS Sets the bass Treble TRE Sets the treble Balance BAL R L Sets the right left volume distribution Fader FAD F R Sets the front F rear R volume distribution You can change the volume at any time by pressing the VOL button Wait approx 5 seconds until the radio has left the menu automatically if you are in a menu Always set the vo...

Page 19: ...t the reception of a PTY or TA station traffic radio MODE Changing the Operating mode Press the MODE button to change between radio reception and the playback of data media SD USB etc The respective Operating mode will be shown in display Operating mode Displayed Radio reception Radio Playback from the USB connection USB Playback from an SD card CARD Playing of an external audio device AUX ...

Page 20: ...ions will be transmitted to a different extent by the station institutions PTY none will appear in the display if you are not receiving any radio data system or PTY information PS None will appear in the display if no frequency is being received Setting the clock time The time will be set automatically at the reception of a station with a radio data system after the device has been first started o...

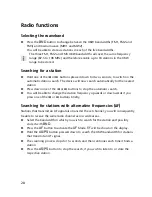
Page 21: ...op the automatic search You will be able to change the station frequency upwards or downwards if you press one of the or buttons briefly Searching for stations with alternative frequencies AF Stations that transmit an AF signal also transmit the set channel you will consequently be able to receive the same radio channel across wide areas Select the bandwidth in which you wish to search for the sta...

Page 22: ...he bandwidth The stations stored will be displayed for 5 seconds when the search has concluded The station deposited at memory position 1 in the FM1 bandwidth will be played after this Press one of the 1 to 6 Station buttons to end the search Presetting the station selector Select the bandwidth in which you have deposited the station with BND You will call up the stored stations again by pressing ...

Page 23: ...tely if the car radio has received this signal The volume will be increased to 20 automatically during a traffic announcement if the volume level is under 20 or the mute setting has been activated The volume level will be set back after the announcement Stations that transmit traffic radio traffic channels are indicated in the display by the TP symbol Press the TA button briefly to switch on the T...

Page 24: ...on buttons are arranged as follows Key Music genre Type of speech programme 1 POP M NEWS News AFFAIRS Public affairs INFO Information 2 EASY M LIGHT M SPORT Sport EDUCATE Education DRAMA 3 CLASSICS classical OTHER M other music CULTURE SCIENCE VARIED 4 JAZZ COUNTRY WEATHER FINANCE CHILDREN 5 NATION M OLDIES SOCIAL RELIGION 6 FOLK M TRAVEL Travel LEISURE Leisure DOCUMENT Documentation An automatic ...

Page 25: ...sticks or MP3 players SD card reader For SD memory cards with MP3 files AUX IN connection For the connection of external audio devices e g a CD player through a 3 5 mm phono connector Compatibility with all the MP3 players USB sticks and memory cards available on the market cannot be guaranteed MP3 files have their own search and display function that you can use to select a track ...

Page 26: ...dio will search for MP3 files on the data media You will be able to select the USB connection with the MODE button if the device is in a different mode Radio SD SD SDHC MMC cards You can push SD SDHC und MMC cards that contain MP3 files into the SD drive The SD drive is located under the control panel Inserting and removing cards Push the memory card into the card slot with the contacts pointing d...

Page 27: ...e e g am CD player with a 3 5 mm phono connector Connect the external audio device to the AUX IN socket on the control panel The AUX message will appear in the display You will be able to select the AUX connection with the MODE button if the device is in a different mode Radio USB ...

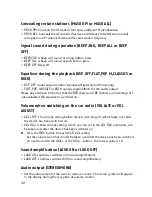
Page 28: ...ion button 5 or 6 to jump forwards or backwards by 10 tracks Fast forward rewind Hold the or the button pressed down for longer to start a fast forward or rewind Preview track In USB SD SDHC or MMC operation Press the 2 INT Station button briefly The S INT visual presentation will appear in the display All tracks will be played successively for approx 10 seconds Pressing the 2 INT button again wil...

Page 29: ... All the usual MP3 codings can be played back Setting up MP3 data media ID3 TAGs Data media with MP3 files CD ROMs USB Sticks etc can contain individual titles or directories like data CDs Please make sure that you do not store tracks on the same level as directories but only in the directories when setting up the data media Mixing tracks and directories on the same level could lead to problems du...

Page 30: ...track is known Directory search Directory If the directory in which the track is stored is known Searching by track number Call up the Track search Track number search function with the APS button Now select the first digit of the track number with the VOL or the VOL button and confirm the selection by pressing the SEL Button The cursor will move to next position Now select the second digit of the...

Page 31: ...display Press the or the button to select the required track from the list Press the SEL button to start the selected track The NONE display will appear if no track begins with the selected letter Searching by directory Call up the Directory search search for a directory search function with the APS button The top Root directory will be displayed The first directory or the first track will be disp...

Page 32: ...e strongest TA station station with traffic announcements if you have left the reception range or the signal for traffic announcements has become weaker TA ALARM An alarm sound will be emitted if you have left the reception range or the signal for traffic announcements has become weaker Sound during a search for stations PI SOUND or PI MUTE PI SOUND Search for stations with sound PI MUTE The sound...

Page 33: ...S bass and TRE treble sound settings are not available if the equalizer is switched on Volume when switching on the car radio VOL LAST or VOL ADJUST VOL LAST The volume setting before the last switching off will be taken over after the device has been switched on VOL ADJ A fixed volume setting which you can set in the VOL ADJ sub menu will be taken over after the device has been switched on Press ...

Page 34: ...ed to national stations LOCAL The sensitivity of reception is aligned to regional local stations CLK On Off CLK Off The display shows the station data CLK ON The display shows the time during operation CLK 24 12 CLK 24 The clock runs in the 24 hour mode CLK 12 The clock runs in the 12 hour mode AM PM ...

Page 35: ...do not work The control panel is not properly fitted Check the correct fitting of the control panel Radio and or automatic search do not work The antenna cable is not connected properly Check the correct location of the antenna cable The transmission signals are too weak Set the station manually Station memory does not work The cable for the permanent plus yellow is not connected properly Check th...

Page 36: ...cycled Appliance The radio should not be disposed of in household rubbish at the end of its useful life Seek the advice of your local authority on environmentally friendly disposal facilities Batteries Do not dispose of used batteries in the household rubbish They should be deposited at a collection point for used batteries ...

Page 37: ...ISO 9660 Joliet format of MP3 Connections AUX 3 5 mm phono connector USB 1 1 Memory cards SD SDHC MMC up to 16 GB tested R C A OUTPUT 4 x Cinch red white There are many partly different data media formats today CD R CD RW USB and SD cards Reading errors or delays can arise in individual cases for this reason This is not a defect in the device Subject to technical modifications This device has been...

Page 38: ...35 05 40 0 34 EUR min E Mail Pour nous contacter merci de vous rendre sur notre site internet à la rubrique Service et Support www medion fr Medion B V John F Kennedylaan 16a 5981 XC Panningen Nederland Hotline 0900 2352534 0 15 EUR Min Fax 0900 3292534 0 15 EUR Min e mail Gebruikt u a u b het contactformulier op onze website onder Service en Ondersteuning www medion nl FR NL UK DE MTC Medion Tech...

Reviews: