background image

12

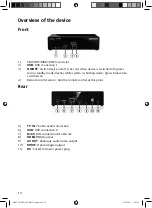
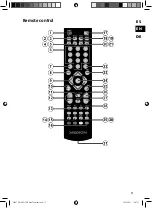
1) 

RQYGT<"

Switch device on/switch to standby mode

2) 

VX

: Change to DVB mode

3) 

OWUKE

: Change to music playback

4) 

QWVRWV

: Set the video output

5) 

CWFKQ

: Set the audio output

6) 

PWODGT"MG[U

: To enter numbers

7) 

OWVG

: To switch the sound off

8) 

TGECNN

: Refresh the current display

9) Navigation 

buttons 



: Move the selection in the menus

10) 

TGVWTP

: Back to previous menu

11) 

RNC[1RCWUG




: Start/pause playback

12) 

XQNWOG"/1-

: Decrease/increase volume

13) 

RTGX1PGZV


/

: Previous/next title

14) 

TGE

: Start PVR recording

15) 

HCX

: Call up the favourites lists

16) Colour 

buttons 

TGF

ITGGP

[GNNQY

DNWG

: Function buttons for video 

text and use in some menus

17) 

JQOG

: Back to the HOME menu

18) 

RJQVQ

: Change to photo playback

19) 

XKFGQ

: Change to video playback

20) 

TGRGCV

: Set repeat function

21) 

UWDVKVNG

: Display the subtitles

22) 

FGNGVG

: Delete the entries

23) 

KPHQ

: Display playback information

24) 

GPVGT

: Confirm entries

25) 

OGPW

: Call up menu

26) 

UVQR

: Stop playback

27) 

\QQO"/1-

: Reduce/enlarge image

28) 

HT1HH


/

: Search backwards/forwards

29) 

VGNGVGZV

: Display teletext

30) 

GRI

: Call up program guide in DVB mode

31) 

Battery compartment (on the rear side)

86597 EN ALDI ES Final Content.indd   12

86597 EN ALDI ES Final Content.indd   12

22.12.2011   12:07:11

22.12.2011   12:07:11

Summary of Contents for LIFE E85024

Page 1: ...rpetania N IV Km 13 28906 Getafe Madrid España Hotline 902196437 Fax 914604772 Internet www medion es E mail Support service spain medion com Reproductor multimedia Full HD MEDION LIFE E85024 MD 86597 Bedienungsanleitung IIIa 01 12 50039841_MPlayer_Cover_ES indd 1 09 01 12 14 09 ...

Page 2: ...available for this purpose You can obtain the firmware file in the Service section of the Medion Homepage at www Medion com Download the firmware file and load it to your preferred storage medium Now connect the storage medium to the Media Player Navigate to the Settings menu option and select the sub item Firmware Update Select Search and the downloaded firmware file should be displayed Press ENT...

Page 3: ...mware Datei erhalten Sie im Service Bereich auf der Medion Homepage unter www Medion com Laden Sie die Firmware Datei herunter und laden Sie diese auf ihr gewähltes Speichermedium Nun muss das Speichermedium an den Media Player angeschlossen werden Navigieren Sie zu dem Menüpunkt Einstellungen und wählen Sie den Unterpunkt Firmware Update Wählen Sie nun Suchen es sollte die heruntergeladene Firmwa...

Page 4: ...0 Mando a distancia 11 Puesta en funcionamiento 13 Colocación de las pilas en el mando a distancia 13 Conexiones del aparato 14 Conexión HDMI 15 Primera puesta en servicio 17 1 Menu Language 17 2 Date Time settings 17 3 DVB settings 17 4 Network controls settings 17 5 Display settings 17 Funcionamiento 18 Encender el aparato puesta en modo Standby 18 Ajustar el volumen 18 Navegar por los menús 18 ...

Page 5: ...ware Update 32 Privacy 32 About 33 Solución de problemas 34 Localización de fallos 34 Necesita Ud más ayuda 35 Limpieza 36 Almacenamiento 36 Eliminación 37 Datos técnicos 38 Glosario 40 Información sobre licencia 42 86597 ES ALDI ES Final Content indd 2 86597 ES ALDI ES Final Content indd 2 22 12 2011 11 29 15 22 12 2011 11 29 15 ...

Page 6: ...s instruccio nes PELIGRO Advertencia de peligro de muerte inminente ADVERTENCIA Advertencia de un posible peligro de muerte y o graves lesiones irreversibles CUIDADO Observe las indicaciones para evitar lesiones y daños materiales ATENCIÓN Observe las indicaciones para evitar daños materiales INDICACIÓN Observe las indicaciones del manual de instrucciones INDICACIÓN Informaciones más detalladas pa...

Page 7: ...isor y o a un equipo de audio Asimismo con la antena suministrada o con la antena doméstica puede Ud recibir programas TDT y reproducirlos en su televisor Este aparato está diseñado para ser utilizado únicamente en espacios interiores secos Este aparato está diseñado exclusivamente para uso privado y no con fines industriales o comerciales 86597 ES ALDI ES Final Content indd 4 86597 ES ALDI ES Fin...

Page 8: ...dispone de un diodo de infrarrojos de la clase 1 No mire el LED con aparatos ópticos No coloque recipientes llenos de líquido como p ej jarrones sobre el aparato el adaptador de red o cerca de los mismos y proteja todas las piezas contra gotas y salpicaduras de agua El recipiente puede volcar y el líquido puede perjudicar la seguridad eléctrica En caso de haber desperfectos en la clavija en el cab...

Page 9: ...si desea guardarlas o elimi narlas Lugar de emplazamiento Para evitar cualquier caída del aparato coloque todos los componentes sobre una base estable nivelada y libre de vibraciones al ponerlo en funcionamiento No exponga el aparato a sacudidas Las sacudidas pueden dañar la sensible electró nica No permita que el aparato esté expuesto a fuentes directas de calor p ej la cale facción No coloque fu...

Page 10: ... interrumpir la alimentación eléctrica a su aparato o desconectar el aparato completamente desenchúfelo de la red Enchufe el aparato exclusivamente a fuentes de corriente de AC 100 240 V 50 Hz y con toma de tierra Si tuviera dudas sobre la corriente en el lugar donde piensa colocar su aparato pregunte a su suministrador de energía Use únicamente la fuente de alimentación de clavija suministrada Kt...

Page 11: ...WAV AAC OGG Foto JPG BMP PNG GIF Con los archivos GIF sólo se muestra la primera foto Sistemas de archivo Su Media Player Full HD de diseño es compatible con los sistemas de archivos FAT16 FAT32 NTFS EXT2 y EXT3 El símbolo de indicación Durante el funcionamiento puede aparecer en la pantalla del televisor el símbolo que indica que la función explicada en el manual de instrucciones no está dispo ni...

Page 12: ...entación de clavija Ktec KSAD1200150W1EU Mando a distancia incl 2 pilas tipo R03 AAA 1 5V Cable cinch de audio vídeo Antena TDT Manual de instrucciones Tarjeta de garantía PELIGRO Mantenga alejado de los niños el material de embalaje como p ej los plásticos Existe riesgo de asfixia en caso de uso incorrecto 86597 ES ALDI ES Final Content indd 9 86597 ES ALDI ES Final Content indd 9 22 12 2011 11 2...

Page 13: ...arato encendido 4 Sensor del mando a distancia dirija el mando a distancia a este punto Lado posterior del aparato 5 VX KP Conexión de antena de 75 ohmios 6 WUD conexión USB 2 7 TL67 conexión LAN para la red 8 JFOK salida HDMI 9 CX QWV salida de audio vídeo analógica 10 URFKH salida digital óptica 11 FE toma para la clavija de la fuente de alimentación 86597 ES ALDI ES Final Content indd 10 86597 ...

Page 14: ...11 ES EN DE Mando a distancia 86597 ES ALDI ES Final Content indd 11 86597 ES ALDI ES Final Content indd 11 22 12 2011 11 29 18 22 12 2011 11 29 18 ...

Page 15: ...tas de favoritos 16 Teclas de color TQLQ XGTFG COCTKNNQ C WN teclas de función para teletexto y para algunos menús 17 JQOG volver al menú HOME 18 RJQVQ pasar a reproducción de fotos 19 XKFGQ pasar a reproducción de vídeo 20 TGRGCV ajustar la función Repetición 21 UWDVKVNG mostrar subtítulos 22 FGNGVG borrar entradas 23 KPHQ mostrar información sobre la reproducción 24 GPVGT confirmar entradas 25 O...

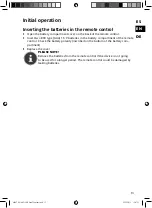
Page 16: ...do a distancia Preste atención a los polos de las pilas marcados en el fondo del compartimento de las pilas Vuelva a a colocar la tapa del compartimento de la pilas NOTA Retire las pilas del mando a distancia si no va a utilizarlo durante un prolongado periodo de tiempo El mando a distancia puede dañarse si las pilas derraman líquidos 86597 ES ALDI ES Final Content indd 13 86597 ES ALDI ES Final C...

Page 17: ...14 Conexiones del aparato 86597 ES ALDI ES Final Content indd 14 86597 ES ALDI ES Final Content indd 14 22 12 2011 11 29 19 22 12 2011 11 29 19 ...

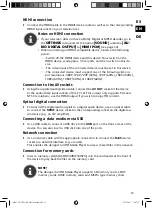
Page 18: ... posibles las resoluciones PAL y NTSC cuando desee disfrutar de contenidos en HD utilice la salida HDMI Conexión digital óptica Para transmitir señales de audio digital a un aparato de audio digital conecte la toma URFKH del aparato con un cable óptico a la correspondiente toma del aparato de audio digital p ej un amplificador A V Conectar un soporte de datos a través de USB Con un cable USB conec...

Page 19: ... 5A con la toma DC del aparato Una vez realizadas todas las conexiones conecte el adaptador de red a una toma de corriente AC 230 V 50 Hz Encontrará información sobre el adaptador de red en los datos técnicos de la página 38 86597 ES ALDI ES Final Content indd 16 86597 ES ALDI ES Final Content indd 16 22 12 2011 11 29 20 22 12 2011 11 29 20 ...

Page 20: ... que su reproductor multimedia recibe las señales TDT tal y como se describe en la página 29 Aquí puede ajustar además el orden de los cana les y el bloqueo para menores A continuación seleccione la opción Next 4 Network controls settings Ajuste aquí la configuración de la red tal y como se indica en la página 30 si desea conectar un cable de red A continuación seleccione la opción Next 5 Display ...

Page 21: ...to desde el modo Standby Ajustar el volumen Pulse las teclas XQN 1 para bajar o subir el volumen El nivel de volumen aparece rá brevemente en el borde superior de la pantalla Navegar por los menús Con las teclas de navegación seleccione los puntos de menú y modifi que los valores en los menús Pulse la tecla GPVGT para confirmar un punto de menú Entrada mediante el teclado de pantalla En algunos me...

Page 22: ...e la emisora que está reprodu ciéndose Para cerrar otra vez la página de teletexto pulse la tecla TGVWTP Seleccionar páginas Introduzca la página de teletexto deseada tecleando un número de tres cifras direc tamente con las teclas numéricas El número de la página seleccionada aparece en la esquina superior izquierda de la ventana El contador de teletexto busca hasta encontrar el número de página s...

Page 23: ...conectado Para poner fin a la grabación pulse la tecla UVQR NOTA Mientras haya una grabación en curso no podrá cambiar de emisora TDT Si no hay conectado ningún soporte de datos USB aparecerá el aviso No Disk available 86597 ES ALDI ES Final Content indd 20 86597 ES ALDI ES Final Content indd 20 22 12 2011 11 29 20 22 12 2011 11 29 20 ...

Page 24: ...ndrá que realizar una búsqueda de emisoras Si no hay programas no podrá abrir el organizador de canales Actualmente la recepción de emisoras de radio a través de TDT no está disponible en todos los países Seleccione una emisora que desee editar Con las teclas de color puede Ud desplazar la emisora Mov TQLQ borrar Del XGTFG borrar todos Delete all COCTKNNQ cambiar entre vista TV Radio C WN Asimismo...

Page 25: ...semana del que desee ver el avance de programación Con las teclas y seleccione una emisión A la derecha se ofrece una breve descripción de la emisión Pulse una de las siguientes teclas para seleccionar otras funciones TGVWTP volver al menú Digital TV Tecla de color TQLQ seleccionar otra emisora GPVGT programar la grabación de esta emisión PVR En el menú PVR puede Ud ver las grabaciones de la graba...

Page 26: ...ente Weekly en días de semana Week day o en sábados y domingos Sa Sun Seleccione la opción Save y pulse la tecla GPVGT para guardar los ajustes Para cancelar la programación de la grabación seleccione la opción Exit Channel Search Aquí se inicia una búsqueda de emisoras Seleccione primero si la búsqueda de canales debe hacerse con Auto Scan o con Manual Scan Para la búsqueda manual de canales en e...

Page 27: ...a RNC 1RCWUG Aparece brevemente el símbolo Play STOP detener la reproducción poner fin a la reproducción Durante la reproducción pulse la tecla UVQR una vez para detener la reproducción y volver de nuevo a la selección de títulos Si retoma la reproducción con RNC 1 RCWUG ésta comienza desde la última posición reproducida la vez anterior Durante la reproducción pulse la tecla UVQR dos veces para po...

Page 28: ...ar la visualización de subtítulos Durante la reproducción pulse varias veces la tecla UWDVKVNG para visualizar los subtítulos disponibles INFO visualizar información de la reproducción Durante la reproducción pulse la tecla KPHQ para visualizar el tiempo transcurrido restante e información sobre el formato de archivo ZOOM reducir aumentar imagen no en grabaciones TV Pulse las teclas QQO y QQO para...

Page 29: ...a lista de títulos 5 Activar desactivar la reproducción aleatoria 6 Ajustar la función Repetición 7 Duración total de reproducción 8 Pausa 9 Acceder al título anterior siguiente 10 Tiempo transcurrido 11 Barra de reproducción 12 Carátula del álbum Funciones de reproducción Durante la reproducción puede Ud hacer uso de las siguientes funciones de las teclas PLAY PAUSE interrumpir continuar la repro...

Page 30: ...ucción Seleccione el título que desee añadir a la lista de reproducción y mantenga pulsada la tecla GPVGT hasta que aparezca un menú de selección Play Seleccione esta opción para reproducir directamente el título marcado Add to Playlist Seleccione esta opción para añadir el título a una lista de reproducción Seleccione Current Playlist para añadir el título a la lista de reproducción que usa actua...

Page 31: ... opción Next A continuación seleccione la opción Save para guardar la lista de reproducción con un nuevo nombre Photo Viewer Seleccione una carpeta y luego el archivo de fotos que desee reproducir Pulse la tecla GPVGT o RNC 1RCWUG para iniciar la reproducción como proyección de diapositivas Funciones de reproducción Durante la reproducción puede Ud hacer uso de las siguientes funciones de las tecl...

Page 32: ...para definir otra hora Defina la nueva hora y confirme con Set Use 24 hour format Pulse la tecla GPVGT para visualizar la hora en formato de 24 o de 12 horas Select Date format Confirme la opción de configuración de formato de fecha para definir otro formato de fecha Seleccione otro formato de fecha y confirme con GPVGT DVB Setup Area Indique aquí la región en la que recibe señales TDT LCN logic c...

Page 33: ...eo por edades La contraseña predefinida de fábrica es 0000 Introduzca primero la antigua contraseña e introduzca luego la nueva contraseña dos veces en los campos siguientes Confirme su ajuste con QM Networks controls Ethernet Seleccione esta opción y pulse la tecla GPVGT para cortar la conexión a la red o para conectarse a la red Ethernet Configuration Ajuste aquí el adaptador de red a su red loc...

Page 34: ...atos de película de 16 9 en toda su altura los márgenes laterales de la imagen se cortan Letter Box 4 3 selección para televisores con formato 4 3 El formato Letterbox reduce el formato de película 16 9 al ancho de la pantalla Wide Screen 16 9 selección para televisores con formato 16 9 Original la relación de aspecto no se ajusta Video Out Ajuste aquí la resolución de vídeo HDMI Auto La resolució...

Page 35: ... la base de datos multimedia Con la base de datos multimedia activada su reproductor multimedia crea un archivo índice en los soportes de datos SD y USB que contienen archivos de música Si selecciona la reproducción de música del soporte de datos podrá seleccionar títulos del índice por Artists Albums Songs o de una de las Playlists Storages Aquí se muestran los medios de almacenamiento conectados...

Page 36: ...mo las versiones de firmware Asimismo puede ver aquí la versión del sistema ope rativo Android y visualizar en el registro Legal Information la licencia de código abierto del aparato 86597 ES ALDI ES Final Content indd 33 86597 ES ALDI ES Final Content indd 33 22 12 2011 11 29 23 22 12 2011 11 29 23 ...

Page 37: ...n compatible con el televisor No hay sonido Conectar firmemente el cable de audio Para el amplificador o la conexión del amplificador se ha realizado un ajuste inco rrecto en el menú Ajustes Audio Digital Output para la fuente de entrada El aparato está realizando una búsqueda o se encuentra en el modo de pausa El mando a distancia no funciona correctamente No se está dirigiendo el mando a distanc...

Page 38: ...l aparato Aparece uno de los siguientes problemas La indicación del panel de control no funciona El aparato no funciona correctamente Se puede reiniciar el aparato de la siguiente manera Abra el menú Settings Privacy Factory Data Reset Seleccione este punto y pulse GPVGT para revocar todos los ajustes introducidos y volver a reponer el aparato a su estado de fábrica Necesita Ud más ayuda Si las re...

Page 39: ...ntalla con un paño suave y que no suelte pelusas Rogamos que guarde el material de embalaje y que lo utilice siempre y exclusivamente para transportar el aparato ATENCIÓN En el interior del aparato no hay piezas que someter a mantenimiento o que limpiar Almacenamiento Si no va a utilizar el aparato durante algún tiempo guárdelo en un lugar seco 86597 ES ALDI ES Final Content indd 36 86597 ES ALDI ...

Page 40: ...pto el aparato al final de su vida útil a la basura doméstica normal Consulte en su ayuntamiento o autoridad local la posibilidad de una eliminación apropiada y respetuosa con el medio ambiente Pilas No tire las pilas usadas a la basura doméstica Se pueden entregar las pilas para su eliminación en un punto de recogida para pilas usadas o en el comercio especializado 86597 ES ALDI ES Final Content ...

Page 41: ...daptador de red 12 V 1 5 A Salida digital óptica Salida HDMI Copyright 2011 Reservados todos los derechos Este manual está protegido por derechos de autor Reservados todos los derechos Está prohibido realizar copias mecánicas electrónicas o de otra forma sin autorización por escrito del fabricante El copyright pertenece a la empresa MEDION Su aparato cumple con los requisitos básicos y las normas ...

Page 42: ... los números de patente estadouniden se 5 451 942 5 956 674 5 974 380 5 978 762 6 487 535 y otras patentes concedidas y registradas en los EE UU o a nivel interna cional DTS y el símbolo son marcas registradas DTS 2 0 Digital Out y los logos DTS son marcas de DTS Inc El producto contiene software DTS Inc Reservados todos los derechos 86597 ES ALDI ES Final Content indd 39 86597 ES ALDI ES Final Co...

Page 43: ...de red puede traducir nombres de host en texto a direcciones IP numéricas para identificar inequívocamente un aparato conecta do a internet Ethernet Un método estándar para conectar ordenadores a una red local LAN Dirección IP Un número binario de 32 bits que identifica inequívocamente a cada ordenador conec tado a internet LAN Local Area Network red local Sistema con el que los usuarios de ordena...

Page 44: ...informáticos que facilitan la implementación de redes domésticas permitiendo la interconexión continua de los aparatos Véase también protocolo 86597 ES ALDI ES Final Content indd 41 86597 ES ALDI ES Final Content indd 41 22 12 2011 11 29 26 22 12 2011 11 29 26 ...

Page 45: ...ar el código fuente de la GPL LGPL usada en el siguiente enlace http www medion com Por favor indique en el centro de descargas el correspondiente número MD o número MSN Encontra rá dichos números en su aparato Como alternativa podemos remitirle gratuitamente por correo un soporte de datos con el contenido del código fuente Para tal fin por favor envíe un mensaje a opensource medion com o llámenos...

Page 46: ...ar 10 Remote control 11 Initial operation 13 Inserting the batteries in the remote control 13 Device connections 14 HDMI connection 15 Using the device for the first time 17 1 Menu language 17 2 Date time settings 17 3 DVB settings 17 4 Network controls settings 17 5 Display settings 17 Operation 18 Switch device on switch to standby mode 18 Setting the volume 18 Navigating in the menus 18 Entry u...

Page 47: ...ks controls 31 Display 32 Sound 33 Storage 33 Firmware update 33 Privacy 33 About 33 Troubleshooting 34 Troubleshooting 34 Do you need more help 35 Cleaning 36 Storage 36 Disposal 37 Technical data 38 Glossary 40 Licence information 42 86597 EN ALDI ES Final Content indd 2 86597 EN ALDI ES Final Content indd 2 22 12 2011 12 07 08 22 12 2011 12 07 08 ...

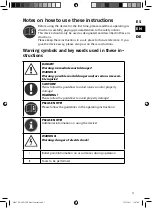
Page 48: ...ed in these in structions DANGER Warning immediate mortal danger WARNING Warning possible mortal danger and or serious irreversi ble injuries CAUTION Please follow the guidelines to avoid injuries and or property damage WARNING Please follow the guidelines to avoid property damage PLEASE NOTE Please follow the guidelines in the operating instructions PLEASE NOTE Additional information on using the...

Page 49: ...evision and or an audio system You can receive DVB T programmes via the supplied aerial or by using your outdoor aerial and watch them on your television set This device is intended for use in dry indoor areas only The device is only intended for private use and not for industrial or commercial use 86597 EN ALDI ES Final Content indd 4 86597 EN ALDI ES Final Content indd 4 22 12 2011 12 07 09 22 1...

Page 50: ...t circuit and fire hazard The slots and openings on the device are for ventilation purposes Do not cover these openings overheating fire risk The universal remote control has a class 1 infrared diode Do not use optical devic es to look at the LED Do not place containers containing liquid e g vases on the appliance the mains adapter or in their immediate surroundings and protect all parts of the de...

Page 51: ...n water and contact your doctor immediately Avoid heavy impacts and vibrations Clean the contacts in the battery compartment and on the new batteries before in sertion Remove spent batteries from the device immediately Remove the batteries from the device if you do not intend to use it for a long period of time Cover the contacts of the batteries with sticky tape if you want to store or dispose of...

Page 52: ... and cleaning products because these may damage the unit s surface and or inscrip tions Data backup Please note Back up your data to external storage media after each update We do not accept any liability for claims for compensation arising from loss of data or any damages incurred Electricity supply Please note Even in standby mode some components of the device are live To dis connect the power f...

Page 53: ...rous file formats The following table lists the playable file formats of various media types Media type File formats Video MPG MPEG AVI WMV MP4 MOV DAT VOB ISO MKV TS M2TS Subtitle formats SRT SUB SMI SSA Audio MP3 WMA WAV AAC OGG Photo JPG BMP PNG GIF For GIF files only the first photo is displayed File systems Your designer full HD Media Player supports FAT16 FAT32 NTFS EXT2 and EXT3 file system...

Page 54: ...ia player Mains adapter Ktec KSAD1200150W1EU Remote control including 2 batteries type RO3 AAA 1 5 V Video audio cinch cable DVB T aerial Operating instructions Warranty card DANGER Keep packaging material e g plastic wrapping out of reach of chil dren Misuse could lead to a risk of suffocation 86597 EN ALDI ES Final Content indd 9 86597 EN ALDI ES Final Content indd 9 22 12 2011 12 07 10 22 12 20...

Page 55: ...ws blue when switched on 4 Remote control sensor Aim the remote control at this point Rear 5 VX KP 75 ohm aerial connection 6 WUD USB connection 2 7 TL67 LAN connection for network 8 JFOK HDMI output 9 CX QWV Analogue audio video output 10 URFKH Optical digital output 11 FE Socket for mains power plug 86597 EN ALDI ES Final Content indd 10 86597 EN ALDI ES Final Content indd 10 22 12 2011 12 07 10...

Page 56: ...11 ES EN DE Remote control 86597 EN ALDI ES Final Content indd 11 86597 EN ALDI ES Final Content indd 11 22 12 2011 12 07 11 22 12 2011 12 07 11 ...

Page 57: ...he favourites lists 16 Colour buttons TGF ITGGP GNNQY DNWG Function buttons for video text and use in some menus 17 JQOG Back to the HOME menu 18 RJQVQ Change to photo playback 19 XKFGQ Change to video playback 20 TGRGCV Set repeat function 21 UWDVKVNG Display the subtitles 22 FGNGVG Delete the entries 23 KPHQ Display playback information 24 GPVGT Confirm entries 25 OGPW Call up menu 26 UVQR Stop ...

Page 58: ...nt of the remote control Check the battery polarity inscribed on the bottom of the battery com partment Replace the cover PLEASE NOTE Remove the batteries from the remote control if the device is not going to be used for a longer period The remote control could be damaged by leaking batteries 86597 EN ALDI ES Final Content indd 13 86597 EN ALDI ES Final Content indd 13 22 12 2011 12 07 11 22 12 20...

Page 59: ...14 Device connections 86597 EN ALDI ES Final Content indd 14 86597 EN ALDI ES Final Content indd 14 22 12 2011 12 07 12 22 12 2011 12 07 12 ...

Page 60: ...utput only supports PAL and NTSC resolutions use the HDMI output if you wish to enjoy HD content Optical digital connection To transmit the digital audio signals to a digital audio device use an optical cable to connect the URFKH device socket to the corresponding socket on the digital au dio device e g an A V amplifier Connecting a data medium via USB Use a USB cable to connect a USB drive to the...

Page 61: ...the DC socket on the device Once you have made all the connections connect the mains adapter to the pow er outlet 230 V 50 Hz For more information on the mains adapter refer to the technical data on page 86597 EN ALDI ES Final Content indd 16 86597 EN ALDI ES Final Content indd 16 22 12 2011 12 07 13 22 12 2011 12 07 13 ...

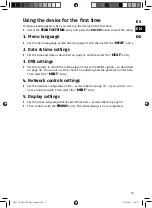
Page 62: ...untry in which the media player receives the DVB T signals as described on page 32 You can also set the channel numbering and the parental control here Then select the NEXT entry 4 Network controls settings Set the network configuration here as described on page 33 if you wish to con nect a network cable Then select the NEXT entry 5 Display settings Set the screen edge adjustment and format here a...

Page 63: ... switch the device back on from standby mode Setting the volume Press the XQN 1 buttons to reduce increase the volume The volume setting will be shown briefly at the top of the screen edge Navigating in the menus The navigation buttons are used to select the menu items and to change the values in the menus Press the GPVGT button to confirm a menu item Entry using the screen keyboard In some menus ...

Page 64: ...he favourites list Display teletext Press the VGNGVGZV button to display the teletext for the current channel To close the teletext page press the TGVWTP button Selecting a page Enter the number of the desired teletext page as a three digit number with the number keys The selected page number is displayed in the top left corner of the window The teletext counter continues to search until it finds ...

Page 65: ...V playback press the TGE button to record directly to a connected USB data medium To stop the recording press the UVQR button NOTE You cannot change the DVB T channel during an ongoing recording If there is no USB data medium connected this note appears NO DISK AVAILABLE 86597 EN ALDI ES Final Content indd 20 86597 EN ALDI ES Final Content indd 20 22 12 2011 12 07 13 22 12 2011 12 07 13 ...

Page 66: ...he Channel Organ iser for the first time If there are no channels then you cannot call up the Channel Organizer Radio reception via DVB T is not yet available in all countries Choose a channel you would like to edit The colour buttons can be used to move MOV TGF delete DEL ITGGP de lete all DELETE ALL GNNQY switch between TV RADIO view DNWG chan nels You can also use the number keys to call up the...

Page 67: ...you are interested in Use the and keys to select a programme A short description of the pro gramme is displayed on the right Press one of the following buttons to select further functions TGVWTP Back to the Digital TV menu TGF colour button Choose a different programme GPVGT Select this programme for recording PVR In the PVR menu you can view the recordings of the personal video recorder PVR Perso...

Page 68: ... rule for the recording here Recording is to occur once ONE TIME daily DAILY weekly WEEKLY on weekdays WEEKDAY or Saturdays and Sundays SA SUN Choose the SAVE entry and press the GPVGTbutton to save the settings To cancel programming the recording choose the EXIT entry Channel search You start the channel search here First choose if you would like to perform the channel search using AUTO SCAN or M...

Page 69: ... cancel the search choose the END entry and press the GPVGT button When the search is completed the display switches back to the playback of the channel on programme position 1 86597 EN ALDI ES Final Content indd 24 86597 EN ALDI ES Final Content indd 24 22 12 2011 12 07 14 22 12 2011 12 07 14 ...

Page 70: ... The Play icon is dis played briefly STOP Stop playback end playback During playback press the UVQR button once to pause playback and return to the title selection If you start playback again with RNC 1RCWUG playback will resume at the last playback position During playback press the UVQR button twice to end playback FR FF Rewind forwards search During playback press the HT or HH button repeatedly...

Page 71: ...DVKVNG button to display the available subtitles INFO Display playback information During playback press the KPHQ button to display the elapsed remaining time as well as information about the file format ZOOM Reduce enlarge image not for TV recordings Press the QQO and QQO buttons to reduce or enlarge the image detail Using the navigation buttons you can move the enlarged image detail 86597 EN ALD...

Page 72: ... The audio player is displayed 1 Artist 2 Album 3 Track 4 Back to track list 5 Switch random playback on off 6 Set repeat function 7 Total playback time 8 Pause 9 Call up previous next title 10 Elapsed time 11 Playback bar 12 Album cover Playback functions You can use the following button functions during playback PLAY PAUSE Pause resume the playback Press the RNC 1RCWUG button to interrupt playba...

Page 73: ...ou can add tracks to a playlist Choose the track you want to add to the playlist and keep the GPVGT button pressed down until a selection menu appears Play Select this entry to directly play back the marked track Add to playlist Select this entry to add the track to a playlist Select the CURRENT PLAYLIST to add the track to the playlist currently being used on this data medium Select NEW to create...

Page 74: ...u appears To play back the entire content of the playlist select the PLAY entry To delete the playlist select the DELETE entry Confirm the next query with QM To rename the playlist select RENAME In the input line press the GPVGT but ton to enter a name for the playlist using the screen keyboard To close the screen keyboard choose the NEXT entry Then select the SAVE entry to save the playlist with ...

Page 75: ...C 1RCWUG button to interrupt playback The Pause icon appears To resume playback press the RNC 1RCWUG button again The Play icon is dis played briefly STOP Stop playback end playback During playback press the UVQR button to pause playback and to return to the track selection When you restart playback with RNC 1RCWUG playback will resume at the last playback position 86597 EN ALDI ES Final Content i...

Page 76: ...lect time zone Confirm the time zone setting entry to set a different time zone Choose a different time zone and confirm with GPVGT Set time Confirm the time setting entry to set a different time Set the new time and confirm with SET Use 24 hour format Press the GPVGT button to display the time in a 24 or 12 hour format Select date format Confirm the date format setting entry in order to set a dif...

Page 77: ...table for all age groups PG AND ABOVE Parental supervision recommended M AND ABOVE Parental supervision strictly recommended MA AND ABOVE Parental supervision strictly recommended some scenes are not suitable for children under 15 AV AND ABOVE Not for children under 15 R AND ABOVE For adults only BLOCK ALL PLEASE NOTE Access restriction on the basis of age rating is not available in every coun try...

Page 78: ...t here Netmask If the media player receives an IP address from the router the network mask is dis played here If you use a static IP address then enter the associated network mask Gateway If the media player receives an IP address from the router the standard gateway is dis played here If you use a static IP address then enter the standard gateway here DNS1 and 2 If the media player receives an IP...

Page 79: ... Set the video resolution here HDMI AUTO The resolution is set automatically 1920X1080 60P HD resolution not for composite video output 1920X1080 60I HD resolution not for composite video output 1280X720 60P HD resolution not for composite video output 720X480 60P HD resolution not for composite video output 1920X1080 50P HD resolution not for composite video output 1920X1080 50I HD resolution not...

Page 80: ...e directory by ARTISTS ALBUMS SONGS or from one of the PLAYL ISTS Storages The storage media connected to the media player are displayed here Internal storage The available memory on the device is displayed here Firmware update If you have a firmware update on a data medium then connect it Select the BROWSE entry to search for the update file To start the update select the UPDATE entry Privacy Fac...

Page 81: ...the television Choose a resolution supported by the television No sound Firmly connect the audio cable The amplifier or the amplifier connection for the input source was set incorrectly in the AUDIO DIGITAL OUTPUT settings menu The device is performing a search or is in Pause mode The remote control is not working correctly The remote control is not pointing towards the remote control sensor of th...

Page 82: ...to HDMI PCM see page 34 Resetting the device One of the following problems occurs The display of the control panel does not work The device does not work without disruptions The device can be reset as follows Call up the menu SETTINGS PRIVACY FACTORY DATA RESET Select this item and press GPVGT to reset all entered settings and to restore the fac tory settings of the device Do you need more help If...

Page 83: ...ean the device with a soft lint free cloth Store the packaging material in a safe place only use this box to transport the device ATTENTION None of the parts inside the device require cleaning or maintenance Storage If you are not going to use the device for a long period of time store it in a dry lo cation 86597 EN ALDI ES Final Content indd 38 86597 EN ALDI ES Final Content indd 38 22 12 2011 12...

Page 84: ...not be disposed of in the normal household rubbish Please consult your local authority for advice on cor rect and eco friendly methods of disposal Batteries Do not dispose of used batteries in household rubbish Please return the batteries to a collecting point for spent batteries or specialist dealer for dis posal 86597 EN ALDI ES Final Content indd 39 86597 EN ALDI ES Final Content indd 39 22 12 ...

Page 85: ...ptical digital output HDMI output Copyright 2011 All rights reserved This manual is protected by copyright All rights reserved Copying mechanically elec tronically and any other way is prohibited unless written permission from the manufac turer is obtained MEDION is the owner of the copyright The device complies with the fundamental requirements and the relevant regulations of EMC Directive 2004 1...

Page 86: ...ufactured under licence of U S patent numbers 5 451 942 5 956 674 5 974 380 5 978 762 6 487 535 and other patents both issued and pending in the USA and worldwide DTS and the symbol are registered trademarks DTS 2 0 Digital Out and the DTS logos are brands of DTS Inc The product contains software DTS Inc All rights reserved 86597 EN ALDI ES Final Content indd 41 86597 EN ALDI ES Final Content indd...

Page 87: ...edia such as music photos and videos to and from other devices over a network DNS Domain Name Service A system that a network name server uses to translate text host names into numerical IP addresses to uniquely identify a device connected to the Internet Ethernet A standard method of connecting a computer to a local network LAN IP Address A binary 32 bit number that uniquely identifies any comput...

Page 88: ...nd which is used by work station users in the network UPnP Universal Plug n Play A series of computer network protocols that simplify the imple mentation of networks at home by seamlessly connecting devices with each other See also Protocol 86597 EN ALDI ES Final Content indd 43 86597 EN ALDI ES Final Content indd 43 22 12 2011 12 07 21 22 12 2011 12 07 21 ...

Page 89: ...ed GPL LGPL from the following link http www medion com In the Download Cent er please specify the corresponding MD or MSN number You will find these numbers on the corresponding device Alternatively we can send you a data medium with the source text content by mail free of charge If you would like us to do this please send an e mail to opensource medi on com or call us on 01805 633466 charges app...

Page 90: ...Geräterückseite 11 Fernbedienung 12 Inbetriebnahme 14 Batterien in die Fernbedienung einlegen 14 Geräteanschlüsse 15 HDMI Anschluss 16 Erstinbetriebnahme 18 Menu Language 18 Datum Uhrzeit Einstellungen 18 DVB T Einstellungen 18 Netzwerkeinstellungen 18 Display Einstellungen 18 Bedienung 19 Gerät einschalten in den Standby Modus schalten 19 Lautstärke einstellen 19 Navigation in den Menüs 19 Eingab...

Page 91: ...n 33 Display 34 Töne 35 Speichermedien 35 Firmware Update 35 Datenschutz 35 Über 35 Problembehebung 36 Fehlersuche 36 Benötigen Sie weitere Unterstützung 38 Reinigung 38 Aufbewahrung 38 Entsorgung 39 Technische Daten 40 Glossar 42 Lizenzinformation 44 86597 DE ALDI ES Final Content indd 2 86597 DE ALDI ES Final Content indd 2 22 12 2011 11 55 36 22 12 2011 11 55 36 ...

Page 92: ...verwendete Warnsymbole und Si gnalwörter GEFAHR Warnung vor unmittelbarer Lebensgefahr WARNUNG Warnung vor möglicher Lebensgefahr und oder schweren irrever siblen Verletzungen VORSICHT Hinweise beachten um Verletzungen und Sachschäden zu vermeiden ACHTUNG Hinweise beachten um Sachschäden zu vermeiden HINWEIS Hinweise in der Bedienungsanleitung beachten HINWEIS Weiterführende Informationen für den ...

Page 93: ...e angeschlossen werden Darüberhinaus können Sie über die mitgelieferte Antenne oder über Ihre Hausantenne DVB T Programme empfangen und auf Ihrem Fernsehgerät wiedergeben Dieses Gerät ist nur für den Gebrauch in trockenen Innenräumen geeignet Dieses Gerät ist für den Privatgebrauch gedacht und nicht für industrielle oder kom merzielle Nutzung vorgesehen 86597 DE ALDI ES Final Content indd 4 86597 ...

Page 94: ...der Klasse 1 Betrachten Sie die LED nicht mit optischen Geräten Stellen Sie keine mit Flüssigkeit gefüllten Gefäße wie z B Vasen auf das Gerät den Netzadapter oder in die nähere Umgebung und schützen Sie alle Teile vor Tropf und Spritzwasser Das Gefäß kann umkippen und die Flüssigkeit kann die elektri sche Sicherheit beeinträchtigen Ziehen Sie bei Beschädigungen des Steckers der Anschlussleitung o...

Page 95: ...ebestreifen wenn Sie Batterien lagern oder entsorgen wollen Aufstellort Stellen und betreiben Sie alle Komponenten auf einer stabilen ebenen und vibrati onsfreien Unterlage um Stürze des Gerätes zu vermeiden Setzen Sie das Gerät keinen Erschütterungen aus Erschütterungen können der empfindlichen Elektronik schaden Achten Sie darauf dass keine direkten Wärmequellen z B Heizungen auf das Ge rät wirk...

Page 96: ...im Standby Modus sind Teile des Gerätes unter Spannung Um die Stromversorgung zu Ihrem Gerät zu unterbrechen oder das Gerät gänzlich von Spannung frei zu schalten trennen Sie das Gerät vollständig vom Netz Betreiben Sie das Steckernetzteil nur an geerdeten Steckdosen mit AC 100 240 V 50 Hz Wenn Sie sich der Stromversorgung am Aufstellort nicht sicher sind fragen Sie bei Ihrem Energieversorger nach...

Page 97: ... darauf treten oder darüber stolpern kann Stellen Sie keine Gegenstände auf die Kabel da diese sonst beschädigt werden könnten 86597 DE ALDI ES Final Content indd 8 86597 DE ALDI ES Final Content indd 8 22 12 2011 11 55 38 22 12 2011 11 55 38 ...

Page 98: ...SSA Audio MP3 WMA WAV AAC OGG Foto JPG BMP PNG GIF Bei GIF Dateien wird nur das erste Photo angezeigt Dateisysteme Ihr Design Full HD Media Player unterstützt die Dateisysteme FAT16 FAT32 NTFS EXT2 und EXT3 Über das Anzeigesymbol Während des Betriebs erscheint auf dem Fernsehbildschirm u U das Symbol und zeigt an dass die im Benutzerhandbuch erläuterte Funktion für diese Be triebsart nicht verfügb...

Page 99: ...en Sie erhalten Media Player Steckernetzteil Ktec KSAD1200150W1EU Fernbedienung inkl 2 Batterien Typ R03 AAA 1 5 V Video Audio Cinchkabel DVB T Antenne Bedienungsanleitung Garantiekarte GEFAHR Halten Sie das Verpackungsmaterial wie z B Folien von Kindern fern Bei Missbrauch besteht Erstickungsgefahr 86597 DE ALDI ES Final Content indd 10 86597 DE ALDI ES Final Content indd 10 22 12 2011 11 55 38 2...

Page 100: ...euchtet im eingeschaltetem Zustand blau 4 Fernbedienungssensor Die Fernbedienung auf diesen Punkt richten Geräterückseite 5 VX KP 75 Ohm Antennenanschluss 6 WUD USB Anschluss 2 7 TL67 LAN Anschluss für Netzwerk 8 JFOK HDMI Ausgang 9 CX QWV Analoger Audio Videoausgang 10 URFKH Optischer Digitalausgang 11 FE Buchse für Steckernetzteil 86597 DE ALDI ES Final Content indd 11 86597 DE ALDI ES Final Con...

Page 101: ...12 Fernbedienung 86597 DE ALDI ES Final Content indd 12 86597 DE ALDI ES Final Content indd 12 22 12 2011 11 55 39 22 12 2011 11 55 39 ...

Page 102: ... 15 HCX Favoritenlisten aufrufen 16 Farbtasten TQV ITàP IGND DNCW Funktionstasten für Videotext und in ei nigen Menüs 17 JQOG Zurück zum HOME Menü 18 RJQVQ zur Fotowiedergabe wechseln 19 XKFGQ zur Videowiedergabe wechseln 20 TGRGCV Wiederholfunktion einstellen 21 UWDVKVNG Untertitel anzeigen 22 FGNGVG Eingaben löschen 23 KPHQ Informationen zur Wiedergabe anzeigen 24 GPVGT Eingaben bestätigen 25 OG...

Page 103: ...eachten Sie dabei die Polung der Batterien im Batteriefachboden mar kiert Setzen Sie die Batteriefachabdeckung wieder ein HINWEIS Nehmen Sie die Batterien aus der Fernbedienung heraus wenn das Gerät längere Zeit nicht benutzt wird Die Fernbedienung könnte durch auslau fende Batterien beschädigt werden 86597 DE ALDI ES Final Content indd 14 86597 DE ALDI ES Final Content indd 14 22 12 2011 11 55 40...

Page 104: ...15 ES EN DE Geräteanschlüsse 86597 DE ALDI ES Final Content indd 15 86597 DE ALDI ES Final Content indd 15 22 12 2011 11 55 40 22 12 2011 11 55 40 ...

Page 105: ...WV des Gerätes über das mitgelieferte Audio Video kabel mit den Audio Videoeingangsbuchsen des TV Gerätes Über diesen Ausgang werden nur PAL und NTSC Auflösungen unterstützt wenn Sie in den Genuss von HD Inhalten kommen wollen verwenden Sie den HDMI Ausgang Optischer Digitalanschluss Zur Übertragung der digitalen Audiosignale an ein digitales Audiogerät verbinden Sie die Buchse URFKH des Gerätes ü...

Page 106: ... Speicherkarten Memory Sticks vom Typ MSPro Netzteil anschließen Verbinden Sie den Stromversorgungsstecker des mitgelieferten Adapters KSAD 1200150W1EU 12V DC 1 5A mit der DC Buchse am Gerät Wenn Sie alle Anschlüsse vorgenommen haben verbinden Sie den Netzadapter mit einer Steckdose AC 230 V 50 Hz Entnehmen Sie die Angaben des Netzadapters den technischen Daten auf Seite 40 86597 DE ALDI ES Final ...

Page 107: ...n in dem der Mediaplayer DVB T Signale empfängt wie auf Seite 31 beschrieben Außerdem können Sie hier die Kanalsortierung und die Ju gendschutz Sperre einstellen Wählen Sie anschließend den Eintrag WEITER Netzwerkeinstellungen Stellen Sie hier die Netzwerkkonfiguration ein wie auf Seite 31 beschrieben falls Sie ein Netzwerkkabel anschließen wollen Wählen Sie anschließend den Eintrag WEITER Display...

Page 108: ...s heraus einzuschalten Lautstärke einstellen Drücken Sie die Tasten XQN 1 um die Lautstärke zu verringern erhöhen Die Laut stärkeeinstellung wird kurz oben am Bildrand eingeblendet Navigation in den Menüs Mit den Navigationstasten wählen Sie Menüpunkte aus und verändern Sie Werte in den Menüs Drücken Sie die Taste GPVGT um einen Menüpunkt zu bestätigen Eingabe über die Bildschirmtastatur In einige...

Page 109: ...ste VGNGVGZV um den Videotext zum aktuell wiedergegebenen Sender anzuzeigen Um die Videotextseite wieder zu schließen drücken Sie die Taste TGVWTP Seiten anwählen Geben Sie die gewünschte Videotextseite als dreistellige Nummer direkt mit den Zifferntasten ein Die gewählte Seitenzahl wird in der linken oberen Ecke des Fensters angezeigt Der Videotextzähler sucht solange bis die gewählte Seitennumme...

Page 110: ... aufzunehmen Um die Aufnahme zu beenden drücken Sie die Taste UVQR HINWEIS Während einer laufenden Aufnahme können Sie den DVB T Sender nicht wechseln Ist kein USB Datenträger angeschlossen erscheint der Hinweis KEIN SPEICHERMEDIUM 86597 DE ALDI ES Final Content indd 21 86597 DE ALDI ES Final Content indd 21 22 12 2011 11 55 42 22 12 2011 11 55 42 ...

Page 111: ...n noch keine Programme vorhanden sind können Sie den Kanal Organizer nicht aufrufen Derzeit ist der Radioempfang über DVB T noch nicht in allen Ländern ver fügbar Wählen Sie einen Sender aus den Sie bearbeiten wollen Über die Farbtasten können Sie den Sender verschieben VERSCHIEBEN TQV löschen LÖSCHEN ITàP alles löschen ALLES LÖSCHEN IGND zwischen TV RADIO Ansicht wechseln DNCW Außerdem können Sie...

Page 112: ... Electronic Programm Guide gesendet werden HINWEIS Einige Programme senden keine EPG Informationen aus In diesem Fall können auch keine Programminhalte angezeigt werden Die Programmvorschau wird immer für den aktuell ausgewählten Sender angezeigt Wählen Sie mit den Tasten und einen Wochentag aus für den Sie eine Pro grammvorschau anzeigen wollen Wählen Sie mit den Tasten und eine Sendung aus Recht...

Page 113: ...g für Aufnahmen vornehmen und verwalten Drücken Sie die Farbtasten um folgende Funktionen aufzurufen Farbtaste TQV Eine neue Aufnahme hinzufügen Farbtaste ITàP Die aktuell ausgewählte Aufnahme bearbeiten Farbtaste IGND Die aktuell ausgewählte Aufnahme löschen Farbtaste DNCW Alle Aufnahmen markieren Eine neue Aufnahme hinzufügen Farbtaste ROT Drücken Sie die Farbtaste TQV um eine neue Aufnahme zu p...

Page 114: ...tarten wählen Sie den Eintrag SUCHE STARTEN aus und drücken Sie die Taste GPVGT Um keinen Suchlauf auszuführen wählen Sie den Eintrag CDDTGEJGP aus Suchlauf Während des Suchlaufs werden alle bereits gefundenen TV Kanäle und Radiokanäle angezeigt Um den Suchlauf abzubrechen wählen Sie den Eintrag ENDE aus und drücken Sie die Taste GPVGT Wenn der Suchlauf abgeschlossen ist wechselt die Anzeige zur W...

Page 115: ...cken Sie während der Wiedergabe die Taste UVQR zweimal um die Wiederga be zu beenden FR FF Suchlauf rückwärts vorwärts Drücken Sie während der Wiedergabe mehrmals die Taste HT bzw HH um einen schnellen Suchlauf in 2 4 8 16 32 oder 64 facher Geschwindigkeit rückwärts oder vorwärts zu starten je nach Medientyp können die zur Verfügung stehenden Geschwindigkeiten variieren Um wieder zur normalen Wied...

Page 116: ...vergrößern nicht bei TV Aufnah men Drücken Sie die Tasten QQO und QQO um den Bildausschnitt zu verkleinern bzw zu vergrößern Mit den Navigationstasten können Sie den vergrößerten Bildausschnitt be wegen Music Player HINWEIS Wenn Sie im Menü EINSTELLUNGEN SPEICHERMEDIEN den Eintrag MEDIEN DATENBANK EINSCHALTEN aktiviert haben er scheint zunächst die von der Mediendatenbank auf dem Datenträger er st...

Page 117: ...rtzusetzen drücken Sie die Taste RNC 1RCWUG erneut Das Play Symbol wird kurz angezeigt STOP Wiedergabe anhalten Drücken Sie während der Wiedergabe die Taste UVQR um die Wiedergabe anzu halten Wenn Sie die Wiedergabe wieder mit RNC 1RCWUG starten wird sie an der zuletzt wiedergegebenen Position gestartet FR FF Suchlauf rückwärts vorwärts Drücken Sie während der Wiedergabe mehrmals die Taste HT bzw ...

Page 118: ...eben Zur Playlist hinzufügen Wählen Sie diesen Eintrag aus um den Titel zu einer Playlist hinzuzufügen Wählen Sie AKTUELLE PLAYLIST um den Titel zur aktuell verwendeten Playlist dieses Datenträgers hinzuzufügen Wählen Sie NEU um eine neue Playlist anzulegen Drücken Sie in der Eingabezeile die Taste GPVGT um über die Bildschirmtastatur einen Namen für die Playlist ein zugeben Um die Bildschirmtasta...

Page 119: ... WEITER Wählen Sie abschließend den Eintrag SPEICHERN um die Playlist mit neuem Na men zu speichern Photo Viewer Wählen Sie einen Ordner aus und anschließend die Photo Datei die Sie wiedergeben wollen Drücken Sie die Taste GPVGT oder RNC 1RCWUG um die Wiedergabe als Diashow zu starten Wiedergabefunktionen Während der Wiedergabe können Sie folgende Tastenfunktionen verwenden PLAY PAUSE Wiedergabe u...

Page 120: ...stätigen Sie den Eintrag der Zeitzonen Einstellung um eine andere Zeitzone einzu stellen Wählen Sie eine andere Zeitzone aus und bestätigen Sie mit GPVGT Zeitzone auswählen Bestätigen Sie den Eintrag der Uhrzeiteinstellung um eine andere Uhrzeit einzustellen Stellen Sie die neue Uhrzeit ein und bestätigen Sie mit EINSTELLEN 24 Stunden Format Drücken Sie die Taste GPVGT um die Uhrzeit im 24 oder im...

Page 121: ...UND ÄLTER Für alle Altersstufen freigegeben PG UND ÄLTER elterliche Aufsicht empfohlen M UND ÄLTER elterliche Aufsicht strengstens empfohlen MA UND ÄLTER elterliche Aufsicht strengstens empfohlen einige Szenen für Jugendliche unter 15 nicht geeignet AV UND ÄLTER nicht für Jugendliche unter 15 Jahren R UND ÄLTER Nur für Erwachsene ALLES SPERREN HINWEIS Die Zugangsbeschränkung über die Altersfreigab...

Page 122: ...n Sie diese hier ein Netzmaske Wenn der Mediaplayer eine IP Adresse vom Router erhält wird hier die Netzwerkmas ke angezeigt Wenn Sie eine statische IP Adresse verwenden so geben Sie die dazugehörige Netzwerkmaske ein Gateway Wenn der Mediaplayer eine IP Adresse vom Router erhält wird hier der Standard Gate way angezeigt Wenn Sie eine statische IP Adresse verwenden so geben Sie hier den Standard G...

Page 123: ...passt Videoausgang Stellen Sie hier die Videoauflösung ein HDMI AUTO Die Auflösung wird automatisch eingestellt 1920X1080 60P HD Auflösung nicht für Composite Video Ausgang 1920X1080 60I HD Auflösung nicht für Composite Video Ausgang 1280X720 60P HD Auflösung nicht für Composite Video Ausgang 720X480 60P HD Auflösung nicht für Composite Video Ausgang 1920X1080 50P HD Auflösung nicht für Composite ...

Page 124: ... einer der PLAY LISTS auswählen Speicherziele Hier werden die mit dem Mediaplayer verbundenen Speichermedien angezeigt Interner Speicher Hier wird der auf dem Gerät verfügbare Speicher angezeigt Firmware Update Wenn Sie ein Firmware Update auf einem Datenträger vorliegen haben so schließen Sie diesen an Wählen Sie den Eintrag SUCHEN um nach der Update Datei zu suchen Um das Update zu starten wähle...

Page 125: ...m Fernseher unterstützte Auflösung Kein Ton Audiokabel fest anschließen Für den Verstärker oder den Verstärkeranschluss wurde eine falsche Einstellung im Menü Einstellungen DIGITALER AUDIO AUSGANG für die Eingangsquel le vorgenommen Das Gerät führt gerade einen Suchlauf durch oder befindet sich im Pause Modus Die Fernbedienung funktioniert nicht richtig Die Fernbedienung ist nicht auf den Fernbedi...

Page 126: ...erätes nach Falls Ihr Fernseher keinen Dolby Digital oder MPEG Decoder besitzt stellen Sie im Einstellungen Menü die Option TÖNE Untermenü DIGITALER AUDIO AUSGANG auf HDMI PCM siehe Seite 34 Zurücksetzen des Gerätes Eines der folgenden Probleme tritt auf Die Anzeige des Bedienungsfeldes funktioniert nicht Das Gerät arbeitet nicht störungsfrei Das Gerät kann wie folgt zurückgesetzt werden Rufen Sie...

Page 127: ...se mit Reinigung Die Lebensdauer des Gerätes können Sie durch folgende Maßnahmen verlängern Ziehen Sie vor dem Reinigen immer den Netzadapter und alle Verbindungskabel Verwenden Sie keine Lösungsmittel ätzende oder gasförmige Reinigungsmittel Reinigen Sie das Gerät mit einem weichen fusselfreien Tuch Bitte bewahren Sie das Verpackungsmaterial gut auf und benutzen Sie ausschließlich dieses um das G...

Page 128: ...de seiner Lebenszeit keinesfalls in den norma len Hausmüll Erkundigen Sie sich bei Ihrer Stadt oder Gemeindeverwal tung nach einer umwelt und sachgerechten Entsorgung Batterien Verbrauchte Batterien gehören nicht in den Hausmüll Die Batterien kön nen zur Entsorgung bei einer Sammelstelle für Altbatterien oder im Fach handel abgegeben werden 86597 DE ALDI ES Final Content indd 39 86597 DE ALDI ES F...

Page 129: ...usgang HDMI Ausgang Copyright 2011 Alle Rechte vorbehalten Dieses Handbuch ist urheberrechtlich geschützt Alle Rechte vorbehalten Vervielfäl tigung in mechanischer elektronischer und jeder anderen Form ohne die schriftliche Genehmigung des Herstellers ist verboten Das Copyright liegt bei der Firma MEDI ON Ihr Gerät entspricht den grundlegenden Anforderungen und den relevanten Vorschrif ten der EMV...

Page 130: ...stellt unter Lizenz der US Patentnummern 5 451 942 5 956 674 5 974 380 5 978 762 6 487 535 und anderen in den USA oder international erteilten und angemeldeten Patenten DTS und das Symbol sind eingetragene Marken DTS 2 0 Digital Out und die DTS Logos sind Marken von DTS Inc Das Produkt ent hält Software DTS Inc Alle Rechte vorbehalten 86597 DE ALDI ES Final Content indd 41 86597 DE ALDI ES Final C...

Page 131: ...deos über ein Netzwerk von und zu anderen Geräten übertragen können DNS Domain Name Service Ein System mit dem ein Netzwerk Nameserver Text Hostnamen in numerische IP Ad ressen übersetzen kann um ein mit dem Internet verbundenes Gerät eindeutig zu identifizieren Ethernet Eine Standardmethode um Computer an ein lokales Netzwerk LAN anzuschließen IP Adresse Eine binäre 32 Bit Nummer die jeden mit de...

Page 132: ...zu werden der Workstation Benutzern im Netzwerk dient UPnP Universal Plug n Play Eine Reihe von Computernetzwerkprotokollen die die Imple mentierung von Netzwerken zu Hause vereinfachen indem die Geräte nahtlos mitein ander verbunden werden können Siehe auch Protokoll 86597 DE ALDI ES Final Content indd 43 86597 DE ALDI ES Final Content indd 43 22 12 2011 11 55 49 22 12 2011 11 55 49 ...

Page 133: ...elltext der verwendeten GPL LGPL unter folgendem Link herunterladen http www medion com Bitte geben Sie im Download Center die entsprechende MD Nummer oder MSN Nummer an Diese Nummern finden Sie auf dem jeweiligen Gerät Alternativ kön nen wir Ihnen einen Datenträger mit dem Quelltextinhalt kostenfrei per Post zusenden Bitte senden Sie zu diesem Zweck eine Email an opensource medion com oder rufen ...

Page 134: ...rpetania N IV Km 13 28906 Getafe Madrid España Hotline 902196437 Fax 914604772 Internet www medion es E mail Support service spain medion com Reproductor multimedia Full HD MEDION LIFE E85024 MD 86597 Bedienungsanleitung IIIa 01 12 50039841_MPlayer_Cover_ES indd 1 09 01 12 14 09 ...

Reviews: