AFTER SALES SUPPORT
www.medionusa.com
866-633-4660
USA
QR
Q
Q
Q
QR
R
R
R
R
R
R
R
R
R
R
R
R
R
R
R
R
R
R
R
R
R
R
R
R
R
R
R
Q
Q
Q
Q
Q
Q
Q
Q
Q
Q
Q
Q
Q
Q
Q
Q
Q
Q
Q
Q
Q
Q
Q
Q
Q
Q
Q
Q
Q
Q
Q
Q
Q
Q
Q
Q
Q
Q
Q
Q
Q
Q
Q
Q
Q
Q
Q
Q
Q
Q
USA
Model: MD 8332 · Product Code:
93606
Promotion period:
06/2016
Quick start guide
MULTIMEDIA PC P2125 D
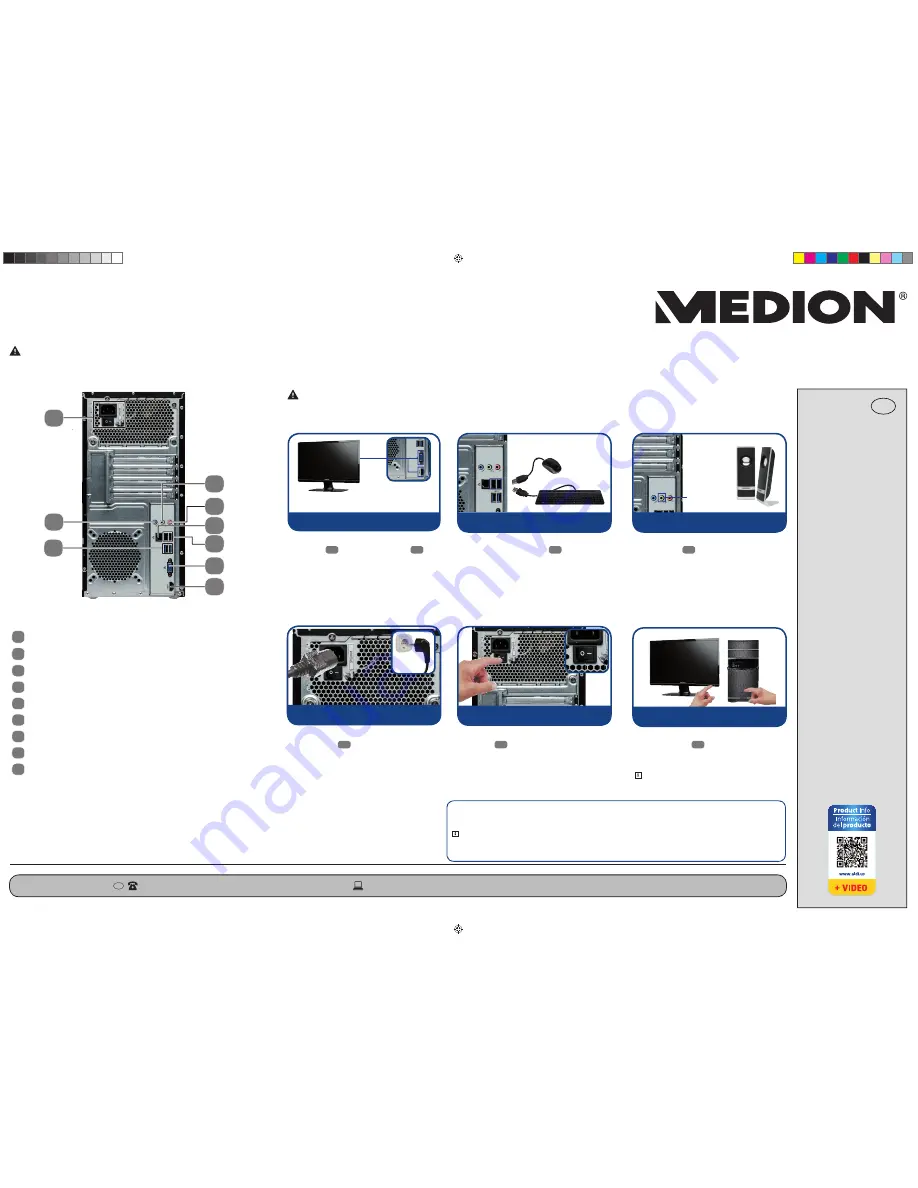
Read the Safety chapter in the operating instructions before you begin, and pay attention to the detailed notes on set-up and connection.
Setting up components
Connecting peripherals
When setting up your PC, arrange the cables so that nobody can step on them or trip over them. Position your PC and
peripherals in such a way that the connections are easily accessible.
7. Follow the initial set-up instructions
once the Windows welcome screen has
appeared. Step-by-step instructions will
guide you through the process to be
followed.
1. Connect your monitor’s signal cable to
the VGA
20
or HDMI connection
24
on your PC. (Please read the operating
manual for your monitor.)
2. Connect the keyboard and the mouse to
a free USB connection
11
.
3. Connect the speakers to the green au-
dio output
15
.
Anti-virus software is installed on your PC. The software will automatically be registered when the PC connects
to the internet. With the free registration you will receive free updates for 30 days.
Notice!
Do not install any additional anti-virus software, as this could impair the performance of your PC.
When you connect to the Internet for the fi rst time, the operating system and anti-virus software are updated automatically. This process usually
takes several minutes to complete. During this period it can adversely affect the operating speed of the computer but this only occurs on fi rst
use.
4. Connect the power cord to the mains
connection
5
on your PC, and then
plug it into a socket. This must be near
to the PC and easily accessible.
5. Your PC power supply unit has a mains
switch
5
to provide the PC with pow-
er. Set the switch to position I. (If you
set it to O the power supply will be
interrupted.)
6. Switch on the PC by briefly pressing the
on/off switch
1
on the top. Your PC
will now start and run through various
steps.
Notice!
There should be no bootable disk in the opti-
cal drive as this will prevent the operating system from
being loaded from the hard drive.
Connecting power supply
Start-up
Activating anti-virus software
Parts of the device
5
Power supply (power cord and mains switch)
9
USB 3.0 connections
11
USB 2.0 connections
14
Audio input (line-in) / speakers (rear line out)*
15
Audio output / speakers (front out)
16
Microphone connection (mic) / speakers (centre/subwoofer out)*
20
Monitor connection, VGA
24
HDMI connection
27
Gigabit LAN network
*
Connections with double assignments – configuration via software
5
11
15
16
27
20
24
14
9
Keyboard
Mouse
2
Connect keyboard and mouse
4
Connect power cord
5
Switch on mains switch
6
Switch on monitor and PC
Speakers
(not supplied)
Speaker
connection
3
Connect speakers
Monitor
(not supplied)
Monitor connec-
tion (VGA or HDMI)
1
Connect monitor
M
S
N 2
0
0
6
2
10
7
8332 EN-ES ALDI USA QSG MSN 2006 2107 final.indd 1
8332 EN-ES ALDI USA QSG MSN 2006 2107 final.indd 1
09.02.2016 13:14:36
09.02.2016 13:14:36


