background image

TREADMILLS MOD. 870A/870S/870C 

Rev.1/01.07.2019


© Medisoft RAM Italia S.r.l.. All rights reserved. 


22


3.4  

MOVING 


To  move  the  treadmill,  lift  it  from  the  back,  holding  on  to  the  side  frame  and 
NOT the rollers.  You will then be able to roll it on its front wheels. Avoid rolling 
over rough surfaces, as this will damage the wheels. Then the treadmill can be 
moved by letting it roll on its front wheels.  This operation should be avoided if 
the floor is rough or not smooth enough. 


3.5  

PRECAUTIONS 


WARNING !  

Improper  installation  of  the  equipment  may  cause  an  accident  and/or 
malfunction. Please observe the following precautions: 


The  room  temperature  should  be  between  10°C  and  40°C.  The  room 
humidity  should  be  between  20%  and  85%.  Keep  the  treadmill  away  from 
dust, moisture and radiation.  


Do not position the treadmill near heat sources such as radiators or devices 
sych as X-ray machines, lasers and so on. 


Before  connecting  the  treadmill  to  the  mains  power,  ensure  the  power 
switch is OFF. Connect the treadmill to a properly grounded outlet only. It is 
mandatory  that  the  treadmill  be  plugged  into  an  approved  outlet  that  is 
properly grounded and dedicated solely to and for the exclusive use of the 
treadmill. No other equipment may be on the treadmill circuit.  


Before  placing  the  plug  into  the  outlet,  verify  the  conformity  of  the  electric 
installation with the electrical characteristics on the identification plate of the 
treadmill  (see  Technical  Specifications).  Do  not  use  extension  cords, 
multiple plugs or plug adapters. 


CAUTION 

A  lower  input  voltage,  below  values  indicated  on  plate,  could  result  in 
uneven  performance  of  the  treadmill  (failure,  faltering,  jerking), 
particularly if the weight of the patient is considerable.   


Plugging or unplugging the treadmill to the mains power must be performed 
with the power switch in OFF position. 


The  treadmill  must  be  grounded.  If  a  malfunction  occurs,  grounding 
provides a path of least resistance for the electric current to reduce the risk 
of electric shock. The treadmill is equipped with a cable with an equipment 
grounding conductor, as well as a grounding plug.  


The  plug  must  be  connected  to  an  appropriate  outlet  that  is  properly 
installed and grounded in compliance with current regulations. 


Summary of Contents for 870 A

Page 1: ...Treadmillmod 870A 870S 870C U S E R S M A N U A L This Manual should be carefully read in all of its parts before starting to operate the treadmill REV 1 01 07 2019...

Page 2: ...or by any means without the written permission of Medisoft RAM Italia S r l The Medisoft RAM Italia S r l company is committed to a policy of constant improvement in compliance to Norm ISO EN 9001 200...

Page 3: ...KING 16 2 2 TRANSPORT 16 2 3 STORAGE 16 2 4 DELIVERY AND CLAIMS 17 3 Installation 18 3 1 INSPECTION 18 3 2 CONFIGURATION 18 3 3 MOUNTING 19 3 4 MOVING 22 3 5 PRECAUTIONS 22 3 6 VERIFICATION OF SPEED P...

Page 4: ...If the tension of the treadmill is taken off by one of this methods Pushing the red emergency button Switch off the mains Pulling off the safety lanyard Wait at least 30 seconds Before give tension t...

Page 5: ...dered as supplementary components for diagnostic purposes and must be handled and maintained under supervision by adequately qualified personnel Typical environments for these treadmills are outpatien...

Page 6: ...logical problems Pregnant women later than six months People with evident condition of overweight Diabetics People without adequate medical certification of their qualification for sports activities 1...

Page 7: ...fore beginning any exercise program check with your doctor to determine your present physical condition and ability to undertake aerobic exercise This is especially essential for people suffering from...

Page 8: ...near an inflammable gas source 16 Do not pull the power cord or the equipment itself in an attempt to remove the plug from the outlet 17 Do not try to move equipment by pulling the power cord 18 Do no...

Page 9: ...ted the Manufacturer invites the end user to focus attention on all special features of the equipment discussed so far and all that will follow including all warnings and recommendations that are ofte...

Page 10: ...ect are turned off Recommended separation distances between portable and mobile RF communications equipment and the 870 A 870 S 870 C treadmills The treadmill model no 860 A 870 A is intended for use...

Page 11: ...hts reserved 10 Always and only use the cables provided by Manufacturer The use of any cables different from the original can result in a raise in emissions or a decrease in immunity The cables sold b...

Page 12: ...TES The identification plate is located on the underside of the treadmill hood Legend The structure of the serial number is as follows pr pr pr S a a a a where pr pr pr progressive production number r...

Page 13: ...19 Medisoft RAM Italia S r l All rights reserved 12 1 8 SAFETY PLATE The safety plate is located below the power switch It reminds users to set the power switch to OFF and remove the plug from the mai...

Page 14: ...ft RAM Italia S r l All rights reserved 13 1 9 MAIN PARTS IDENTIFICATION 1 Front handrail 2 Angular covers 3 Lateral handrail 4 Red stop switch 5 Treadmill hood 6 Anti skid tape 7 Running belt 8 Back...

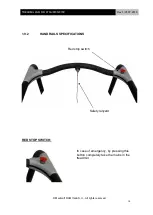
Page 15: ...ev 1 01 07 2019 Medisoft RAM Italia S r l All rights reserved 14 1 9 2 HANDRAILS SPECIFICATIONS RED STOP SWITCH Red stop switch Safety lanyard In case of emergency by pressing this button completely t...

Page 16: ...M Italia S r l All rights reserved 15 SAFETY LANYARD WARNING CLAMP THIS CLIPS TIGHT ON VEST WARNING DISENGAGE ALL STOP SWITCHES AFTER 30 SEC By a clip is attached to the patient in case of patient fal...

Page 17: ...arton This may cause damage to mechanical and electronic parts of the treadmill Transport the treadmill with care and do not subject it to any kind of mechanical shock 2 3 STORAGE When not in use we r...

Page 18: ...tart the equipment by switching the power on and let it work for about an hour This procedure allows the equipment to reach operating temperature favouring the elimination of any moisture that might h...

Page 19: ...he wooden pallet using a proper pincer 2 Ensure you remove them all to avoid injury 3 Lift the carton from the wooden pallet This will require more than one person 4 If it is likely that you will want...

Page 20: ...te it can be moved to the exercise area by rolling it on its front wheels If it is necessary to move the treadmill over a rough surface for example a pavement use a trolley to avoid damage to the whee...

Page 21: ...ld lift the front handrail and position it at the front of the treadmill as indicated in fig 1 Before executing this operation you must unthread and put away the two screws at the base of the front ha...

Page 22: ...d stop switches connection wire Fig 4 Remove the screws at the end of lateral handrails Fig 6 These handrails are in the package and must be mounted Connect now the lateral handrails with the front ha...

Page 23: ...rounded outlet only It is mandatory that the treadmill be plugged into an approved outlet that is properly grounded and dedicated solely to and for the exclusive use of the treadmill No other equipmen...

Page 24: ...eck with a qualified electrician if you are in doubt as to whether the product is properly grounded Do NOT modify the plug provided with the product If it will not fit the outlet have a proper outlet...

Page 25: ...he side cover over an accurate minute time Check if the counted values is the same of the tables below Treadmill mod 870 A Clinical Units for the speed chosen Speed value to be set Expected count Mph...

Page 26: ...s reserved 25 If any further information is required contact your authorised dealer Alternatively you may contact Medisoft RAM Italia directly Medisoft RAM Italia S r l Via Germania 14 35127 CAMIN PAD...

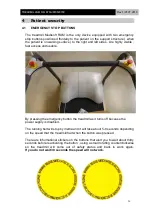
Page 27: ...visible fast access and usable By pressing the emergency button the treadmill as it turns off because the power supply is disabled The running belt will stop by inertia and it will take about 5 8 sec...

Page 28: ...TREADMILLS MOD 870A 870S 870C Rev 1 01 07 2019 Medisoft RAM Italia S r l All rights reserved 27...

Page 29: ...otentially dangerous When lubricating parts of the equipment as outlined below ensure you do not exceed the recommended amount of lubricant 5 2 ROUTINE MAINTENANCE 5 2 1 Routine Maintenance to be perf...

Page 30: ...self off Repeat the operation for the other red STOP switch as well 5 2 1 2 General cleaning of equipment It is good policy to keep the equipment clean by washing it with soap and water or with mild d...

Page 31: ...ng of the engine bonnet to access the electromechanical parts of the device For this reason and for the delicate nature of the interventions these operations must be performed by the qualified personn...

Page 32: ...events the end user should contact Technical Assistance and only Technical Assistance CAUTION If a problem requires the intervention of Technical Assistance the end user must immediately suspend the...

Page 33: ...spose of it To make sure that the equipment cannot be used by anyone else it is recommended that the electric cable be cut After executing this operation the equipment must not be simply thrown away b...

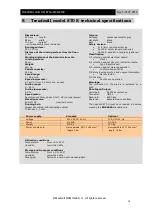
Page 34: ...lanyard optional Opt 004 paediatric handrails optional Classification 1 Protection against electrical hazard Class I 2 Protection against direct or indirect contacts Type B applied part 3 Protection a...

Page 35: ...lanyard optional Opt 004 paediatric handrails optional Classification 1 Protection against electrical hazard Class I 2 Protection against direct or indirect contacts Type B applied part 3 Protection...

Page 36: ...ty lanyard optional Opt 004 paediatric handrails optional Classification 1 Protection against electrical hazard Class I 2 Protection against direct or indirect contacts Type B applied part 3 Protectio...

Page 37: ...IEC ISO 417 and Tab D II IEC ISO 417 878 Symbol IEC ISO Description 417 5032 Alternate current AC 348 Warning consult attached documents 417 5008 OFF Power is disconnected from the mains 417 5007 ON P...

Page 38: ...ion protocols including the commands and the replies to the commands To utilise the RS 232 Serial Port you must Connect the 9 pin serial cable to the 9 pin connector situated on the rear of the Contro...

Page 39: ...the transmission of the commands to the treadmill Obviously the commands can reach the treadmill if the serial port of the computer and the serial port of the treadmill are connected by a RS232 cable...

Page 40: ...cribed in section 5 4 Accidental discontinuity of the connection between the Control Panel and the Motor space Check the connection as described in section 3 2 see Fig 6 Electronic fault in the Contro...

Page 41: ...ble includes all tasks necessary to avoid the occurrence of this problem Check the voltage values If the problem persists contact the Technical assistance Support Customer Service Damaged engine Conta...

Page 42: ...OD 870A 870S 870C Rev 1 01 07 2019 Medisoft RAM Italia S r l All rights reserved 41 MEDISOFT RAM ITALIA SRL VIA GERMANIA 14 35127 PADOVA ITALIA TEL 39 049 870 33 55 FAX 39 049 870 33 88 Email info med...

Reviews: