


HUSH endura
™
SPRINTER
7. Troubleshooting
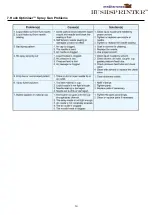
Q. Hush Sprinter™ unit turned ON. Air blows out of Hush Optimiser™ Spray Gun?
• This is correct. Air blows constantly when Hush Sprinter™ unit is ON.
Q. Hush Sprinter™ unit turned ON. Unit does not operate or blow air?
• Check that the unit is plugged in to proper electric source. Be sure there is power at the electric source. Check if the unit
has been running. The overheat protector will be activated if the unit has reached 125ºC. Allow the unit to cool if overheating.
Q. Hush Sprinter™ unit is turned ON the trigger is pulled back on Hush Optimiser™ Spray Gun but no solution comes out?
• Check that the cup is screwed firmly to Hush Optimiser™ Spray Gun.
• Check that there is no solution bubbling or leaking around the cup.
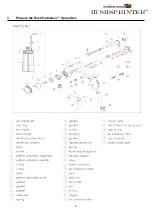
• Turn Hush Sprinter™ unit OFF. Unscrew cup. Be sure that Solution Tube (#39, Diagram on page 7) is connected and has
not come loose.
• Turn Hush Sprinter™ unit OFF. Remove air cap ring (#1-1, Diagram on page 6) remove air cap (#1-2, Diagram on page 6)
remove the needle (#20, Diagram on page 6) remove nozzle (#2, Diagram on page 6) with an adjustable wrench or spanner
which is supplied at purchase. Rinse Solution Nozzle under running water and check for dried solution that may have
blocked the hole. Reinstall Solution Nozzle, solution needle, air cap and air cap ring. Try spraying again.
Q. Solution leaks in front of trigger?
• With an adjustable wrench or spanner tighten Solution Needle Packing Screw (#28, Diagram on page 6). Do not
over tighten. This can cause Solution needle to stick and not spring back. Try spraying again. If leaking continues the
Solution Needle Packing needs to be replaced. (Rare). Remove solution needle (#20, Diagram on page 6), then remove
Solution Needle Packing Screw (#28, Diagram on page 6). Dry out the Solution Needle Packing’s Replace. Reinstall
Solution Needle Packing Screw and solution needle. Tighten all the way, and then back off slightly. (1/8 turn) Test the Hush
Optimiser™ spray gun for leakage.
Q. When Hush Sprinter™ unit is ON, Solution continues to spray from the Hush Optimiser™ Spray Gun without trigger being
pulled?
• Immediately turn Hush Sprinter™ unit OFF.
• Disconnect Hush Optimiser™ spray gun from air hose.
• Slightly adjust (loosen) Solution Needle Packing Screw (#28, Diagram on page 6). Test to see if problem is resolved.
• Check to see that Needle Spring is installed. (#21, Diagram on page 6). Remove Solution Flow Screw (#22, Diagram on
page 6). Look for Needle Spring around the back of the Solution Needle. If lost, order for replacement.
• Check Solution nozzle. Remove and clean following the spray gun weekly clean directions on page 12.
Q. Solution leaks around the top of the cup.
• Make sure there is a gasket (#36, diagram on page 6)
• Make sure the cup is screwed firmly to the body of the Hush Optimiser™ Spray Gun.
• Make sure the threads around the cup are clean and the threads inside the cup top assembly are clean.
• Replace the cup top gasket. Pry out old gasket. Install new gasket. Test Hush Optimiser™ spray gun.
13


