


HUSH endura
™
SPRINTER
1. General Safety Information
Read all instructions and safety precautions before operating the unit.
THIS INDICATES A CONDITION THAT WILL CAUSE SERIOUS INJURY OR LOSS OF LIFE IF THE WARNING IS IGNORED.
THIS INDICATES A CONDITION THAT COULD CAUSE SERIOUS INJURY OR LOSS OF LIFE IF THE WARNING IS IGNORED.
THIS INDICATES A CONDITION THAT MAY CAUSE MINOR INJURY AND/OR EQUIPMENT/PROPERTY DAMAGE.
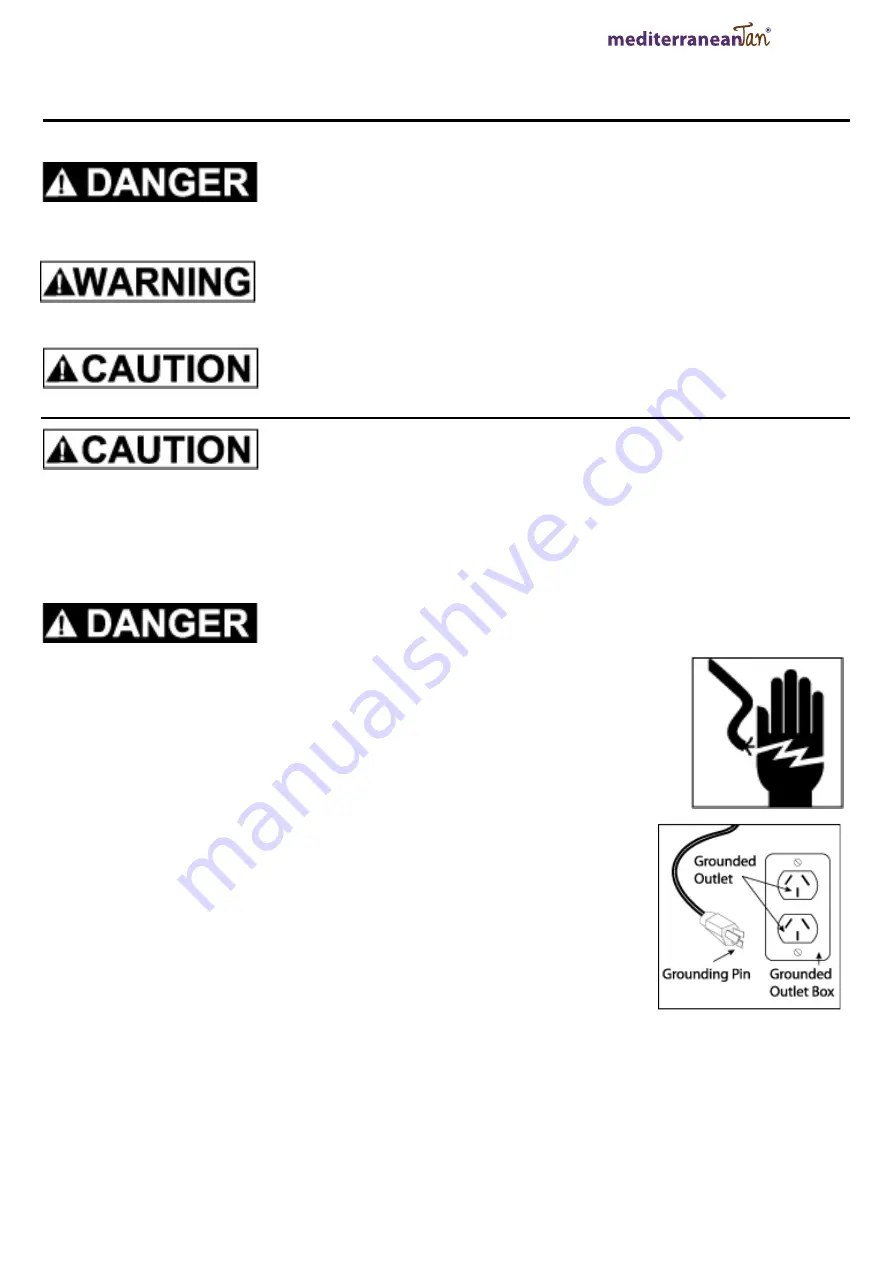
GROUNDING INSTRUCTIONS
This product must be properly grounded. In the event of an electrical short circuit, grounding reduces the risk of electrical shock by
providing an alternate path for the electrical current.
This product is equipped with a cord that has a ground wire and an appropriate ground plug. Plug the unit into an outlet that is properly
installed and grounded in accordance with local codes and ordinances.
I
IMPROPER INSTALLATION OF THE GROUND PLUG CAN RESULT IN THE RISK OF
ELECTRICAL SHOCK. IF REPAIR OR REPLACEMENT OF THE PLUG OR CORD IS
NECESSARy, DO NOT CONNECT THE GROUND WIRE TO EITHER FLAT BLADE
TERMINAL. THE WIRE WITH GREEN INSULATION (WITH OR WITHOUT A yELLOW
STRIPE) IS THE GROUNDING WIRE.
1. For any question regarding proper installation of the ground plug, consult a qualified
(licensed or certified) electrician.
2. Do not modify the plug provided. If the plug does not fit the outlet, have the proper
outlet installed by a qualified electrician.
3. This product is for use on a nominal 240-volt circuit and has a grounding plug that
looks like the plug in Figure 2. Make sure that the product is connected to an outlet
having the same configuration as the plug. No adapters should be used with this
product.
4. If an extension cord is required, use only a three wire extension cord that has the
same configuration as the unit cord, including the ground terminal. Make
sure that the extension cord is plugged into a properly grounded receptacle.
5. When using an extension cord, be sure it is in good condition and meets specifications.
6. Ensure the Hush Sprinter™ is tagged and tested every 12 months after initial purchase to comply with Australian Electrical Safety
standards.
7. Always turn off power switch of Hush Sprinter™ and remove plug after operation.
8. Be aware to hold the solid plug body to remove from socket. Never remove the plug by just pulling the flexible part of the power
cord
9. Disassemble or maintenance of the Hush Sprinter™ is to be conducted by an authorised technician only as this voids all warranty.
10. Do not operate near water or moisture as electrocution may occur.
3
1
General Safety Information:
Read all instructions and safety precautions before operating the unit.
THIS INDICATES A CONDITION THAT WILL CAUSE SERIOUS INJURY OR LOSS OF LIFE IF THE WARNING IS
IGNORED.
THIS INDICATES A CONDITION THAT COULD CAUSE SERIOUS INJURY OR LOSS OF LIFE IF THE WARNING IS
IGNORED.
THIS INDICATES A CONDITION THAT MAY CAUSE MINOR INJURY AND/OR
EQUIPMENT/PROPERTY DAMAGE.
•
Risk of fire or explosion! Solvent and paint fumes can explode or ignite, causing severe
injury and property damage.
•
Paints and solvents containing HALOGENATED HYDROCARBONS can react explosively
with aluminum. Always check the product’s label before using these materials in the unit.
•
Hazardous vapors: Paint, solvents, insecticides and other materials may be harmful if
inhaled, causing severe nausea, fainting or poisoning.
•
Make sure the room is well ventilated. Avoid all ignition sources, such as static electricity
sparks, open flames, hot objects, sparks from connecting and disconnecting power cords,
and working light switches.
•
Follow the material and solvent manufacturers’ safety precautions and warnings. Do not
use liquids with flash points less than 100 degrees Fahrenheit (38 degrees Celsius).
•
Static electricity can be produced by HVLP spraying. Make sure any electrically conductive
object being sprayed is grounded to prevent static sparking. The sprayer is grounded to
prevent static sparking. The spray grounded through the electrical cord. If an extension
cord is necessary, the cord must be a grounded with three wires made for the appropriate
voltage used.
•
Use a respirator or mask whenever there is a chance that vapors may be inhaled. Read
all instructions with the mask to ensure that the mask will provide the necessary
protection against the inhalation of harmful vapors.
•
Do not carry the turbine while spraying.
•
Keep the turbine at the maximum distance from the spraying area.
4
1
General Safety Information cont’d.:
•
Tipping the Spray Gun causes the Spray Gun to clog. Dried spray material also clogs the pressure delivery tube
and fittings. The Spray Gun does not function when clogging occurs.
•
When not in use, be sure to disconnect the hose and place the Spray Gun into the holder in the turbine to avoid
tipping.
GROUNDING INSTRUCTIONS
This product must be properly grounded. In the event of an electrical short circuit, grounding reduces the risk of electrical
shock by providing an alternate path for the electrical current.
This product is equipped with a cord that has a ground wire and an appropriate ground plug. Plug the unit into an outlet
that is properly installed and grounded in accordance with local codes and ordinances.
IMPROPER INSTALLATION OF THE GROUND PLUG CAN RESULT IN THE RISK OF
ELECTRICAL SHOCK. IF REPAIR OR REPLACEMENT OF THE PLUG OR CORD IS
NECESSARY, DO NOT CONNECT THE GROUND WIRE TO EITHER FLAT BLADE TERMINAL.
THE WIRE WITH GREEN INSULATION (WITH OR WITHOUT A YELLOW STRIPE) IS THE
GROUNDING WIRE.
1. For any question regarding proper installation of the ground plug, consult a qualified
(licensed or certified) electrician.
2. Do not modify the plug provided. If the plug does not fit the outlet, have the proper
outlet installed by a qualified electrician.
3. This product is for use on a nominal 240-volt circuit and has a grounding plug that
looks like the plug in Figure 2. Make sure that the product is connected to an outlet
having the same configuration as the plug. No adapters should be used with this
product.
4. If an extension cord is required, use only a three wire extension cord that has the
same configuration as the unit cord, including the (round) ground terminal. Make
sure that the extension cord is plugged into a properly grounded receptacle.
5. When using an extension cord, be sure it is in good condition and heavy enough to
meet the specifications in the chart below. If an extension cord is needed the
following wire sizes must be used.
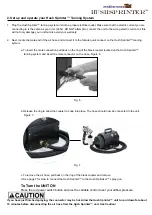
6. (See Chart 1) Figure 2
25’ cord……………………..…….10, 12, or 14 Gauge
50’ cord……………………….………..10 or 12 Gauge
100’ cord………………………………………10 Gauge
Chart 1 Extension Cord Requirements
4
1
General Safety Information cont’d.:
•
Tipping the Spray Gun causes the Spray Gun to clog. Dried spray material also clogs the pressure delivery tube
and fittings. The Spray Gun does not function when clogging occurs.
•
When not in use, be sure to disconnect the hose and place the Spray Gun into the holder in the turbine to avoid
tipping.
GROUNDING INSTRUCTIONS
This product must be properly grounded. In the event of an electrical short circuit, grounding reduces the risk of electrical
shock by providing an alternate path for the electrical current.
This product is equipped with a cord that has a ground wire and an appropriate ground plug. Plug the unit into an outlet
that is properly installed and grounded in accordance with local codes and ordinances.
IMPROPER INSTALLATION OF THE GROUND PLUG CAN RESULT IN THE RISK OF
ELECTRICAL SHOCK. IF REPAIR OR REPLACEMENT OF THE PLUG OR CORD IS
NECESSARY, DO NOT CONNECT THE GROUND WIRE TO EITHER FLAT BLADE TERMINAL.
THE WIRE WITH GREEN INSULATION (WITH OR WITHOUT A YELLOW STRIPE) IS THE
GROUNDING WIRE.
1. For any question regarding proper installation of the ground plug, consult a qualified
(licensed or certified) electrician.
2. Do not modify the plug provided. If the plug does not fit the outlet, have the proper
outlet installed by a qualified electrician.
3. This product is for use on a nominal 240-volt circuit and has a grounding plug that
looks like the plug in Figure 2. Make sure that the product is connected to an outlet
having the same configuration as the plug. No adapters should be used with this
product.
4. If an extension cord is required, use only a three wire extension cord that has the
same configuration as the unit cord, including the (round) ground terminal. Make
sure that the extension cord is plugged into a properly grounded receptacle.
5. When using an extension cord, be sure it is in good condition and heavy enough to
meet the specifications in the chart below. If an extension cord is needed the
following wire sizes must be used.
6. (See Chart 1) Figure 2
25’ cord……………………..…….10, 12, or 14 Gauge
50’ cord……………………….………..10 or 12 Gauge
100’ cord………………………………………10 Gauge
Chart 1 Extension Cord Requirements
Fig 1
Fig 2
4


