background image

4     MEDLINE

 | GPI074-IM19 (Rev. 05-20-2015)

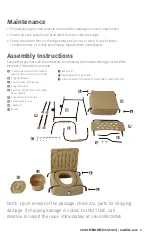
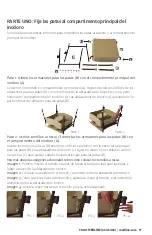
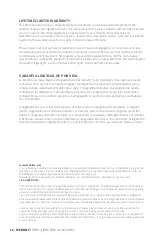
Part one: attaching Legs to main commode compartment

Below parts will be needed to assemble the legs to the main commode compartment 
and seat. 

Step 1: Line up the leg mainframes (B) with the main commode compartment (A). 

Start by flipping the commode compartment (A) upside down.  Match up the holes 
on the leg mainframes (B) with the holes on the bronze brace (L) on the outside of 
the commode compartment (A). The bronze braces (L) will be on the inside of the leg 
mainframes (B). Ensure the tubular slot protruding from the back of the leg mainframe is 
placed toward the back end of the commode. 

Step 2: Use hand screws (C) to connect the leg mainframes (B) to the commode 
compartment (A). 

Insert hand screws (B) where holes align on the leg main frame (B) and bronze brace (L). 
Hand tighten. 4 hand screws (C) will be needed to fasten each leg main frame (B). 

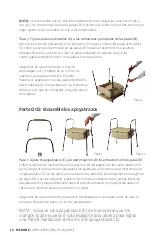
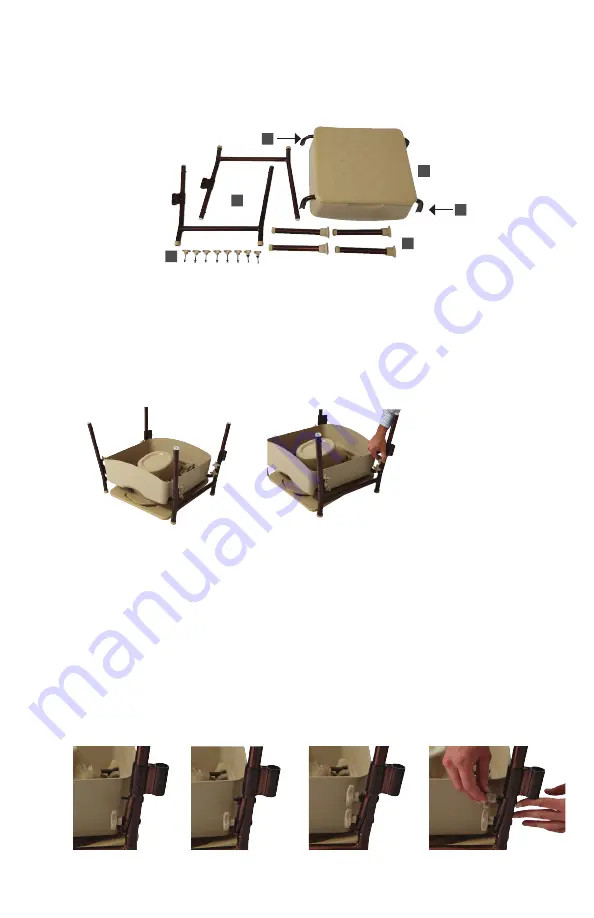
See below for additional pictures on how to apply hand screws.
Picture 1:


Insert screw through the leg main frame first and then through the bronze brace

Picture 2: 

Apply washer over screw and up against the bronze braze.

Picture 3: 

Take plastic screw piece and hand tighten over screw pressing washer up 

against bronze brace.

Picture 4: 

Hand Tighten till hand screw is secure.

PIC  1                                                                           

PIC  2                                                                           

PIC  3                                                                    

PIC  4                                                                  

Step  1                                                                           

Step  2                                                              

A

B

C

D

L

L

Summary of Contents for ELEMENTS MDS89664ELMB

Page 1: ...AR SU INODORO PORTÁTIL MEDLINE Para una instalación ajuste y funcionamiento seguros del banco para baño se DEBEN seguir estas instrucciones MDS89664ELMB User Instructions and Warranty Instrucciones para el usuario y garantía Inhibits the Growth of Stains and Odors from Bacteria Mold Mildew Inhibe El Crecimiento De Manchas y Olores De Bacterias Moho y Hongos Keeps the Bedside Commode Cleaner for Lo...

Page 2: ...g extensions are securely locked in position and an even height adjustment is achieved Ensure all screws nuts and or bolts are tight at all times Check the rubber tips on the leg extensions for rips wear or if they are missing Replace them immediately if any of these conditions exist All four leg extensions with rubber tips must touch the floor at all times Users with limited physical capabilities...

Page 3: ...fore assembling your Medline Elements Bedside Commode NOTE Upon receipt of the package check ALL parts for shipping damage If shipping damage is noted DO NOT USE Call Medline to report the issue immediately at 1 800 MEDLINE A L G L B C E D F H G H A B i C D E F 1 Commode compartment bucket splash guard and lid are all inside 2 Leg Mainframes 8 hand screws with washer 4 leg extensions 2 armrest han...

Page 4: ...the back of the leg mainframe is placed toward the back end of the commode Step 2 Use hand screws C to connect the leg mainframes B to the commode compartment A Insert hand screws B where holes align on the leg main frame B and bronze brace L Hand tighten 4 hand screws C will be needed to fasten each leg main frame B See below for additional pictures on how to apply hand screws Picture 1 Insert sc...

Page 5: ...his ensures that the leg extensions are securely locked in position and an even height adjustment is achieved PART TWO Assemble the Armrests Step 1 Attach armrest E to the topside of the leg mainframes B Flip commode over so it is resting with all four feet securely on the floor Ensure that the legs are all set to the same height level Insert one of the armrests E down into the upward facing tubes...

Page 6: ...til the backrest locks into place Make sure push buttons are fully protruded before using Step 2 Attach the backrest extension bars F to the back of the leg mainframes B Insert one of the backrest extension bars F into the tubular slot protruding from the back of the leg mainframes B Once inserted align the holes and tighten the small hand screw G HAND TIGHTEN ONLY Repeat this step with the second...

Page 7: ...fully protruded and secure before using Adjustment points 5 increment adjustable seat height Armrests can be removed if preferred Height adjustable seat Height adjustable backrest Height adjustable armrests The Medline ELEMENTSTM Bedside Commode has a large flat seat cover that conceals the toilet seat and commode bucket when not in use Concealing the commode function when not in use promotes dign...

Page 8: ...mmode Liner with Absorbent Pad answers those concerns Safe collection Solidifies liquids Eliminates Odor Easy disposal of body fluids The Medline Commode liner will allow you to avoid unpleasant hand cleaning of the commode pail after use REF MDS89664LINER 12 liners per Box 6 boxes per case Medline Commode Liners sold separately Purchase Medline Commode Liners where ever the Medline Elements Bedsi...

Page 9: ...as de forma segura en su respectiva posición y de que se ha logrado un ajuste parejo de la altura Asegúrese de que todos los tornillos tuercas y o pernos estén ajustados en todo momento Verifique que las puntas de caucho en las patas extensibles no presenten rasgaduras ni desgaste y que no falte ninguna Reemplácelas inmediatamente si existiera alguna de estas condiciones Las cuatro pata extensible...

Page 10: ...Al recibir el paquete verifique que TODAS las piezas se encuentren en buenas condiciones y no se hayan dañado durante el transporte En caso de encontrar algún tipo de daño NO USE EL PRODUCTO Comuníquese con Medline al 1 800 MEDLINE para informar de inmediato el problema A L G L B C E D F H G H A B i C D E F 1 compartimento del inodoro el cubo la protección contra salpicaduras y la tapa se encuentr...

Page 11: ... armazones para las patas B con el compartimento del inodoro A Inserte los tornillos a rosca B donde los orificios se alineen con la estructura principal para las patas B y las abrazaderas de bronce L Ajuste a mano Se necesitarán 4 tornil los a rosca C para ajustar cada estructura principal para las patas B Vea más abajo las imágenes adicionales sobre cómo colocar los tornillos a rosca Imagen 1 Pr...

Page 12: ...trabadas de forma segura en su respectiva posición y de que se ha logrado un ajuste parejo de la altura Parte DOS Ensamble los apoyabrazos Paso 1 Ajuste el apoyabrazos E a la parte superior de los armazones de las patas B Voltee el inodoro de manera tal que se apoye de forma segura con las cuatro patas en el suelo Asegúrese de que todas las patas estén ajustadas a la misma altura Inserte uno de lo...

Page 13: ...se de que los botones pulsadores sobresalgan por completo antes de usar el producto Paso 2 Fije las barras extensibles del respaldo F a la parte trasera de los armazones principales de las patas B Inserte una de las barras extensibles del respaldo F en la ranura tubular que sobresale de la parte trasera de los armazones principales de las patas B Una vez insertados alinee los orificios y ajuste lo...

Page 14: ...ducto Puntos de ajuste La altura de la silla se puede ajustar en incrementos de 1 27 cm Si lo prefiere se pueden quitar los apoyabrazos Asiento de altura ajustable Respaldo de altura ajustable Apoyabrazos de altura ajustable El inodoro portátil de Medline ELEMENTS tiene una amplia cubierta plana para asiento que oculta el asiento y el cubo del inodoro cuando no se lo utiliza La posibilidad de ocul...

Page 15: ... Medline es la solución a estos problemas Recolección segura Solidifica los líquidos Elimina el olor Facilita el desecho de los fluidos corporales La funda para inodoro Medline le permitirá evitar la tarea de limpiar a mano el cubo del inodoro después de su uso REF MDS89664LINER 12 fundas por estuche 6 estuches por caja Las bolsas para inodoro Medline se venden por separado Puede comprar las bolsa...

Page 16: ... La garantía no se extiende a productos no durables tales como accesorios de goma que están sujetos al desgaste y reemplazo normales Los componentes no duraderos están garantizados por 6 meses Si tiene una consulta sobre su producto Medline o esta garantía llámenos al 1 800 MEDLINE Esta garantía le proporciona derechos legales específicos y puede tener otros derechos que varían de estado a estado ...

Reviews: