background image

MDS86410KDBW (GPI088

Revision: 01/19/11

6

Assembly Instructions cont.

The Medline blue folding walker can use both 5" (12.7 cm) wheeled-leg extensions  
or non-wheeled leg extensions depending on user's discretion.  

To utilize blue folding walker with non-wheeled leg extensions:
5.   

Turn walker upside down and depress color push-button completely and install leg 

extension onto leg in desired hole. Repeat step 5 for other (3) leg extensions. 
 

Note:  

Make sure push-button is fully reset and visible to ensure leg extension  

is secured. Also make sure that all (4) leg extensions are adjusted at the same 
height.  Refer to the adjustment height number on each leg extension.  

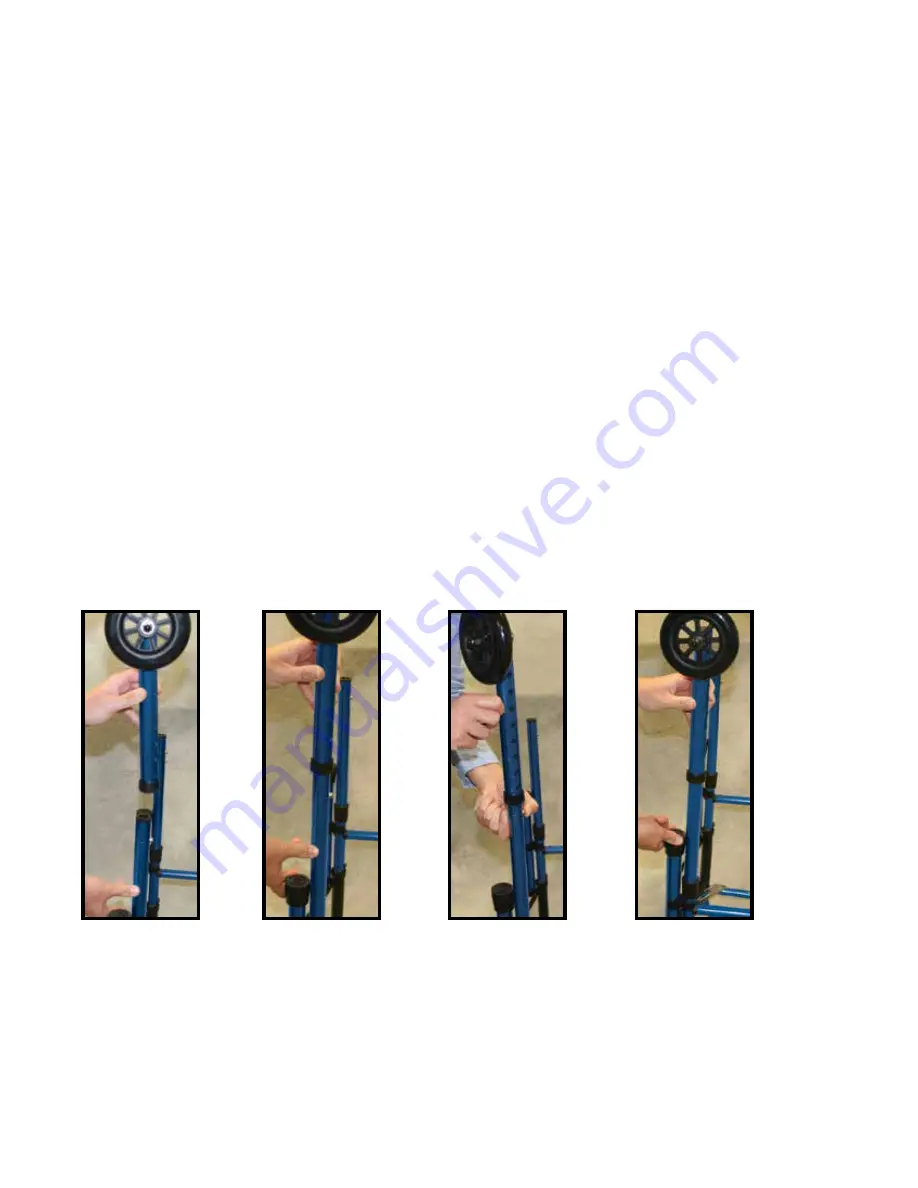
For 5" (12.7 cm) wheeled-leg extension use:
6.   

Turn walker upside down and depress push-button completely and install  

5" (12.7 cm) wheeled-leg extension onto leg into desired hole (Figures 12-15).   
Make sure push-button "clicks" into hole to ensure securing of leg extension to leg.  

Note: 

 5" (12.7 cm) Wheeled-Leg Extensions are for front use ONLY.

Figure 14

Figure 15

Figure 12

Figure 13

Summary of Contents for MDS86410KDBW

Page 1: ...MDS86410KDBW GPI088 Revision 01 19 11 User Guide MDS86410KDBW Blue Folding Walker Supplying Hospitals for Over 90 Years...

Page 2: ...ers made anywhere With proper assembly the walker will provide years of great performance Front cross braces are located near top of walker to allow full stride Easy to use large push button mechanism...

Page 3: ...g mechanisms and spring buttons are fully engaged Tips are in good condition Replace tips immediately when worn or missing Walker sits level and all legs are adjusted to an equal height Use only as in...

Page 4: ...Unfold frame completely ensuring the sides click and lock into place Figures 5 6 When not in use push or pull on paddles Note DO NOT push or pull these buttons when using walker Figure 5 Figure 6 Wal...

Page 5: ...for other front leg 4 Pull rear leg away from Ez Clip attached to frame and insert rear leg into frame Figures 9 10 Repeat step 4 for other rear leg Figure 7 Figure 8 Figure 9 Figure 10 Black Collar...

Page 6: ...r 3 leg extensions Note Make sure push button is fully reset and visible to ensure leg extension is secured Also make sure that all 4 leg extensions are adjusted at the same height Refer to the adjust...

Page 7: ...ion of use by the original purchaser This device was built to precise standards and carefully inspected prior to shipment This limited warranty is an expression of our confidence in the materials and...

Page 8: ...tes Medline Canada Medline Mexico 1 800 MEDLINE 633 5463 1 800 396 6996 01 800 831 0898 www medline com info medline com www medline ca Canada medline com www medlinemexico com mexico medline com Medl...

Reviews: