background image


DRW-015 (GPI171) 

Revised: 11/23/09

Operating Instructions

Opening the Walker

Push down on the seat 

(C) 

until all four wheels are 

extended out and the seat is completely flat. Before  

using the walker make sure that all four wheels make 

contact with the floor and the walker is stable in the 

open position. 

Folding the Walker

•   For more compact storage, remove bag  

and the backrest.

•   Pull up on the bar under the seat until  

the walker closes.

Checking the Brakes

•   Before each use, check to make sure the brakes are  

working properly.

•   Applying pressure on the brake handles by squeezing 

the brake up, will stop the wheels momentarily.

•   Pushing down on the brake handles will lock the 

wheels in place permanently.

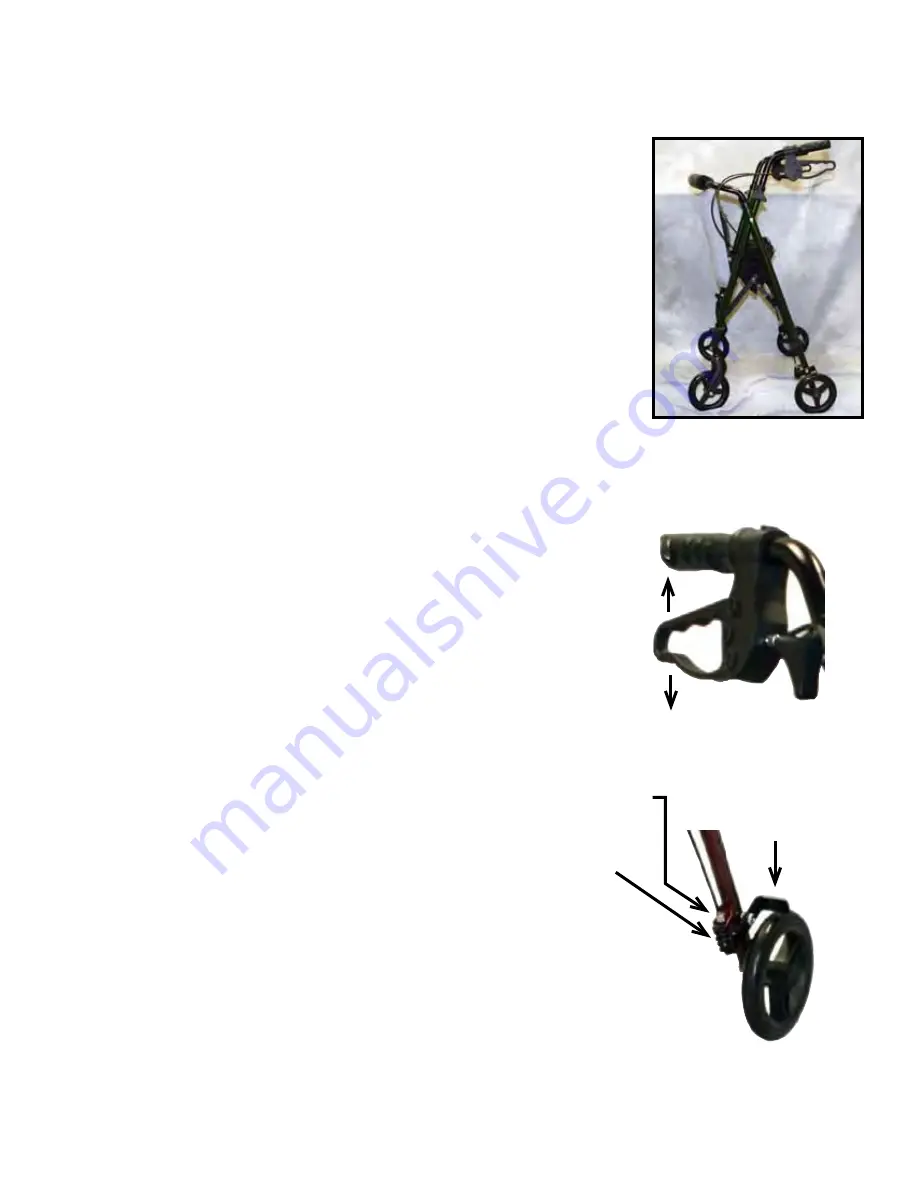
Adjusting the Brakes
1.

  Loosen the cable nut.

2.

  While holding the brake down onto the 

  wheel, pull down on the brake cord to  

  lengthen the brake cable.

3.

   Retighten the nut. Retest and repeat 

as necessary for good brake function.

1. Loosen the cable nut

3. Retighten the cable nut 

2a.  Hold brake down 

onto wheel

2b.  Pull down on 

brake cord

12

Summary of Contents for MDS86835

Page 1: ...User Guide MDS86835 Deluxe Rolling Walker Supplying Hospitals for Over 90 Years DRW 015 GPI171 Revised 11 23 09...

Page 2: ...Walker Features 3 Walker Components 4 Safety Instructions 5 Assembly Instructions 6 Rear Wheel Assembly 7 Front Wheel Assembly 8 Brake Handle Assembly 9 Backrest Assembly 10 Cup Holder Assembly 11 Op...

Page 3: ...justable from 19 to 23 25 48 2 to 59 cm Handle height adjustable from 30 5 to 37 25 77 5 to 94 6 cm Deluxe Rolling Walker Features Congratulations on purchasing one of the most durable walkers made an...

Page 4: ...r A Hand Grips B Hand Brake Lock C Padded Seat D Padded Backrest E Triangular Hand Screw F 7 17 8 cm Front Wheels G Folding Hinge H 7 17 8 cm Rear Wheels I Brake Cable J Bag with Shoulder Strap Figure...

Page 5: ...ill ensure the walker is properly balanced The brakes MUST be in the locked position BEFORE sitting on the seat DO NOT sit on the seat when the walker is on an incline DO NOT use the walker to walk ba...

Page 6: ...ar Wheels 1 Backrest with Push Buttons 2 Hand Grips with Brake Assembly 2 Examine all parts for shipping damage DO NOT use the walker if there is apparent damage or if any parts other than the bag are...

Page 7: ...that the triangular hand screw stays outside of walker frame see Figure C 4 Tighten triangular hand screw Important HandTighten Only until secure see Figure C 5 Repeat steps 1 4 for other rear wheel...

Page 8: ...Insert wheel to desired height depicted by numbered holes set to the same number as rear wheels see Figure B 3 Place triangular hand screw into hole Make sure triangular hand screw stays outside of wa...

Page 9: ...cm 33 83 8 cm 34 86 4 cm 35 88 9 cm Hole 4 33 25 84 5 cm 33 75 85 7 cm 34 75 88 3 cm 35 75 90 8 cm Hole 5 34 86 4 cm 34 50 87 6 cm 35 50 90 cm 36 50 92 7 cm Hole 6 34 75 88 3 cm 35 25 89 5 cm 36 25 9...

Page 10: ...est until buttons securely lock into holes see Figure B Please note There are 2 positions for the back rest Adjust according to your preference but make sure both push buttons are protruding and at th...

Page 11: ...insert holder through the opening in the clamp and tighten the knob to assure that the cup holder stays tightly attached see Figures C and D Important HandTighten Only Note If necessary insert a rubb...

Page 12: ...the walker closes Checking the Brakes Before each use check to make sure the brakes are working properly Applying pressure on the brake handles by squeezing the brake up will stop the wheels momentar...

Page 13: ...rakes click into locked position If the brakes have been adjusted but the rear wheels on the walker move while the brakes are in the locked position DO NOT use the walker Please call our toll free cus...

Page 14: ...king and squeezing the brakes and by stopping pushing down on the brakes to a locked position and then trying to push the walker If the brakes do not lock the wheels the brakes need to be adjusted If...

Page 15: ...pair or replace the device This warranty does not cover device failure due to owner misuse negligence or normal wear and tear The warranty does not extend to non durable components such as plastic acc...

Page 16: ...errors that may occur within this manual 2009 Medline Industries Inc Medline is a registered trademark of Medline Industries Inc Medline United States 1 800 MEDLINE 633 5463 www medline com info medli...

Reviews: