background image

ENGLISH 

21 


OPERATION 

Uses 

This orbital sander is only intended for dry sanding, and with the right type of sandpaper can be used for 
sanding  wood,  metal  and  plastic,  as  well  as  putty  and  other  fillers.  It  can  also  be  used  for  intermediate 
sanding stages and the removal of rust and old coats of paint.  

Safety 


Only use the machine for dry sanding. It is not intended for wet sanding. 


Inhalation  of  sanding  dust  and  other  dust  is  harmful  to  health.  Always  use  equipment  for  dust 
extraction. 


Take  care  to  align  the  openings  in  the  sanding  paper  with  the  suction  openings  in  the  machine's 
sanding pad. 


Do  not  apply  any  additional  pressure  while  you  are  sanding.  The  machine's  own  weight  is 
sufficient. 

Starting and stopping 

Connect the machine to the mains power. 
ON: 

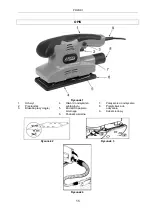
Press in and hold the switch (2) depressed. 

OFF: 

Release the switch. 

Continuous operation ON: 

Press in the switch and lock it in the depressed 
position with the latch (3). 

Continuous operation OFF: 

Press in the switch. The latch releases 
automatically and the switch is released. 

Fitting sandpaper 


Switch off the machine and disconnect it from the power outlet. 


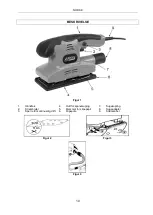
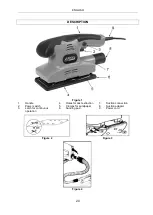
Trim the edges of the sandpaper, see figure 2. 


Release the clamps (5) holding the sandpaper in place, see figure 3. 


Position the sandpaper tightly over the sanding pad (6) and ensure that the suction openings (4) in 
the sanding pad and sandpaper are aligned. 


Fold in protruding sandpaper and secure the sandpaper with the clamps (5). 

Dust extraction 

The orbital sander is equipped with a dust extraction system. Connection the suction pipe of a 
vacuum  cleaner  to  the  machine's  suction  connection  (7).  Use  the  supplied  adapter  (8)  if 
necessary. Always use the machine with dust extraction activated.  

Sanding 

Start the machine and the dust extraction. Move the machine over the work surface with gentle, elliptical 
movements.  Do  not  press  against  the  surface.  The  machine's  own  weight  is  sufficient.  Repeat  sanding 
with increasingly finer sandpaper. 

MAINTENANCE 


Clean the sanding pad's suction openings (4) from time to time with a dry brush. 


Only use a damp cloth to clean the outside of the machine. 


Dry the machine carefully after cleaning. 


Do not use solvents for cleaning.  

Summary of Contents for 010-074

Page 1: ...Bruksanvisning för planslip Bruksanvisning for plansliper Instrukcja obsługi szlifierki oscylacyjnej Operating instructions for Orbital Sander 010 074 20 06 2016 Jula AB ...

Page 2: ...eżeniem prawa do zmian W razie ewentualnych problemów skontaktuj się telefonicznie z naszym działem obsługi klienta pod numerem 22 338 88 88 www jula pl EN Operating instructions Translation of the original instructions Jula reserves the right to make changes In the event of problems please contact our service department www jula com Tillverkare Produsent Producenci Manufacturer Jula AB Box 363 53...

Page 3: ...ksfall När du använder ett elverktyg utomhus ska du använda en förlängningssladd som är avsedd för utomhusbruk Användning av en sladd som är avsedd för utomhusbruk minskar risken för elolycksfall Om du måste använda ett elverktyg i fuktig miljö ska det anslutas till en strömkälla med jordfelsbrytare Användning av jordfelsbrytare minskar risken för elolycksfall Personlig säkerhet Var uppmärksam se ...

Page 4: ...dare Underhåll elverktyget Kontrollera att rörliga delar inte är felinriktade eller har fastnat att delar inte har gått av och att inga andra förhållanden föreligger som kan påverka användningen av verktyget Om elverktyget är skadat ska det repareras innan det används Många olyckor orsakas av bristfälligt underhållna elverktyg Se till att skärande verktyg är vassa och rena Skärande verktyg som und...

Page 5: ...het med standardiserad testmetod kan användas för att jämföra olika verktyg med varandra och för en preliminär bedömning av exponering VARNING Den faktiska vibrationsnivån under användning av elverktyg kan skilja sig från det angivna totalvärdet beroende på hur verktyget används Identifiera därför de säkerhetsåtgärder som krävs för att skydda användaren baserat på en uppskattning av exponering i v...

Page 6: ...NSKA 6 BESKRIVNING Figur 1 1 Handtag 2 Strömbrytare 3 Spärr för kontinuerlig drift 4 Hål för spånutsugning 5 Klämmor för slippapper 6 Slipdyna 7 Sugkoppling 8 Sugadapter 9 Nätkabel Figur 2 Figur 3 Figur 4 ...

Page 7: ...örs Montering av slippapper Stäng av och koppla loss maskinen från eluttaget Trimma kanterna på slippapperet se figur 2 Frigör klämmorna 5 som håller slippapperet på plats se figur 3 Placera slippapperet tätt över slipdynan 6 och se till att sugöppningarna 4 i slipdynan och på slippapperet är inriktade mot varandra Vik in utskjutande slippapper och spänn fast slippapperet med klämmorna 5 Spånutsug...

Page 8: ... støt Bruk en skjøteledning som er beregnet for bruk utendørs hvis elektroverktøyet brukes utendørs Bruk av skjøteledning som er beregnet for bruk utendørs reduserer faren for elektrisk støt Hvis bruk av elektroverktøy på et fuktig sted ikke kan unngås må en jordfeilbryter brukes Bruk av jordfeilbryter reduserer faren for elektrisk støt Personlig sikkerhet Vær oppmerksom se på det du gjør og bruk ...

Page 9: ...re Bruk elektroverktøy tilbehør og verktøybits osv i samsvar med disse instruksjonene og ta hensyn til arbeidsforholdene og arbeidet som skal utføres Hvis elektroverktøyet brukes til andre arbeidsoppgaver enn det er ment for kan det føre til farlige situasjoner Service Få service på elektroverktøyet utført av en kvalifisert reparatør som kun bruker originale reservedeler Dette sikrer at elektrover...

Page 10: ...K 10 BESKRIVELSE Figur 1 1 Håndtak 2 Strømbryter 3 Sperre for kontinuerlig drift 4 Hull for sponutsuging 5 Klemmer for slipepapir 6 Slipepute 7 Sugekopling 8 Sugeadapter 9 Strømkabel Figur 2 Figur 3 Figur 4 ...

Page 11: ...bryteren Sperren slipper automatisk og strømbryteren frigjøres Sette på slipepapir Slå av maskinen og kople den fra strømuttaket Beskjær kantene på slipepapiret Se figur 2 Frigjør klemmene 5 som holder slipepapiret på plass Se figur 3 Legg slipepapiret tett over slipeputen 6 og sørg for at sugeåpningene 4 i slipeputen og på slipepapiret står overfor hverandre Brett inn overskytende papir og fest s...

Page 12: ...ciągnięcia narzędzia ani do wyjmowania wtyczki z gniazda Przewód elektryczny należy chronić przed wysoką temperaturą olejem ostrymi krawędziami i ruchomymi częściami urządzeń Uszkodzony lub poplątany przewód elektryczny zwiększa ryzyko porażenia prądem Używając elektronarzędzia na zewnątrz należy używać przedłużacza który jest przeznaczony do użytku zewnętrznego Używanie przedłużacza który jest pr...

Page 13: ...iejscu niedostępnym dla dzieci i nie udostępniać ich do użycia osobom które nie znają narzędzia lub nie zapoznały się z treścią tej instrukcji Elektronarzędzia w rękach nieprzeszkolonego użytkownika są niebezpieczne Elektronarzędzia wymagają konserwacji Należy sprawdzić czy ruchome części narzędzia zostały dobrze ustawione i nie są zablokowane czy nie doszło do uszkodzenia niektórych części oraz c...

Page 14: ...wą może zostać wykorzystana do porównania różnych narzędzi ze sobą oraz w celu dokonania wstępnej oceny narażenia się na działanie drgań OSTRZEŻENIE Rzeczywisty poziom drgań podczas korzystania z elektronarzędzia w zależności od sposobu posługiwania się nim może różnić się od podanej wartości całkowitej Dlatego należy zidentyfikować te środki zabezpieczające które w oparciu o ocenę narażenia na od...

Page 15: ...Uchwyt 2 Przełącznik 3 Blokada pracy ciągłej 4 Otwór do odsysania wiórów pyłu 5 Zaciski do papieru ściernego 6 Poduszka ścierna 7 Połączenie do odsysania 8 Przejściówka do odsysania 9 Kabel sieciowy Rysunek 2 Rysunek 3 Rysunek 4 ...

Page 16: ... blokady 3 WYŁĄCZANIE pracy ciągłej Naciśnij przełącznik Blokada zostaje automatycznie usunięta a przełącznik zwolniony Zakładanie papieru ściernego Wyłącz urządzenie i wyciągnij wtyczkę z gniazdka Przytnij krawędzie papieru ściernego zobacz rys 2 Poluzuj zaciski 5 przytrzymujące papier ścierny na miejscu zobacz rys 3 Umieść papier ścierny dokładnie nad poduszką ścierną 6 i dopilnuj aby otwory ods...

Page 17: ... use reduces the risk of electric shock If operating a power tool in a damp location is unavoidable use a residual current device RCD protected supply Use of an RCD reduces the risk of electric shock Personal safety Stay alert watch what you are doing and use common sense when operating a power tool Do not use a power tool while you are tired or under the influence of drugs alcohol or medication A...

Page 18: ...rts breakage of parts and any other condition that may affect the power tool s operation If damaged have the power tool repaired before use Many accidents are caused by poorly maintained power tools Keep cutting tools sharp and clean Properly maintained cutting tools with sharp cutting edges are less likely to bind and are easier to control Use the power tool accessories and tool bits etc in accor...

Page 19: ...easured by a standardised test method can be used to compare different tools with each other and for a preliminary assessment of exposure WARNING The actual vibration level when using power tools may differ from the specified maximum value depending on how the tool is used It is therefore necessary to determine which safety precautions are required to protect the user based on an estimate of expos...

Page 20: ...RIPTION Figure 1 1 Handle 2 Power switch 3 Latch for continuous operation 4 Holes for dust extraction 5 Clamps for sandpaper 6 Sanding pad 7 Suction connection 8 Suction adapter 9 Power cord Figure 2 Figure 3 Figure 4 ...

Page 21: ...eleases automatically and the switch is released Fitting sandpaper Switch off the machine and disconnect it from the power outlet Trim the edges of the sandpaper see figure 2 Release the clamps 5 holding the sandpaper in place see figure 3 Position the sandpaper tightly over the sanding pad 6 and ensure that the suction openings 4 in the sanding pad and sandpaper are aligned Fold in protruding san...

Page 22: ...u 010 074 conforms to the following directives and standards överensstämmer med följande direktiv och standarder er i samsvar med følgende direktiver og standarder są zgodne z następującymi dyrektywami i normami Machinery Directive 2006 42 EC EN 60745 1 2009 A11 EN 60745 2 4 2009 A11 Electromagnetic Compatibility Directive 2014 30 EU EN 55014 1 2006 A1 A2 EN 55014 2 1997 A1 A2 EN 61000 3 2 2014 EN...

Reviews: