background image

EN

18

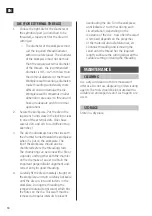
overloading the die. Turn the workpiece 
anticlockwise 2 to 4 times during each 
circumvolution, depending on the 
resistance of the die – how often the swarf 
is removed depends on the properties 
of the material and axle tolerances, etc. 
Continue threading and removing the 
swarf until the thread has the required 
length. Lubricate the cutting edges with a 
suitable cutting oil during the threading.

MAINTENANCE

CLEANING

Use a dry and clean cloth to remove swarf 
after use. Do not use degreasing or dessicating 
agents. The tools should be lubricated with a 
suitable oil and wiped clean if such agents are 
used.

STORAGE

Store in a dry place.

DIE (FOR EXTERNAL THREAD)

1.   Choose the right die for the diameter of 

the cylindrical part (a round bar) to be 
threaded, a tap wrench for the die and 
cutting oil.


–  The diameter of the workpiece must 

suit the required thread diameter 
within close tolerances. The diameter 
of the workpiece must not be more 
than the required external diameter 
of the thread – the recommended 
diameter is 0.15–0.25 mm less than 
the nominal diameter of the thread. 
Workpieces with overlarge diameters 
make threading considerably more 
difficult and can damage the die. 
Workpieces with somewhat smaller 
dimensions are easier to thread and 
have an adequate pitch for normal 
applications.

2.   Secure the workpiece. Put the die in the 

tap wrench and screw in the locking screw 
in one of the external slots. (Dies have 
several slots and slits to suit different tap 
wrenches.)

3.   The die should always have the side with 

the chamfer turned towards the workpiece 
when it is put on the workpiece. The 
tip of the workpiece should also be 
chamfered before the threading starts. 
The chamfering can be done with a file or 
a grinder, and together with the chamfer 
on the die makes it easier to obtain the 
important perpendicular alignment and 
correct entry for good threading.

4.   Carefully fit the die completely straight on 

the workpiece and turn carefully clockwise 
until the die cuts into and fastens in the 
workpiece. During the threading the 
removed material forms swarf, which fills 
the flutes on the die. This swarf must be 
removed at regular intervals to prevent 

Summary of Contents for 014372

Page 1: ...gen nøye før bruk Ta vare på den for fremtidig bruk Oversettelse av original bruksanvisning Viktigt Läs bruksanvisningen noggrant innan användning Spara den för framtida behov Bruksanvisning i original Ważne Przed użyciem uważnie przeczytaj instrukcję obsługi Zachowaj ją na przyszłość Tłumaczenie oryginalnej instrukcji Gängverktygssats Gjengeverktøysett Zestaw gwintowników i narzynek Item no 01437...

Page 2: ...la reserves the right to make changes In the event of problems please contact our customer service www jula com Tillverkare Produsent Producenci Manufacturer Distributör Distributør Dystrybutor Distributor Jula Poland Sp z o o ul Malborska 49 03 286 Warszawa Polska Jula Norge AS Solheimsveien 30 1473 LØRENSKOG 2021 01 13 Jula AB Jula AB Box 363 532 24 SKARA För senaste version av bruksanvisningen ...

Page 3: ...orrdiameter för gängdiametern enligt tabellen Borrdiametrar för invändiga gängor efter detta avnsitt Håldiametern måste passa den önskade gängdiametern inom snäva toleranser För stor håldiameter resulterar i gänga med otillräcklig profilhöjd för liten håldiameter medför överbelastning av gängtappen och skador på gängtapp och arbetsstycke 2 För in gängtappens fyrkantfäste mellan SYMBOLER Läs bruksa...

Page 4: ...h helt rakt i hålet Vrid försiktigt medurs tills gängtappen skär in och fäster i arbetsstycket När gängtappen skurit in i arbetsstyckets gods drar den sig själv vidare in i hålet när svängjärnet vrids 4 Fortsätt gängningen tills gängtappen passerar ut genom arbetsstycket genomgående hål eller tills den når hålets botten bottenhål Fortsättning på nästa sida ...

Page 5: ... 10 16 5 3 4 16 17 4 7 8 9 19 4 7 8 14 20 4 1 8 22 3 1 14 23 5 M grov M fin Diameter Stigning Borrdiameter Diameter Stigning Borrdiameter M3 0 5 2 4 M3 0 35 2 6 M4 0 7 3 2 M4 0 5 3 5 M5 0 8 4 1 M5 0 5 4 5 M6 1 0 4 9 M6 0 75 5 2 M7 1 0 6 0 M7 0 75 6 2 M8 1 25 6 6 M8 1 0 6 9 M9 1 25 7 8 M9 0 75 8 2 M10 1 5 8 4 M10 1 25 8 6 M11 1 5 9 5 M11 0 75 10 2 M12 1 75 10 1 M12 1 5 10 4 M14 2 0 11 8 M12 1 25 10...

Page 6: ...tern får under inga omständigheter vara större än den önskade gängans ytterdiameter rekommenderad diameter är 0 15 0 25 mm mindre än gängans nominella ytterdiameter Arbetsstycken med för stor diameter försvårar gängningen avsevärt och kan skada gängsnittet Arbetsstycken med viss underdimension är lättare att gänga och ger fullt tillräcklig gänghöjd för normala tillämpningar 2 Spänn fast arbetsstyc...

Page 7: ...or gjengediameteren i henhold til tabellen Borediametere for innvendige gjenger etter dette avsnittet Hulldiameteren må passe til den ønskede gjengediameteren innen snevre toleranser For stor hulldiameter resulterer i gjenge med utilstrekkelig profilhøyde og for liten hulldiameter medfører overbelastning av gjengetappen og skader på gjengetappe og arbeidsemne SYMBOLER Les bruksanvisningen Godkjent...

Page 8: ...appen nøye og helt rett i hullet Vri forsiktig med klokken til gjengetappen skjærer inn og fester seg i arbeidsemnet Når gjengetappen har skåret inn i arbeidsstykkets materiale trekker den seg selv videre inn i hullet når svingjernet vris 4 Fortsett gjengingen til gjengetappen passerer ut gjennom arbeidsemnet gjennomgående hull eller har nådd hullets bunn bunnhull Forts på neste side ...

Page 9: ...4 10 16 5 3 4 16 17 4 7 8 9 19 4 7 8 14 20 4 1 8 22 3 1 14 23 5 M grov M fin Diameter Stigning Bordiameter Diameter Stigning Bordiameter M3 0 5 2 4 M3 0 35 2 6 M4 0 7 3 2 M4 0 5 3 5 M5 0 8 4 1 M5 0 5 4 5 M6 1 0 4 9 M6 0 75 5 2 M7 1 0 6 0 M7 0 75 6 2 M8 1 25 6 6 M8 1 0 6 9 M9 1 25 7 8 M9 0 75 8 2 M10 1 5 8 4 M10 1 25 8 6 M11 1 5 9 5 M11 0 75 10 2 M12 1 75 10 1 M12 1 5 10 4 M14 2 0 11 8 M12 1 25 10 ...

Page 10: ...indriske detaljen som en rund stang som skal gjenges svingjern for gjengesnitt samt skjæreolje Arbeidsemnets diameter må passe til den ønskede gjengediameteren innen snevre toleranser Arbeidsemnets diameter skal ikke under noen omstendigheter være større enn den ønskede gjengens ytre diameter anbefalt diameter er 0 15 0 25 mm mindre enn gjengens nominelle ytre diameter Arbeidsemner med for stor di...

Page 11: ...dzi tnących podczas gwintowania poprawia wykonanie gwintu i zapewnia dłuższą żywotność gwintownika 1 Wybierz gwintownik do żądanej średnicy gwintu pokrętkę do gwintownika oraz odpowiednią średnicę wiertła do średnicy gwintu zgodnie z tabelą Średnice wiertła do gwintów wewnętrznych zamieszczoną po niniejszej sekcji Średnica otworu musi pasować do żądanej średnicy gwintu z niewielkimi marginesami to...

Page 12: ...inny odpowiedni sposób a następnie dokładnie i idealnie prosto dopasuj gwintownik do otworu Ostrożnie przekręć w prawo aż gwintownik się wetnie i osadzi w obrabianym przedmiocie Po wcięciu się w materiał obrabianego przedmiotu gwintownik posuwa się dalej sam w głąb otworu podczas przekręcenia pokrętki 4 Nie przerywaj gwintowania dopóki gwintownik nie przejdzie przez obrabiany przedmiot w przypadku...

Page 13: ...0 16 5 3 4 16 17 4 7 8 9 19 4 7 8 14 20 4 1 8 22 3 1 14 23 5 M zwykły M drobnozwojowy Średnica Skok Średnica wiertła Średnica Skok Średnica wiertła M3 0 5 2 4 M3 0 35 2 6 M4 0 7 3 2 M4 0 5 3 5 M5 0 8 4 1 M5 0 5 4 5 M6 1 0 4 9 M6 0 75 5 2 M7 1 0 6 0 M7 0 75 6 2 M8 1 25 6 6 M8 1 0 6 9 M9 1 25 7 8 M9 0 75 8 2 M10 1 5 8 4 M10 1 25 8 6 M11 1 5 9 5 M11 0 75 10 2 M12 1 75 10 1 M12 1 5 10 4 M14 2 0 11 8 M...

Page 14: ...H 1 Wybierz odpowiednią narzynkę do średnicy cylindrycznego elementu na przykład okrągłego pręta który ma być gwintowany pokrętkę do narzynki oraz olej do cięcia Średnica obrabianego przedmiotu musi pasować do żądanej średnicy gwintu z niewielkimi marginesami tolerancji Średnica obrabianego przedmiotu pod żadnym pozorem nie może być większa niż żądana średnica zewnętrzna gwintu zalecana średnica j...

Page 15: ...lerances An overlarge hole diameter results in thread with an insufficient profile height while a small hole diameter results in overloading the tap and damaging the tap and workpiece 2 Fit the square fastener on the tap between the jaws on the tap wrench and tighten 3 Secure the workpiece in a vice with clamps or other means and then carefully put the tap straight in the hole SYMBOLS Read the ins...

Page 16: ...the workpiece When the tap has cut into the workpiece material it will pull itself into the hole when the tap wrench is turned 4 Continue threading until the tap comes out through the workpiece through hole or until it reaches the bottom blind hole Continued on next page ...

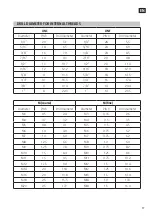
Page 17: ... 10 16 5 3 4 16 17 4 7 8 9 19 4 7 8 14 20 4 1 8 22 3 1 14 23 5 M coarse M fine Diameter Pitch Drill diameter Diameter Pitch Drill diameter M3 0 5 2 4 M3 0 35 2 6 M4 0 7 3 2 M4 0 5 3 5 M5 0 8 4 1 M5 0 5 4 5 M6 1 0 4 9 M6 0 75 5 2 M7 1 0 6 0 M7 0 75 6 2 M8 1 25 6 6 M8 1 0 6 9 M9 1 25 7 8 M9 0 75 8 2 M10 1 5 8 4 M10 1 25 8 6 M11 1 5 9 5 M11 0 75 10 2 M12 1 75 10 1 M12 1 5 10 4 M14 2 0 11 8 M12 1 25 1...

Page 18: ...he thread the recommended diameter is 0 15 0 25 mm less than the nominal diameter of the thread Workpieces with overlarge diameters make threading considerably more difficult and can damage the die Workpieces with somewhat smaller dimensions are easier to thread and have an adequate pitch for normal applications 2 Secure the workpiece Put the die in the tap wrench and screw in the locking screw in...

Reviews: