background image

ENGLISH 

14 

Use 

1. 

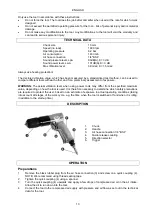
Fit the required drill bit in the chuck (1) and tighten clockwise. 

2. 

Select either right or left-hand action using the direction selector (5). 

3. 

Hold the tool firmly by the handle (2). 

4. 

Press the trigger (6) to start the tool. 

WARNING:

 Disconnect the air hose from the tool before changing direction and/or changing drill bits. 

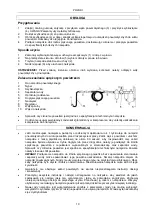
Recommended air supply 

1. 

To the compressed air tool 

2. Nipple 
3. Quick-release 

coupling 

4. Water 

separator 

5. Empty 

daily 

6. Compressed 

air 

supply 

7. Lubricating 

unit 

8. Regulator 
9. Spiral 

hose 

10. 

Hose to the tool 


Check that the air pressure corresponds to the technical data for the tool. 


Drain any condensation from the compressor every day, to avoid damaging the compressor and/or 
tool. 

MAINTENANCE 


If the tool is operated without a lubricator, apply about 1 tbsp of compressed air oil into the air inlet 
on the tool at the start of each working day. Reconnect the air hose and operate the tool at a low 
speed for approx. 30 seconds to distribute the oil evenly. If the tool is to be used continuously or for 
long periods it should be connected to a compressed air supply with a regulator provided with a 
lubricating device and water separator. Check that the air pressure corresponds to the technical 
data for the tool. Air filters must always be used. 


NOTE:

 The tool can be seriously damaged if it is connected to the compressed air supply without 

correct lubrication and water separation. Lubricate the tool with compressed air oil. Never use oil of 
another type, for example, engine oil. Keep the tool clean and well lubricated. Inadequate 
lubrication can shorten the service life of the tool. 


The warranty does not embrace damage resulting from a failure to follow use and maintenance 
instructions. 


Read all the instructions and warning labels on the tool prior to use, in order to understand its area 
of application, its limitations and possible risks. Save these instructions together with the tool for 
future reference. All persons who use or service the tool must have read these instructions. 


Even if the tool is used in accordance with the instructions, it is impossible to rule out all risk 
factors. Do not use the tool if in doubt. Contact your dealer if you have any questions. 

Jula reserves the right to make changes. In the event of problems, please contact our service department 
www.jula.com 


Summary of Contents for 070-001

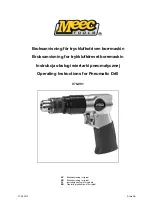
Page 1: ...rykkluftdrevet boremaskin Instrukcja obsługi wiertarki pneumatycznej Operating Instructions for Pneumatic Drill 070 001 SV Bruksanvisning i original NO Bruksanvisning i original PL Instrukcja obsługi w oryginale EN Operating instructions in original 27 05 2013 Jula AB ...

Page 2: ...lera alltid att ställnycklar och liknande avlägsnats från verktyget innan du startar det Säkra arbetsstycket med tving eller skruvstycke Hantera alltid verktyget med båda händerna Sträck dig inte för långt Ha hela tiden säkert fotfäste och god balans Farliga arbetsområden Arbetsområdet ska hållas rent Använd verktyget endast i väl ventilerat utrymme eller i sprutmålningsbås Dra luftslangen så att ...

Page 3: ...nivån under användning av elverktyg kan skilja sig från det angivna totalvärdet beroende på hur verktyget används Identifiera därför de säkerhetsåtgärder som krävs för att skydda användaren baserat på en uppskattning av exponering i verkliga driftförhållanden som tar hänsyn till alla delar av arbetscykeln såsom tiden när verktyget är avstängt och när den körs på tomgång utöver igångsättningstiden ...

Page 4: ...jare Kontrollera att lufttrycket överensstämmer med tekniska data för verktyget Luftfilter måste alltid användas OBS Verktyget kan skadas allvarligt om det ansluts till tryckluftsförsörjning utan korrekt smörjning och vattenfrånskiljning Smörj verktyget med tryckluftsolja Använd aldrig olja av annan typ till exempel motorolja Håll verktyget rent och väl smort Bristande smörjning kan förkorta verkt...

Page 5: ...en monterte beskyttelsesanordninger Kontroller alltid at skrunøkler og lignende er fjernet fra verktøyet før du starter det Sikre arbeidsemnet med tvinge eller skrustikke Håndter alltid verktøyet med begge hender Ikke strekk deg for langt Ha alltid godt fotfeste og god balanse Farlige arbeidsområder Arbeidsområdet skal holdes rent Verktøyet må kun brukes på godt ventilerte steder eller i sprøyteka...

Page 6: ...L Det faktiske vibrasjonsnivået under bruk av el verktøy kan skille seg fra den angitte totalverdien avhengig av hvordan verktøyet brukes Finn derfor ut hvilke sikkerhetstiltak som er nødvendig for å beskytte brukeren på grunnlag av en vurdering av eksponering under reelle driftsforhold som tar hensyn til alle delene av arbeidsprosessen som tiden når verktøyet er avslått og når det kjøres på tomga...

Page 7: ...het og vannutskiller Kontroller at lufttrykket stemmer overens med tekniske data for verktøyet Bruk alltid luftfilter OBS Verktøyet kan bli ødelagt hvis det kobles til trykklufttilførsel uten korrekt smøring og vannutskilling Smør verktøyet med trykkluftsolje Bruk aldri annen type olje f eks motorolje Hold verktøyet rent og godt smurt Manglende smøring kan forkorte verktøyets levetid Garantien omf...

Page 8: ...terialnych Osłona musi być zawsze zamontowana musi być w dobrym stanie technicznym i musi być prawidłowo wyregulowana Nigdy nie używaj narzędzia bez zamontowanych osłon Przed włączeniem narzędzia zawsze sprawdzaj czy usunięto z niego klucze nastawne i podobne elementy Przymocuj obrabiany materiał za pomocą zacisku lub imadła Zawsze obsługuj narzędzie obiema rękami Nie pochylaj się zbytnio do przod...

Page 9: ... min Przyłącze węża pneumatycznego 1 4 BSP Poziom ciśnienia akustycznego LpA 90dB A K 3 dB Poziom mocy akustycznej LwA 101dB A K 3 dB Maksymalny poziom drgań 0 9m s2 K 1 5 m s2 Zawsze używaj środków ochrony słuchu Deklarowana wartość drgań która została zmierzona zgodnie ze standardową metodą testową może zostać wykorzystana do porównania różnych narzędzi ze sobą oraz w celu dokonania wstępnej oce...

Page 10: ...k 1 łyżki oleju do narzędzi pneumatycznych do wlotu powietrza przed rozpoczęciem pracy Załóż wąż z powrotem i uruchom narzędzie z niską prędkością obrotową na około 30 sekund aby rozprowadzić olej Jeżeli narzędzie będzie używane w trybie ciągłym lub przez długi czas należy je podłączyć do źródła sprężonego powietrza z regulatorem wyposażonym w smarowniczkę oraz separator wody Sprawdź czy ciśnienie...

Page 11: ...strzeżeniem prawa do zmian W razie ewentualnych problemów skontaktuj się telefonicznie z naszym działem obsługi klienta pod numerem 801 600 500 Jula Poland Sp z o o ul Malborska 49 03 286 Warszawa Polska www jula pl ...

Page 12: ...ithout the guard Always check that adjuster spanners etc have been removed from the tool before switching it on Secure the workpiece with clamps or in a vice Always operate the tool with both hands Do not overreach Always maintain a firm footing and good balance Dangerous work areas Keep the work area clean Only use the tool in well ventilated areas or in spray booths Route the air hoses so that t...

Page 13: ...inary assessment of exposure WARNING The actual vibration level when using power tools may differ from the specified maximum value depending on how the tool is used It is therefore necessary to determine which safety precautions are required to protect the user based on an estimate of exposure in actual operating conditions taking into account all stages of the work cycle e g the time when the too...

Page 14: ...be connected to a compressed air supply with a regulator provided with a lubricating device and water separator Check that the air pressure corresponds to the technical data for the tool Air filters must always be used NOTE The tool can be seriously damaged if it is connected to the compressed air supply without correct lubrication and water separation Lubricate the tool with compressed air oil Ne...

Page 15: ......

Reviews: