background image

STAINLESS STEEL

There are many different stainless steel cleaners available. Always use the mildest cleaning 
procedure first, scrubbing in the direction of the grain. Do not use steel wool as it will scratch 
the surface. Specks of grease can gather on the surfaces of the stainless steel and bake on to 
the surface and give the appearance of rust. For removal use a mild abrasive pad in 
conjunction with a stainless steel cleaner.

BRAAI GRATE

The easiest way to clean the braai is immediately after cooking is completed and after turning 
off the flame. Wear an oven mitt to protect your hand from the heat and steam. Dip a brass 
bristle barbeque brush in water and scrub the hot braai. Dip the brush frequently in the bowl 
of water. Steam, created as water contacts the hot braai, assists the cleaning process by 
softening any food particles. If the braai is allowed to cool before cleaning, cleaning will be 
more difficult.

BRAAI BURNERS

Extreme care should be taken when moving a burner as it must be correctly centered on the 
orifice before any attempt is made to relight the braai. Frequency of cleaning will depend on 
how often you use the braai.

BRAAI BURNER CLEANING

Ensure the gas supply is off and the knobs are in the “OFF” position. Make sure the braai is 
cool. Clean the exterior of the burner with a wire brush. Remove excessive build up with a 
metal scraper. Clear any clogged ports with a straightened paper clip. Never use a wooden 
toothpick as it may break off and clog the port. If insects or other obstructions are blocking 
the flow of gas through the burner, you will need to call our customer care.

1.

Turn off the gas supply, and make sure all the knobs are in the “OFF” position.

2.

Wait for the braai to cool.

3.

Clean the exterior of the burner with a wire brush.  Use a metal scraper for stubborn stains.

4.

Clear clogged port with a straightened paper clip.  Never use a wooden toothpick as it may 
break off and clog the port.

5.

If inserts or other obstructions are blocking the flow of gas through the burner, call customer 
care.

GREASE TRAY CLEANING

The grease tray should be emptied and wiped down periodically and washed with a mild 
detergent and warm water solution. A small amount of sand may be placed in the bottom of 
the grease tray to absorb the grease. Check the grease tray frequently, do not allow excess 
grease to accumulate and overflow out of the grease tray. 

31

CAUTION: ENSURE THAT THE GAS SUPPLY AND THE KNOBS ARE IN THE 
“OFF” POSITION. MAKE SURE THE RANGETOP BURNER IS COOL BEFORE 
REMOVAL.

CARE AND MAINTANENCE

Summary of Contents for 720-0804C

Page 1: ...iliarize yourself with the appliance before connecting it to its gas container Keep this manual for future reference MODEL NO 720 0804C LPGSASA Permit Number 1185 79 1 RSA 17 A 19000706A0 Questions problems missing parts Before returning to your retailer call our Customer Service Department at Tel 010 001 6342 8 a m 5 p m CAT Monday Thursday and Friday till 3 p m Or send us an E mail at service me...

Page 2: ...mselves At Megamaster we believe anything worth doing is worth doing well That s why as with all of our products we ve put a lot of thought and effort into this user manual It really is the first step towards making your time with friends family and flavour truly better Manufactured in China Distributed by Megamaster 27 0 12 802 1515 PO Box 15 Woodlands 072 South Africa www megamaster co za THIS M...

Page 3: ...ry hot Never lean over the cooking area while using your braai Do not touch cooking surfaces braai housing lid or any other braai parts while the braai is hot and in operation or until the gas braai has cooled down after use 3 Failure to comply with these instructions may result in serious bodily injury death 4 DO NOT LEAVE THE BRAAI UNATTENDED WHILE COOKING 5 FOR OUTDOOR USE ONLY 3 Gas Hookup Ins...

Page 4: ... other enclosed area 2 DO NOT use this appliance under overhead combustible surfaces 3 Do not install this unit in combustible enclosures 4 The minimum air space clearance from sides and back of unit to combustible construction is 36 in 91cm from the sides and 36 in 91cm from the back 5 Never operate this appliance within 10 ft 3 m of any structure combustible material or other LP gas cylinder 6 N...

Page 5: ...bs or make nests in the braai burner tubes during transit and warehousing These webs can lead to gas flow obstruction which could result in a fire in and around burner tubes This type of fire is known as BURN BACK and can cause serious damage to your braai and create an unsafe operating condition for the user Although an obstructed burner tube is not the only cause of BURN BACK it is the most comm...

Page 6: ...on to what you are doing Make certain you are aware of which burner you are lighting so your body and clothing remain clear of open flames When using the braai do not touch the braai rack burner grate or immediate surroundings as these areas become extremely hot and could cause injury Use only dry potholders Moist or damp potholders on hot surfaces may cause steam burns Do not use a towel or bulky...

Page 7: ...if the cylinder is disconnected and removed from the outdoor cooking gas appliance When your gas braai is not in use the gas must be turned off at LP gas cylinder The gas must be turned off at the supply cylinder when the outdoor cooking gas appliance is not in use LP gas cylinder must be stored outdoors in a well ventilated area and out of reach of children and pets Disconnected LP gas cylinders ...

Page 8: ...8 NOW THAT WE GOT ALL THE SAFETY INFORMATION OUT OF THE WAY LET S START WITH SOME ELBOW GREASE ...

Page 9: ...9 PACKAGE PARTS LIST 5 6 7 8 9 10 1 3 4 2 x2 x2 x2 ...

Page 10: ...10 14 16 17 18 19 20 11 12 13 15 x2 x2 x2 PACKAGE PARTS LIST x2 ...

Page 11: ...11 23 24 22 25 x3 x2 21 PACKAGE PARTS LIST ...

Page 12: ...nstalled Loosen and tighten for final assembly 12 B x18 Truss head screw Black 5 32 32 x 2 5 Truss head screw Black 1 4 20x1 2 A x30 C x6 Flat Washer 1 4 E x2 Nut 5 16 D x2 Flat Washer 5 16 F x2 Nut 5 32 HARDWARE PACK LIST TOOLS NEEDED ...

Page 13: ...1 2 3 4 5 4 13 1 A x4 2 A x4 ASSEMBLY INSTRUCTIONS ...

Page 14: ...2 7 6 3 8 14 3 4 A x8 ...

Page 15: ...B x4 9 10 11 E x2 D x2 15 5 6 ...

Page 16: ...16 7 8 A x4 12 13 ...

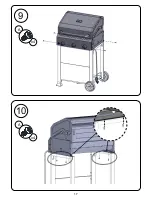
Page 17: ...17 9 10 A x4 A x4 ...

Page 18: ...18 11 12 B x4 15 14 16 14 ...

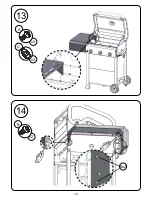
Page 19: ...19 13 14 C A x3 x3 B x2 Bx2 ...

Page 20: ...20 15 16 B x4 16 17 18 ...

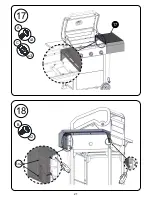
Page 21: ...21 17 18 C A x3 x3 B x2 17 Bx2 ...

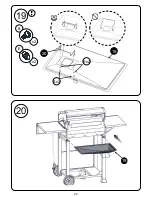
Page 22: ...22 19 20 19 20 Bx2 Ex2 B x2 E x2 19 ...

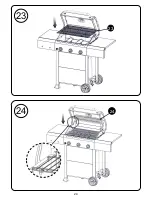
Page 23: ...23 21 22 21 22 ...

Page 24: ...24 23 24 23 24 ...

Page 25: ...25 25 26 25 ...

Page 26: ...30cm diameter To connect the LP gas supply cylinder please follow the steps below 1 Make sure cylinder valve is in the complete off position turn clockwise to stop 2 Check cylinder valve to ensure it has proper internal female threads 3 Make sure all burner valves are in their off position 4 Inspect valve connections port and regulator assembly Look for any damage or debris Remove any debris Inspe...

Page 27: ... the braai 4 Substitution will void the warranty Do not use the braai until all connections have been checked and do not leak GAS FLOW CHECK Each braai burner is tested and adjusted at the factory prior to shipment however variations in the local gas supply may make it necessary to adjust the burners The flames of tips excessive noise or lithe burners should be visually checked Flames should be bl...

Page 28: ... braai using hose regulator assembly provided for 9kg LP gas cylinder Unit tested and free of leaks User informed of gas supply shut off valve location Removed all packaging including straps before using the braai INSTALLATION FINAL CHECKLIST We feel much better knowing you re safer for having taken the time to go through that first section thoroughly Now let s get on with putting your Megamaster ...

Page 29: ...nd of the cooking time NOTE This braai unit is designed to cook efficiently without the use of lava rocks or briquettes of any kind Heat is radiated by the stainless steel flame tamers positioned above each burner NOTE The hot braai sears the food sealing in the juices The more thoroughly the braai is preheated the faster the meat browns and the darker the braai marks BEFORE LIGHTING THE BRAAI Ins...

Page 30: ...adjusted prior to shipment however variations in the local gas supply may make minor adjustments necessary Oxygen setting can be adjusted by using the screw located on the top of the burner near the orifice connection Turn the screw using a star screwdriver until the flame quality is acceptable Open lid during lighting Make sure all the knobs are in the OFF position and then turn the Liquid Propan...

Page 31: ...ANING Ensure the gas supply is off and the knobs are in the OFF position Make sure the braai is cool Clean the exterior of the burner with a wire brush Remove excessive build up with a metal scraper Clear any clogged ports with a straightened paper clip Never use a wooden toothpick as it may break off and clog the port If insects or other obstructions are blocking the flow of gas through the burne...

Page 32: ...aai Spread the cover and allow it to relax preferably in warm sunlight or in a warm room For braai with a side shelf bunch the cover like a sock put on left to right braai only heats to 200 300 degrees Check to see if the fuel hose is bent or kinked Make sure the braai area is clear of dust Make sure the burner and orifices are clean Check for spiders and insects The regulator has a safety device ...

Page 33: ...ting the correct part Please note the shipping cost for the delivery of any replacement parts will be on yourself Gas braais model number see data sticker on braai Part number of replacement part needed Description of replacement part needed Quantity of parts needed To obtain replacement parts contact our Customer Service hotline at 010 001 6342 33 WARNING If you wish to replace the main burner we...

Page 34: ...34 PARTS DIAGRAM 1 3 2 4 5 2 4 6 15 9 7 8 12 13 14 10 10 11 16 17 18 20 19 21 25 28 29 40 40 41 41 42 33 39 30 38 32 34 36 35 30 31 37 26 16 27 23 22 24 ...

Page 35: ...ame 1 2 10 Hood buffer B 1 2 31 Cart leg front left 1 1 11 Main burner bowl assembly Non replaceable 1 32 Cart leg insert 1 2 12 Main burner igniter wire A 1 1 33 Cart leg rear left 1 1 13 Main burner igniter wire B 1 1 34 Cart triangle bracket left 1 1 14 Main burner igniter wire C 1 1 35 Front panel 1 2 15 Side shelf left 1 1 36 Bottom panel 1 1 16 Triangle bracket 1 2 37 Cart leg front right 1 ...

Page 36: ...arts replaced under the terms of this limited warranty MANUFACTURER WILL NOT PAY FOR Service calls to your home Repairs when your product is used for other than normal single family household or residential use Damage resulting from accident alteration misuse lack of maintenance cleaning abuse fire flood acts of God improper installation and installation not in accordance with electrical or plumbi...

Page 37: ... better For great inspiration and recipes to use your braai check out the recipe pages on our website www megamaster co za Finally don t forget to keep this manual in a safe place for future reference Manufactured in China Distributed by Megamaster 27 0 12 802 1515 PO Box 15 Woodlands 0072 South Africa 37 ...

Reviews: