HOW TO REPLACE THE MAIN BURNER
1. Insert the burner onto the orifice. As shown below, make sure burner hole aims at the
orifice.
2. Secure the main burner on the back wall of fire box with 1 Pin and secure it at the front of
fire box with 1 screw
HOW TO ORDER REPLACEMENT PARTS
To make sure you obtain the correct replacement part (s) for your gas braai, please refer to the
parts list at the end of the manual. The following information is required to assure getting the
correct part. Please note the shipping cost for the delivery of any replacement parts will be on
yourself.
• Gas braais model number (see data sticker on braai).
• Part number of replacement part needed.
• Description of replacement part needed.
• Quantity of parts needed.
To obtain replacement parts, contact our Customer Service hotline at
010 001 6342.
33
WARNING: If you wish to replace the main burner, we strongly recommend
that you hire a professionally trained technician to replace it. Please
understand that we will not be responsible for any liability, personal injury,
or property damage resulting from an improperly assembled burner.
MAIN BURNER REPLACEMENT
Summary of Contents for 720-0804C
Page 9: ...9 PACKAGE PARTS LIST 5 6 7 8 9 10 1 3 4 2 x2 x2 x2 ...
Page 10: ...10 14 16 17 18 19 20 11 12 13 15 x2 x2 x2 PACKAGE PARTS LIST x2 ...
Page 11: ...11 23 24 22 25 x3 x2 21 PACKAGE PARTS LIST ...
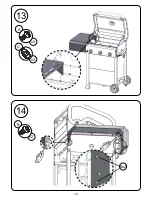
Page 13: ...1 2 3 4 5 4 13 1 A x4 2 A x4 ASSEMBLY INSTRUCTIONS ...
Page 14: ...2 7 6 3 8 14 3 4 A x8 ...
Page 15: ...B x4 9 10 11 E x2 D x2 15 5 6 ...
Page 16: ...16 7 8 A x4 12 13 ...
Page 17: ...17 9 10 A x4 A x4 ...
Page 18: ...18 11 12 B x4 15 14 16 14 ...
Page 19: ...19 13 14 C A x3 x3 B x2 Bx2 ...
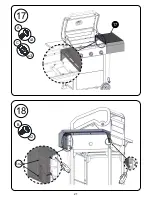
Page 20: ...20 15 16 B x4 16 17 18 ...
Page 21: ...21 17 18 C A x3 x3 B x2 17 Bx2 ...
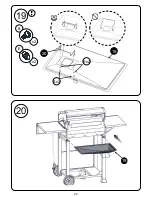
Page 22: ...22 19 20 19 20 Bx2 Ex2 B x2 E x2 19 ...
Page 23: ...23 21 22 21 22 ...
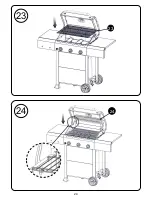
Page 24: ...24 23 24 23 24 ...
Page 25: ...25 25 26 25 ...

