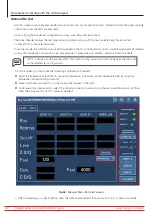
5. Depending on the type of HiPot test you select, the buttons will behave differently to accommodate the HiPot test
type you run.
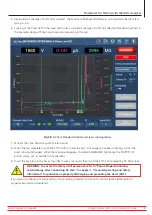
6. Looking at the Timer field in the lower left corner, you will see the type of HiPot test selected (Standard Hipot Test in
this example) along with the time (in seconds) remaining in the test.
Fig 48:
DC Test Standard HiPot test screen configuration.
7. Monitor the timer field along with the test results.
8. When the test completes, touch the STOP button to end the test. A message will appear notifying you that the
Asset is being discharged. When the message disappears, the LEADS ENERGIZED light above the START/STOP
button will go out, as will the front panel LEDs.
9. Touch the Save icon in the bar at top right to save your results then touch the EXIT icon to leave the DC Test screen.
WARNING: To ensure the safety of all personnel, refer to “Ensure Proper Grounding
and Discharge after Conducting DC Tests” in chapter 1, “General Operating and Safety
Information” for guidance on properly discharging and grounding the Asset (DUT).
If you plan to continue with Surge testing, no grounding is needed, but do not touch test leads before testing is
properly executed and completed.
www.megger.com/baker
Megger Baker ADX Quick Reference Guide
47
Procedures for Testing with the ADX Analyzer

