Reports Screen
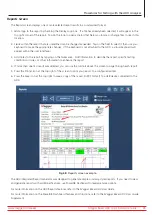
The Reports screen displays one or more selected report results in a summarized format.
1. Add a logo to the report by checking the Display Logo box. If a file has already been selected, it will appear in the
top right corner of the report. Tap on the logo to open a dialog that helps you locate or change files to use in this
location.
2. Fields within the report that are underlined can be changed as needed. Tap on the field to select it then use your
keyboard to make the appropriate changes. (If the keyboard is not attached to the ADX, a virtual keyboard will
appear within the user interface.)
3. Add notes to the report by tapping on the Notes area. Add information to describe the report, specific testing
conditions or issues, or other information to enhance the report.
4. If more than one test result was selected, you can use the controls above the screen to page through each report.
5. Press the Printer icon at the top right of the screen to print your report to a configured printer.
6. Press the Save icon at the top right to save a copy of the report (in PDF format) to a USB device connected to the
ADX.
Fig 68:
Reports screen example.
The ADX integrated Report Generator was designed to generate simple summary-styled reports. If you need to view
and generate reports with additional features, use PowerDB Dashboard to leverage more options.
For more information on the ADX Reports features, refer to the
Megger Baker ADX User Guide.
For more information on the PowerDB Dashboard features and functions, refer to the
Megger Baker ADX User Guide
Supplement.
www.megger.com/baker
Megger Baker ADX Quick Reference Guide
65
Procedures for Testing with the ADX Analyzer


