background image


AVTM651070  Rev B Nov 2006 

3  

Specifications 

Receiver 

Operating frequency: 

82 kHz, 8 kHz, 815 Hz,  50/60 Hz (PASSIVE) 

Antenna mode: 

Null-responding vertical coil 

Peak-responding horizontal coil 

Audio indication: 

Variable pitch response on all frequencies. 

Current measurement 

Display indicated relative current simultaneously between any two 
selected cables for target cable verification in a multi-conductor 
environment. 

Operating &  storage 
temperature range 

-4°F to 133°F (-20°C to +55°C) 

Battery type: 

Six 1.5 V, C-size alkaline 

Battery life: 

Continuous: 40 hr 

Intermittent: 82 hr (automatic shutoff after 10 min of nonuse) 

Dimensions: 

30.3 x 3.7 x 9.4 in. (76.9 x 9.3 x 23.8 cm) (L x W x H) 

Weight: 

3 lb (1.36 kg) 

Signal strength: 

Analog LCD bar graph. Absolute Digital Signal Strength readout 
from 0 to 999. 

Gain control: 

Up/down button for automatic centering and manual control. 

Dynamic range: 

126 dB 

Depth measurement 
Automatic: 

Push-button, three-digit readout to 15 ft (4.6 m) in feet -inches. 
(optional m-cm) 


Summary of Contents for L1070

Page 1: ...ruction Manual L1070 and L1071 Portable Locator Catalog No 651070 and 651071 Read this entire manual before operating M Valley Forge Corporate Center 2621 Van Buren Avenue Norristown PA 19403 2329 U S...

Page 2: ...L1070 and L1071 Portable Locator Instruction Manual...

Page 3: ...pairing at our option defective equipment Equipment returned to the factory for repair must be shipped prepaid and insured Contact your MEGGER representative for instructions and a return authorizatio...

Page 4: ......

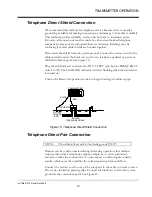
Page 5: ...Connection 14 Flexible Coupler Connection 15 Inductive Connection 16 Direct Connection 17 Notes on Selecting the Tracing Signal 17 Continuously Grounded Circuit 18 Telephone Direct Shield Connection...

Page 6: ...Introduction 31 Signal Return through an Insulated Fault 31 Setting the Transmitter to Fault Mode 32 Setting the Receiver to Fault Mode 32 Ground Return Probe 32 Ground Return Probe Insertion 33 Groun...

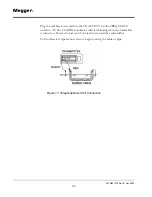
Page 7: ...t Connection 17 Figure 9 Continuously Grounded Circuit 18 Figure 10 Telephone Direct Shield Connection 19 Figure 11 Telephone Direct Pair Connection 20 Figure 12 Receiver Controls and Indicators 21 Fi...

Page 8: ...AVTM651070 Rev B Nov 2006 iv M...

Page 9: ...manual General Information Thanks for purchasing the Megger L1070 or L1071 Portable Locator The portable locator will help you locate and trace the routes of buried power cables cable television cable...

Page 10: ...attery charger automotive Preparation for Use Remove the receiver from the case Locate the battery compartment Install the six 1 5 V C size batteries as marked on the battery holder Install the batter...

Page 11: ...ts of the test equipment and the specimen under test Treat all terminals of power equipment as a potential electric shock hazard There is always the possibility of voltages being induced at these term...

Page 12: ...e The L1071 Portable Locator uses rechargeable batteries Replace only with sealed lead acid batteries as specified in Section 3 Specifications Danger of explosion can result if the wrong batteries are...

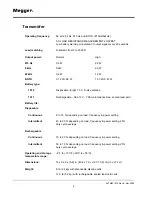
Page 13: ...ti conductor environment Operating storage temperature range 4 F to 133 F 20 C to 55 C Battery type Six 1 5 V C size alkaline Battery life Continuous 40 hr Intermittent 82 hr automatic shutoff after 1...

Page 14: ...One 12 V 7 Ah maintenance free sealed lead acid Battery life Disposable Continuous 8 to 15 hr depending on load frequency power setting Intermittent 40 to 60 hr depending on load frequency power sett...

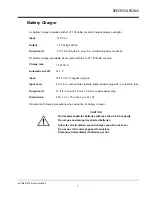
Page 15: ...V Input 10 15 V dc negative ground Input cord 4 ft 1 2 m with vehicle cigarette lighter adapter plug with 3 A fast blo fuse Output cord 12 ft 3 6 m with 2 5 mm x 5 5 mm coaxial power plug Dimensions...

Page 16: ...M AVTM651070 Rev B Nov 2006 8 M...

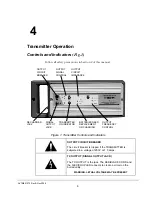
Page 17: ...f the TRANSMITTER is subjected to a voltage of 250V or 1 5 amps TX OUTPUT SIGNAL OUTPUT JACK The TX OUTPUT is the jack The RED BLACK CORD and the FLEXICOUPLER connects to create a circuit on the burie...

Page 18: ...is on FREQUENCY CONTROL The FREQUENCY CONTROL cycles through the output frequencies The LED s next to the frequency label indicate which frequency is in use When the LED s next to the 815Hz and 82kHz...

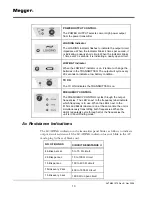
Page 19: ...10 5 V the LOW BAT icon on the LCD is activated From the time the LOW BAT icon is activated you will have between 15 and 30 min of operating time before automatic shutdown occurs Also when the LOW BAT...

Page 20: ...ating method turn to the page that tells you how to connect the equipment For the most reliable locate we recommended that you use low power and low frequency whenever possible Refer to the Specificat...

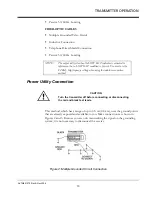
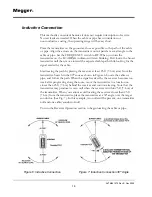
Page 21: ...t use the 82 kHz high frequency setting when using the inductive connection method Power Utility Connection G CAUTION Turn the transmitter off before connecting or disconnecting the red and black test...

Page 22: ...the ground rod approximately 10 ft 3 m from this point at an angle of 90 to the buried cable or pipe Drive the ground rod into the ground 8 to 10 in 20 3 to 25 4 cm Connect the black test cord to the...

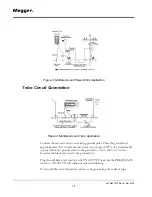
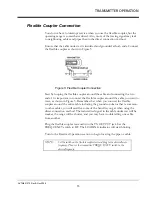
Page 23: ...around the cable you want to trace as shown in Figure 5 Remember that when you connect the flexible coupler around the entire cable including the ground conductor that is common to other cables you w...

Page 24: ...t tracing the path by placing the receiver at least 25 ft 7 6 m away from the transmitter Search in the 90 zone as shown in Figure 6 Locate the cable or pipe and follow the path When the signal receiv...

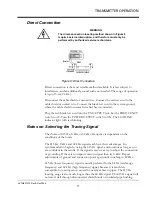
Page 25: ...ER OUTPUT switch to ON The LOADING indicator light will start blinking Notes on Selecting the Tracing Signal The choice of 815 Hz 8 kHz or 82 kHz Frequency is dependent on the conditions of the locate...

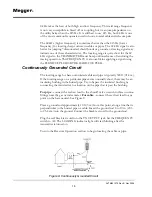
Page 26: ...ously Grounded Circuit The locating range for bare uninsulated cable and pipe is typically 300 ft 91 4 m If the locating range on a particular pipe seems unusually short there may be an insulating bus...

Page 27: ...k test cord into the TX OUTPUT jack Set the FREQUENCY switch to AF The LOADING indicator will start blinking when the transmitter is turned on Turn to the Receiver Operation section to begin locating...

Page 28: ...t the FREQUENCY switch to AF The LOADING indicator will start blinking when the transmitter is turned on Proceed to locate with the receiver toward the central office Turn to Receiver Operation sectio...

Page 29: ...ON OFF BUTTON MEASURES DEPTH SELECTS FREQUENCY with SHIFT key selects either English or metric depth measurement BUBBLE LEVEL for 45 degree depth SELECTS PEAK OR NULL Note Hidden function Using SHIFT...

Page 30: ...ed To change the Depth Measurement from English to Metric hold SHIFT and press FREQUENCY To change LINE and SONDE use the LINE SONDE key GAIN Button Up or Down Used to adjust the gain level for the re...

Page 31: ...INPOINT and NOR will appear in the display to indicate NORMAL REFIND PEAKING MODE The L1070 L1071 has a hidden function To activate PIN Peaking Mode hold the SHIFT key and press MODE key Pin will appe...

Page 32: ...ll locating mode Peak Mode Locating Figure 14 Determine Cable Path in Peak Mode Keep the receiver approximately vertical While you are walking along the path of the target cable or pipe with the recei...

Page 33: ...tions of the path every few feet Mark sharp curves loops and cable bundles every few inches Sharp changes in the path cause the receiver Peak and Null indications to behave differently than when traci...

Page 34: ...ctively As the receiver nears the buried cable the numbers increase As the receiver moves away from the buried cable the numbers decrease These numbers indicating signal strength are sometimes referre...

Page 35: ...eiver vertically over one of the conductor paths and rest the foot of the locator on the ground While holding the receiver vertically press and release the CURR button When the meter changes from a th...

Page 36: ...may be inaccurate Depth measurement 45 degree angle method should be used to verify push button depth measurements You need only push a button on the receiver to measure depth Depth is displayed digi...

Page 37: ...es Move to the spot where you want to measure depth and pinpoint and mark the path of the cable Then place the foot of the receiver on the ground with the meter facing up Adjust the position of the un...

Page 38: ...ating errors You can verify the presence of this problem by using triangulation to measure depth as described in the preceding section on Depth Measurement 45 Angle Method If the right side and the le...

Page 39: ...th before attempting to fault locate If during the path locate an unusual amount of signal loss occurs a part of the signal has escaped to ground in the last several feet Note Signal would go to groun...

Page 40: ...to Fault Mode To set the RECEIVER to fault mode press the FREQUENCY button toggling through the frequencies until F F flashes at the top of the display above the bar graph The transmitter is now read...

Page 41: ...y concentrated in the soil near the fault as it begins its return and near the GROUND ROD as it finishes its return Notice that the current is widely dispersed in the soil between the fault and the GR...

Page 42: ...drop the probe every three or four steps Once the signal indicator on the RECEIVER changes directions you should move back taking smaller steps covering smaller segments of ground to avoid passing the...

Page 43: ...n use keep the portable locator in its carrying case and store in a safe dry place away from extremes in weather conditions Should the unit become dirty wipe it down with a damp cloth Do not use clean...

Page 44: ...M AVTM651070 Rev B Nov 2006 36 M...

Reviews: