background image


22

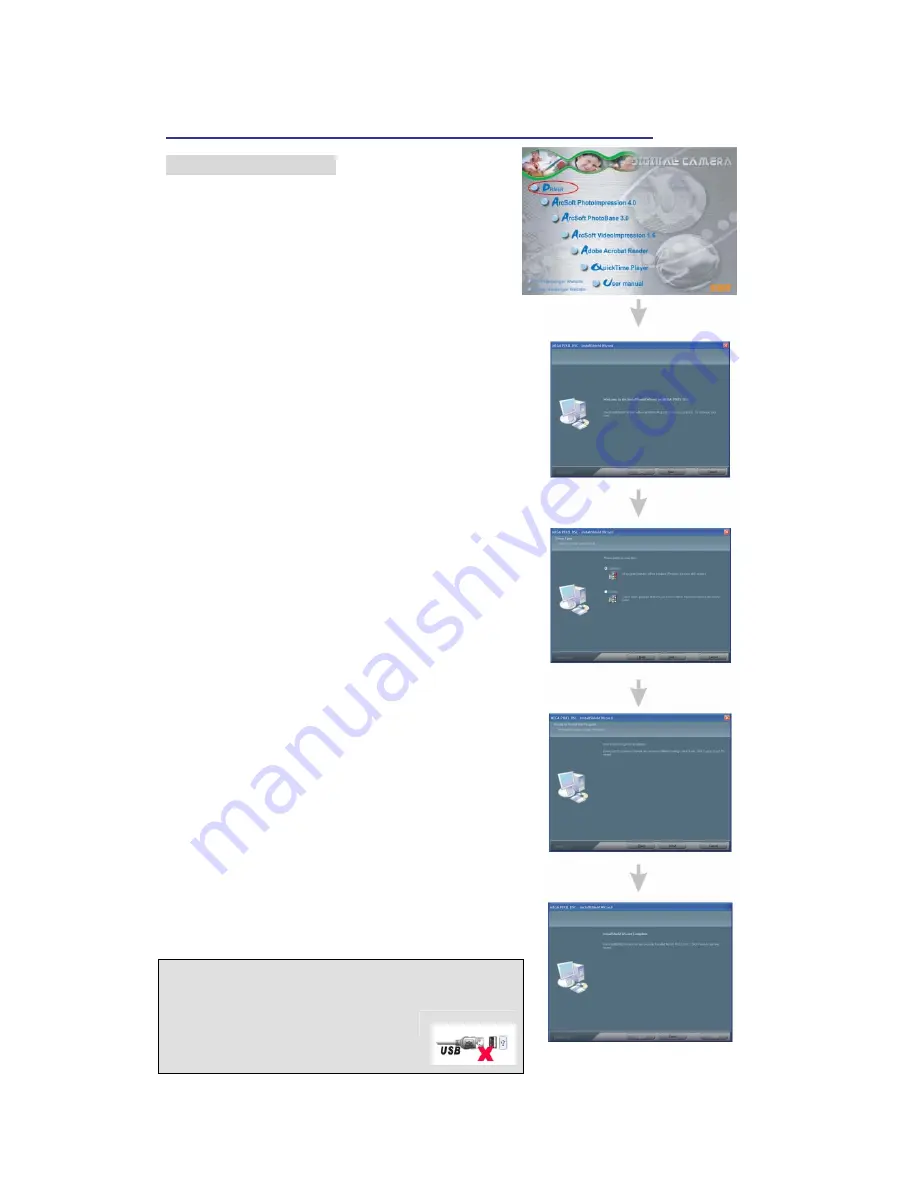
Install Camera Drivers and ArcSoft Programs 

Install Camera Driver 

1. Insert CD-Disc & Select "Driver". 


2. Click "Next". 


3. Click "Next". 


4. Click "Install". 


5. Click "Finish". 


WARNING 

Do not connect camera to PC during the installation. 

Your camera may become unstable or crash.


Summary of Contents for S304

Page 1: ...1 ...

Page 2: ...Pictures Video and Audio 18 Taking Pictures 19 Taking Video or Audio 20 Playing Back Pictures Video and Audio 20 DPOF Print 21 Install Camera Drivers and ArcSoft Programs 22 26 Install Camera Driver 22 ArcSoft PhotoImpression 4 0 23 ArcSoft PhotoBase 3 0 24 ArcSoft VideoImpression 1 6 25 QuickTime Player 26 Uninstall Application Programs 27 Download Photos 28 31 Using a Memory Card to Transfer Ima...

Page 3: ...ut only by authorized service providers Do not fire the flash too close to the eyes of animals or people especially for young children Eye damage may result In particular remain at least one meter away from infants when using flash Keep the camera away from water and other liquids Do not use the camera with wet hands Never use the camera in the rain or snow Moisture creates the danger of fire and ...

Page 4: ...4 Getting Started Contents of Package 1 Digital Camera 4 Video Cable 5 Neck Strap 2 QOG 6 USB Cable 7 Installation CD 3 Carry Bag 8 2xAAA Batteries ...

Page 5: ... with Pentium 166 MHz minimum and with an active USB universal serial bus port Windows 98SE ME 2000 XP CD ROM drive color monitor mouse and keyboard NOTE For transferring still images or for video conferencing your computer must have modem and communication software for internet connection ...

Page 6: ...n LCD display 3 Step Focus Range Switch A V Out port USB Memory selected for date storage EV value Photo mode Image size Quality White balance indicator Sharpness Battery capacity Zoom indicator Flash mode indicator Timer Picture remaining Shutter button Power Flash Indicator Getting Started Feature LCD Display Icons Microphon ...

Page 7: ...GRAPHY Use this mode to take a single image each time the Shutter button is pressed BURST Use this mode to take up to five images when the Shutter button is pressed PLAYBACK Use this mode to view the images video clips Thumbnail display delete or set DPOF recorded images is available PC CAMERA Use this mode to open the Webcam mode ...

Page 8: ...tting Icons AVI Mode Video and Audio Video Only Return Video and Audio White Balance Auto WB Daylight Shade Fluorescent Tungsten Return Quality Super Fine High Normal Return Resolution 640X480 320X240 160X120 Return Return Set Up ...

Page 9: ...Self Timer OFF 50 seconds 30 seconds 10 seconds 2 seconds Return White Balance Auto Daylight Shade Select Fluoresce Tungsten Return Set Up Return Filter Vivid Normal Sepia Black and White Return Quality Super Fine High Normal Return Sharpness Hard Normal Soft Return Metering Pattern Center weighted average Average ...

Page 10: ...nds 30 seconds 10 seconds 2 seconds Return White Balance Auto Daylight Shade Select Fluoresce Tungsten Return Set Up Return Filter Vivid Normal Sepia Black and White Return Quality Super Fine High Normal Return Sharpness Hard Normal Soft Return Metering Pattern Center weighted average Average ...

Page 11: ...Current image play Cancel Protect Current image Protect All image Cancel Return Slide Show Start Return Repeat play Delete Delete Current Return Delete All DPOF Print Current image play Cancel Print Current image Print All image play Cancel Print All image Return PC Camera Mode Mass Storage Mode Set Up ...

Page 12: ...FF Getting Started Camera Setting Icons Set Up Mode Quick View ON Return OFF Auto Power 1 minute 10 minutes 20 minutes Return Video Format Off NTSC PAL Return Date Time Return Beep Sound ON Return OFF Date Stamp Return Return Startup screen Default User s screen No screen Return ...

Page 13: ... LCD screen turn on Sleep Mode 1 In the Setup mode 2 Use button to select Auto Power Off and press Set button 3 Use button to select the setting you want and press Set button 1 minute When the camera is ON while not being used for 1 minute it will automatically perform sleep mode to save battery power 10 minutes When the camera is ON while not being used for 10 minutes it will automatically perfor...

Page 14: ...elect Set up Mode and press Set button 3 Use to select Startup Screen and press Set button 4 Use to select No Screen and press Set button 5 Then when you start camera there will be no startup screen Video Format Default NTSC Set the video output format for displaying recorded pictures video clips on a television For North America Japan Europe South America and China etc area Sharpness Default NORM...

Page 15: ...3 Use to select the setting you want and then press Set button Quality Purpose Super Fine High quality but large file size High Normal quality Normal Small file size but low quality Selecting the Focus Mode You can select one of three different focus modes Macro Portrait and Infinity Mode Purpose Infinity The focus present is restricted to 120cm to unlimited distance Portrait The focus present is ...

Page 16: ... Record the image Auto The flash fires automatically as required by the lighting level Red eye reduction The flash fires automatically as required by the lighting level and the flash pre strobes before shooting to reduce red eye phenomenon Force Off The flash does not fire Force On The flash always fires NOTE You may not be able to achieve the desired results using a flash if the subject is too cl...

Page 17: ...n 3 Use to select the what you want and then press Set button Auto Settings are automatically set by the camera Day light For recording outdoors on a bright day Shade For recording under overcast shady or twilight skies Tungsten For recording under tungsten lighting Fluorescent For recording under fluorescent lighting Using the Self Timer The self timer lets you select either a 2 second 10 second ...

Page 18: ...udio Step 1 Turn the mode switch to Playback mode Step 2 Hit the Menu button then use to select Delete and press Set button Step 3 Use to select Delete current or Delete all and press Set button Step 4 Use to select to delete and press Set button ...

Page 19: ...Photo mode Step 2 Frame your target through the LCD display Step 3 Press the or button to zoom in or out on your subject Step 4 Press the Sutter button to take a picture NOTE The camera stores all pictures in the built in memory Secure Digital Memory Card or Multi Media Card ...

Page 20: ... Mode switch to Playback mode Use button to select the images video clips and audio stored in the internal memory or on an SD card Step 2 Press the Set button to start playback Press the Set button again to stop playback at any time Step 3 Still images can be magnified and moved around the screen using button Step 4 Video clips can be play back by high speed and slow play back using button or paus...

Page 21: ...pies settings recorded on the card With this camera you should always select images by viewing them on the monitor screen Do not specify images by file name without viewing the file contents DPOF Settings 1 In the Playback mode press Menu button 2 Use to select DPOF and then press Set button 3 Use to select the what you want and then press Set button Print current image play To create a DPOF file ...

Page 22: ...d ArcSoft Programs Install Camera Driver 1 Insert CD Disc Select Driver 2 Click Next 3 Click Next 4 Click Install 5 Click Finish WARNING Do not connect camera to PC during the installation Your camera may become unstable or crash ...

Page 23: ...C s CD ROM drive 3 Introduction screen will appear automatically 4 Click ArcSoft PhotoImpression 4 0 5 Follow on screen instruction to install camera drivers 6 Re starting your computer is recommended NOTE To find out more about PhotoImpression 4 0 or how to use it consult online help by clicking Icon or help on the pull down menu ...

Page 24: ...tallation CD into your PC s CD ROM drive 3 Introduction screen will appear automatically 4 Click ArcSoft PhotoBase 3 0 5 Follow on screen instruction to install camera drivers NOTE To find out more about PhotoBase 3 0 or how to use it consult online help by clicking Icon or help on the pull down menu ...

Page 25: ...C s CD ROM drive 3 Introduction screen will appear automatically 4 Click ArcSoft VideoImpression 1 6 5 Follow on screen instruction to install camera drivers 6 Re starting your computer is recommended NOTE To find out more about VideoImpression 1 6 or how to use it consult online help by clicking Icon or help on the pull down menu ...

Page 26: ...PC s CD ROM drive 3 Introduction screen will appear automatically 4 Click QuickTime Player 5 Follow on screen instruction to install camera drivers 6 Re starting your computer is recommended NOTE To find out more about QuickTime Player or how to use it consult online help by clicking Icon or help on the pull down menu ...

Page 27: ...on screen instruction to uninstall software Uninstall ArcSoft PhotoBase 3 0 1 Search through Start Programs ArcSoft PhotoBase 3 0 Uninstall 2 Follow on screen instruction to uninstall software Uninstall ArcSoft VideoImpression 1 6 1 Search through Start Programs ArcSoft VideoImpression 1 6 Uninstall 2 Follow on screen instruction to uninstall software ...

Page 28: ...able PC card adapter for an SD memory card MMC For full details see the user documentation that comes with the PC card adapter and your computer Using a Commercially Available SD Memory Card Reader Writer See the user documentation that comes with the SD memory card reader writer for details about how to use it Using a Commercially Available PC Card Reader Writer and PC Card Adapter for SD Memory ...

Page 29: ...or Windows 98SE users please install the installation CD first For Windows XP For Windows Me 2000 Step 3 Double click My Computer on the desktop Step 4 A removable disk drive appears For Windows XP For windows 98SE Me 2000 Step 5 Double click on the removable disk Step 6 Double click on the DCIM folder WARNING Please do not copy any files into the DCIM folder of your camera Your camera may become ...

Page 30: ...on any other disk drive For Windows 98SE user please go to Microsoft www microsoft com to update Windows for Mass Storage Function Support Turn on the camera and connect with USB cable the camera will set at Mass Storage mode 1 Click PhotoImpression 4 0 icon on desktop 2 PhotoImpression 4 0 introduction screen will appear 3 Click From Folder button 4 Click Browse 5 Click D or G Mass Storage Disk D...

Page 31: ... 3 0 1 Click PhotoBase 3 0 icon on desktop 2 PhotoBase 3 0 introduction screen will appear 3 Open Album menu bar 4 Select Create New and enter file name 5 Open Album menu bar and select Add Image 6 Save the pictures to your computer 7 Share and manage your pictures ...

Page 32: ...sion 1 6 1 Turn the camera on with the mode switch set to mode Use to select PC Camera mode 2 Click VideoImpression 1 6 icon on desktop 3 VideoImpression 1 6 introduction screen will appear 4 Click New button 5 Click Capture 6 Video will begin playing ...

Page 33: ...tch set to mode Use to select Mass Storage mode 2 Click QuickTime Player icon on desktop 3 QuickTime Player introduction screen will appear 4 Open File menu bar and select Open Movie in New Player 5 Select Desktop and click My Computer 6 Click VOLUMELABE F 7 Click SVI 0001 8 Movie will begin playing ...

Page 34: ...lock the memory card using the write protect switch NO PICTURES No files in the camera FILE ERROR Files format is error Delete the files DISK ERROR Memory card format is error FAT32 NTFS Format the memory card to FAT Green LED Flashing Flash Light in charging status Green LED Lighting Flash Light is set to fire Battery icon flashing Green LED flashing Buttery low TFT LCD will be off Change new bat...

Page 35: ...s 8 X Digital Zoom 3 Mega Pixels 16X Digital Zoom 2 Mega Pixels 4 X Digital Zoom 1 3 Mega Pixels 4X Digital Zoom 1 5 inch TFT LCD Still Image 4000x3000 Interpolation 2048x1536 1600x1200 1280x960 Video 640X480 320X240 160X120 VGA 640X480 11 fps Still Image JPEG Support DPOF Video Image AVI 2 10 30 50 seconds Auto Day light Shade Tungsten Fluorescent Auto On Off Red eye reduction Auto Built in 16 MB...

Reviews: