Replacing the fuse
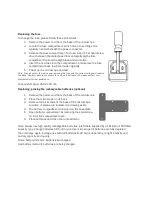
To change the fuse, please follow these procedures:
1. Remove the power cord from the back of the microscope.
2. Locate the fuse compartment, which has a Fuse image. It is
typically located beneath the power connector.
3. Remove the fuse compartment. To do so, insert a flat head screw
driver between the metal power tines and gently pry the fuse
compartment loose with a slight down and out motion.
4. Insert the new fuse into the compartment, and replace the fuse
compartment back to where it was originally.
5. Power up the microscope and test.
Note: Fuse may blow. In most cases, replacing the fuse with the correct voltage will resolve
the issue. However, should you encounter a blown fuse frequently, please contact your
distributor for further assistance.
Fuse specification: 250V, 150 mA
Replacing/placing the rechargeable batteries (optional)
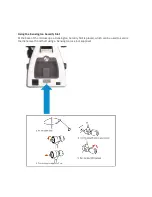
1. Remove the power cord from the back of the microscope.
2. Place the microscope on its back.
3. Remove the six screws of the base of the microscope.
Location of screws are indicated on drawing aside.
4. The battery compartment in located on the baseplate.
5. Open battery compartment, by removing the small screw
on top, slide compartment open.
6. Place batteries and close the compartment.
Note: Always use high quality rechargeable batteries, preferable supplied by us. Minimum 1800mA
capacity type. Charge batteries full for 8 hours. Use microscope till batteries are fully depleted
then recharge again. Average use with full batteries 8-32 hours depending on light intensity and
battery capacity and quality.
Green battery indicator: batteries are charged
Red battery indicator: batteries are being charged


