


14
WARNINGS AND SAFETY PRECAUTIONS
*This appliance is intended for home usage.
*Operating voltage of your appliance is 220-240
Volt~50 Hz.
*A grounded plug is installed on the power cord of
your appliance. This cord shall always be plugged to
a grounded outlet.
*Electrical installation shall be performed by a
qualified electrician.
*Installation by unqualified persons may cause
operation with low performance, damage to the
appliance or accidents.
*Power cord shall not be crushed or smashed during
installation. Do not route the power cord near the
stoves; cord may melt and cause fire.
*Do not plug the appliance before installation of the
appliance.
*Make sure that the plug is easily reachable in order
to unplug the appliance in case of any danger.
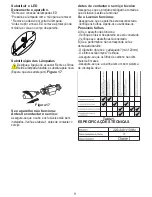
*Do not touch the lamps of your appliance when they
have operated for a long time. Lamps may burn your
hand as they may be hot.
*Kitchen hoods are intended for home usage only
with normal cooking. There is a risk of fault and it
shall be void of warranty when it is operated for other
purposes.
*Comply with the regulations of the authorities on the
discharge of outlet air. (This warning does not apply
to flueless applications.)
*Do not cook flammable food under the appliance.
*Operate your appliance after putting a pan, pot etc.
on the stoves. Otherwise, high temperature may
cause deformation of some parts of appliance.
*Turn off the stove before removing a pan, pot etc.
from the stoves.
*Do not leave hot oil on a stove. Pots with hot oil
inside may catch fire by itself.
*Oil may catch fire while you are frying etc.; watch for
your curtains and linens.
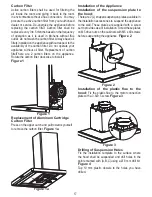
*Ensure that the filters are replaced in time. Filters
that are not replaced in time may cause a risk of fire
due to the fat collected on them.
*Do not use filtering material that are not resistant to
flames instead of filters.
*Do not operate your appliance without filters; do not
remove the filters while the appliance is operated.
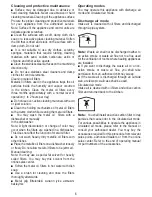
*In case of any fire, de-energize the hood and any
other cooking devices. (De-energize the appliance
by unplugging it.)
Your appliance may cause a risk of fire if the cleaning
is not performed as per the specified periods.
*De-energize the appliance before any maintenance
operations. (De-energize the appliance by
unplugging it.)
*Negative pressure inside the room when the electric
stove-top hood and other electrically powered
devices are operated simultaneously shall not
exceed 4 Pa ( 4 X 10 bar ).
*Any fuel- or gas-powered devices in the medium
where your appliance shall be used, such as room
heaters, shall be completely isolated from the volume
where the exhaust of this appliance is placed, or the
device shall be of hermetic type.
*Use pipes with a diameter of 150mm or 120 mm
when you use flue connection for your appliance.
Pipe connection shall be as short as possible and
have minimum number of elbows.
*Do not allow your children to play with the appliance.
Do not allow little children to use the appliance.
Use “MAX 6A” fuses on the hood installation for your
safety.
*Keep package material away from children as they
may pose a risk.
*If the power cord is damaged, it shall be replaced
by the manufacturer or its authorized service or by
an equally qualified technician to prevent any risky
condition.
*In case of any fire, de-energize the hood and any
other cooking devices, and cover the fire. Do not use
water to put off the fire.
*When the cooking appliances are being operated,
accessible parts may become hot.
*This appliance is not intended for use by persons
(including children) with reduced physical, sensory
or mental capabilities, or lack of experience and
knowledge, unless they have been given supervised
or instruction concerning use of the appliance by a
responsible person for their safety.
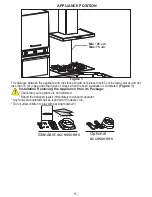
*The distance between the appliance and the stoves
should not be less than 65 cm in electric stoves and
not less than 75 cm in gas and other types of stoves
when the hood installation is completed.
*Exhaust of the hood shall not be connected to air
ducts with other smoke.
*You should be careful when the appliance is
operated with other appliances that use the air in
the room and their fuel (e.g. heaters, water heaters
that operate with gas, diesel fuel, coke or wood etc.)
Because, hood may negatively effect the burning of
the fuel as it exhausts the air inside the room.
*This warning does not apply to flueless applications.
Summary of Contents for MEP 191 XN
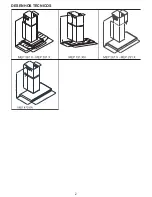
Page 2: ...2 DESENHOS TÉCNICOS ...
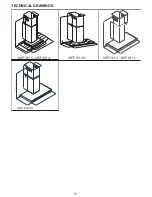
Page 13: ...13 TECHNICAL DRAWINGS ...


