3
1 2 3 4 5 6
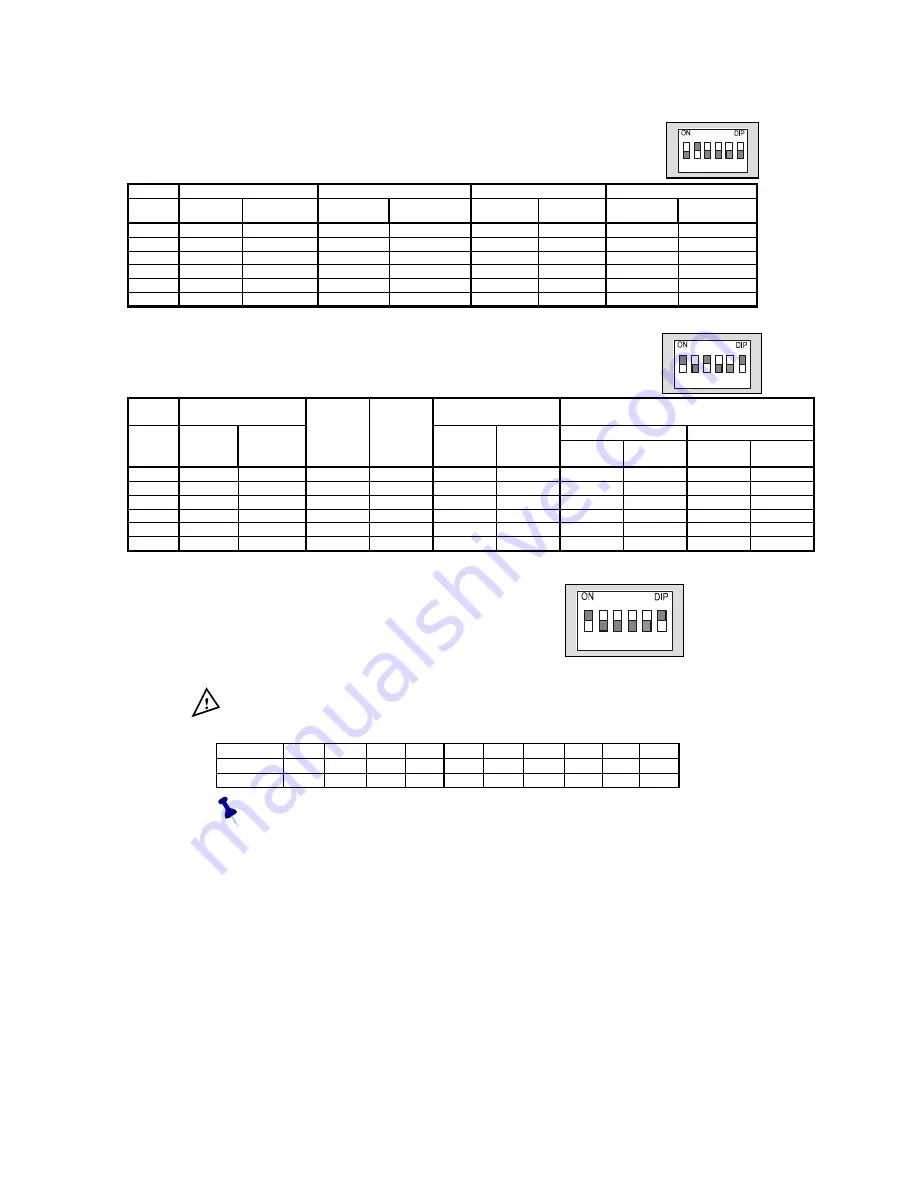
Table 4.1 – DIP switch selection
DIP switch S1:
Func.
Fan Mode in Econ.
Time Delay
Cool only or All modes
Window Contact
No.
Auto Fan*
Continuous
4 Minutes*
No Delay**
Cool only
All modes*
OFF*
Change Set
point “EC”
1 OFF* ON
X
X
X
X
X
X
2 X
X
X
X OFF ON* X
X
3 X
X OFF* ON
X X
X
X
4 X
X
X
X
X X
X
X
5 X
X
X
X
X X
X
X
6 X
X
X
X
X X OFF* ON
X = Not important * = Default switch ** = No delay for compressor – for test only
DIP switch S2:
Func.
Internal/External
Sensor
Display of T. Ambient
HC / HP configuration
HC configuration
HP configuration
No. Internal* External
COOL &
HEAT
(HC##)*
HEAT
PUMP
(HP##)
With*
display
No
display
Elc.
Heat*
Oil Heat
HP in
Heat
HP in
Cool
1
ON*
OFF
X X X X X X X X
2
OFF*
ON X X X X X X X X
3
ON*
OFF
X X X X X X X X
4
X X
OFF*
ON X X X X X X
5
X X X X X X
OFF*
ON
OFF
ON
6
X X X X
ON*
OFF
X X X X
X = Not important * = Default switch
4.2 DIP switch Operation
The DIP switch has 6 pins.
Each pin can be ON or OFF.
In this example picture, pins 1,6 - ON and pins 2,3,4,5 - OFF
4.3 External sensor connection - option
Important! The external sensor must be Meitav-Tec type.
Table 4.3 - N.TC. Sensor: Temperature ~ Resistance Characteristics
Temp
°
C
7.2 10.0
12.8
15.6 18.3 21.1 23.9 26.7 29.4 32.2
Temp
°
F
45 50 55 60 65 70 75 80 85 90
Res.
k
115.8 100.9 88.1 77.1 67.7 59.6 52.5 46.4 41.2 36.6
The default from factory is INTERNAL SENSOR.
•
Disconnect power to the thermostat 24vac.
•
Move the DIP switch S2 as described in the table above
•
Connect the temperature sensor to S4, S5 terminals.
•
Reconnect power 24vac.
•
Make sure the reading in the display is by the external sensor.
The length of the cable for the external sensor is 100 feet (30 meters) with standard cable.
If longer distance is needed then the cable MUST be shielded.
There is a wide range of sensors for different applications, duct, rooms, etc.
There is also option for averaging the temperature.
For details please contact our technical line or visit our web site.
1 2 3 4 5 6
Example
1 2 3 4 5 6
Default:
Default:


